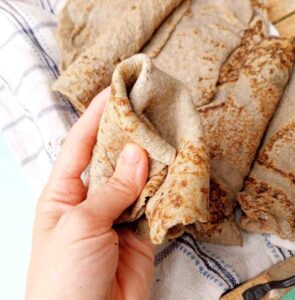
These delicious gluten-free sourdough English muffins are soft, flavorful, and crispy on the outside. For more recipes like that check out my gluten-free sourdough discard recipes collection!
Jump to:
- Why You Will Love This Recipe
- What Is A Sourdough Starter?
- Reader review
- Ingredients
- Substitutes & Variations
- Step-by-Step Instructions
- Storing & freezing
- Serving Suggestions
- FAQ
- More gluten-free sourdough breakfast ideas!
- Get my new gluten-free sourdough recipes eBook
- Gluten-Free Sourdough English Muffins
- 💬 Community
Why You Will Love This Recipe
- Flavor. These gluten-free English muffins are so good, I couldn't stop snacking on them even without toppings!
- Texture. The muffins are not dense, yet, not too crumbly. They are soft and airy just like the original English muffins!
- Make-ahead recipe. Make and freeze these English muffins to use later!
What Is A Sourdough Starter?
A sourdough starter is a wild yeast that is used to leaven sourdough bread. I use a brown rice gluten-free sourdough starter and I love baking my own gluten-free vegan sourdough bread!
All you need to make a starter is flour, water, and a little patience. Then, you can use it in bread or recipes like this one! Or you can make sourdough discard pancakes, sourdough pizza dough, or even chocolate chip cookies with discard! For hamburgers, you can check out my gluten-free sourdough dinner rolls or fermented hamburger buns.
New to gluten-free sourdough? Watch my 16-minute video tutorial for beginners!
Reader review
These turned out perfect!!!
I followed the recipe exactly (including the gf flour recipe) and let them rise overnight. I got fluffy, perfectly cooked gluten-free English muffins.
- Nikki
⭐⭐⭐⭐⭐
Ingredients
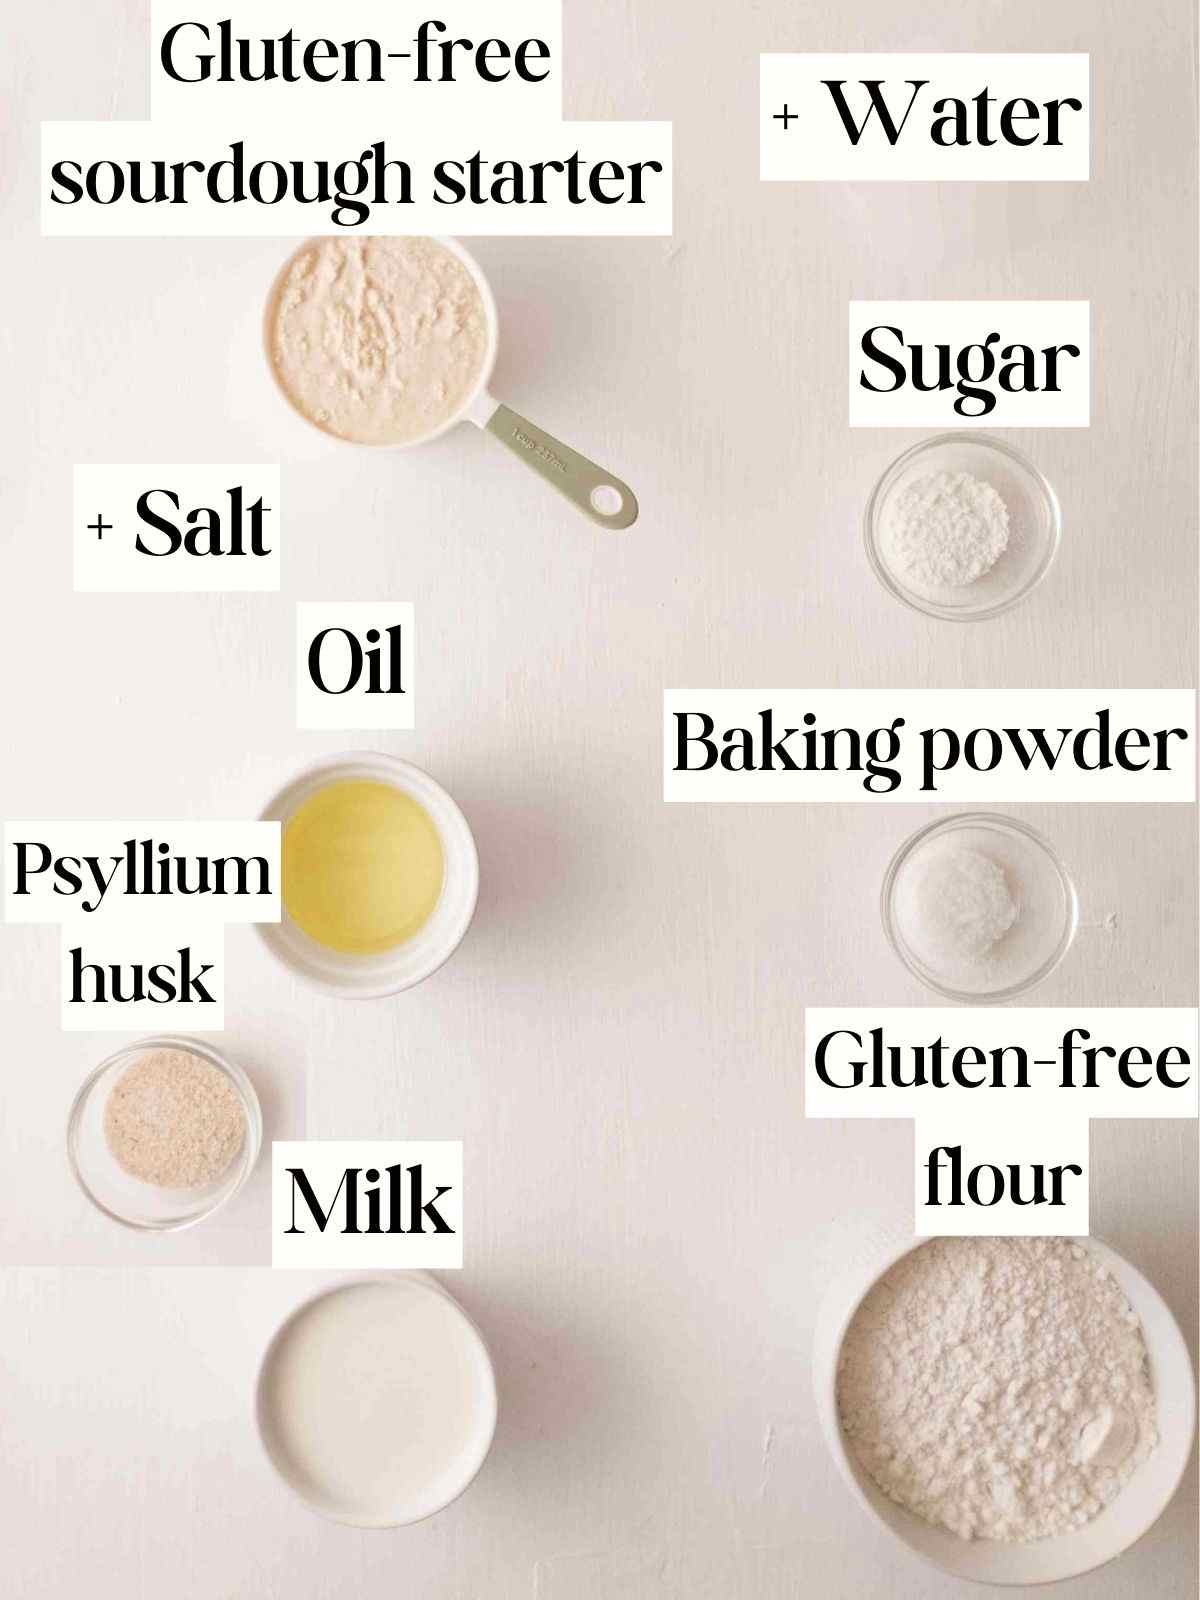
GF sourdough starter - use a mature starter, meaning it was fed, then rose to its full capacity, and is still bubbling. You can also use starter discard with an additional 7g of dry active/instant yeast or 20g of fresh yeast.
GF flour - I am using my homemade gluten-free flour mix without potato starch but other GF flour will work, too. Just keep an eye on the texture of the dough, if it is too runny, you can add a bit more of your flour since it might be more absorbent than mine. The dough is supposed to be sticky but workable with greased hands!
Milk - use any milk, plant-based or not.
Oil - I used sunflower oil and it works great but other types should work, too!
Psyllium husk - either whole husks or powder will work well in this recipe.
Baking powder - check the package to make sure it is gluten-free.
Substitutes & Variations
You can use any oil or type of milk. Most gluten-free flour blends should work with this recipe!
You can add cinnamon and raisins for a sweeter version of these English muffins or you can add some jalapenos to the dough for a spicy version!
Step-by-Step Instructions
Step 1
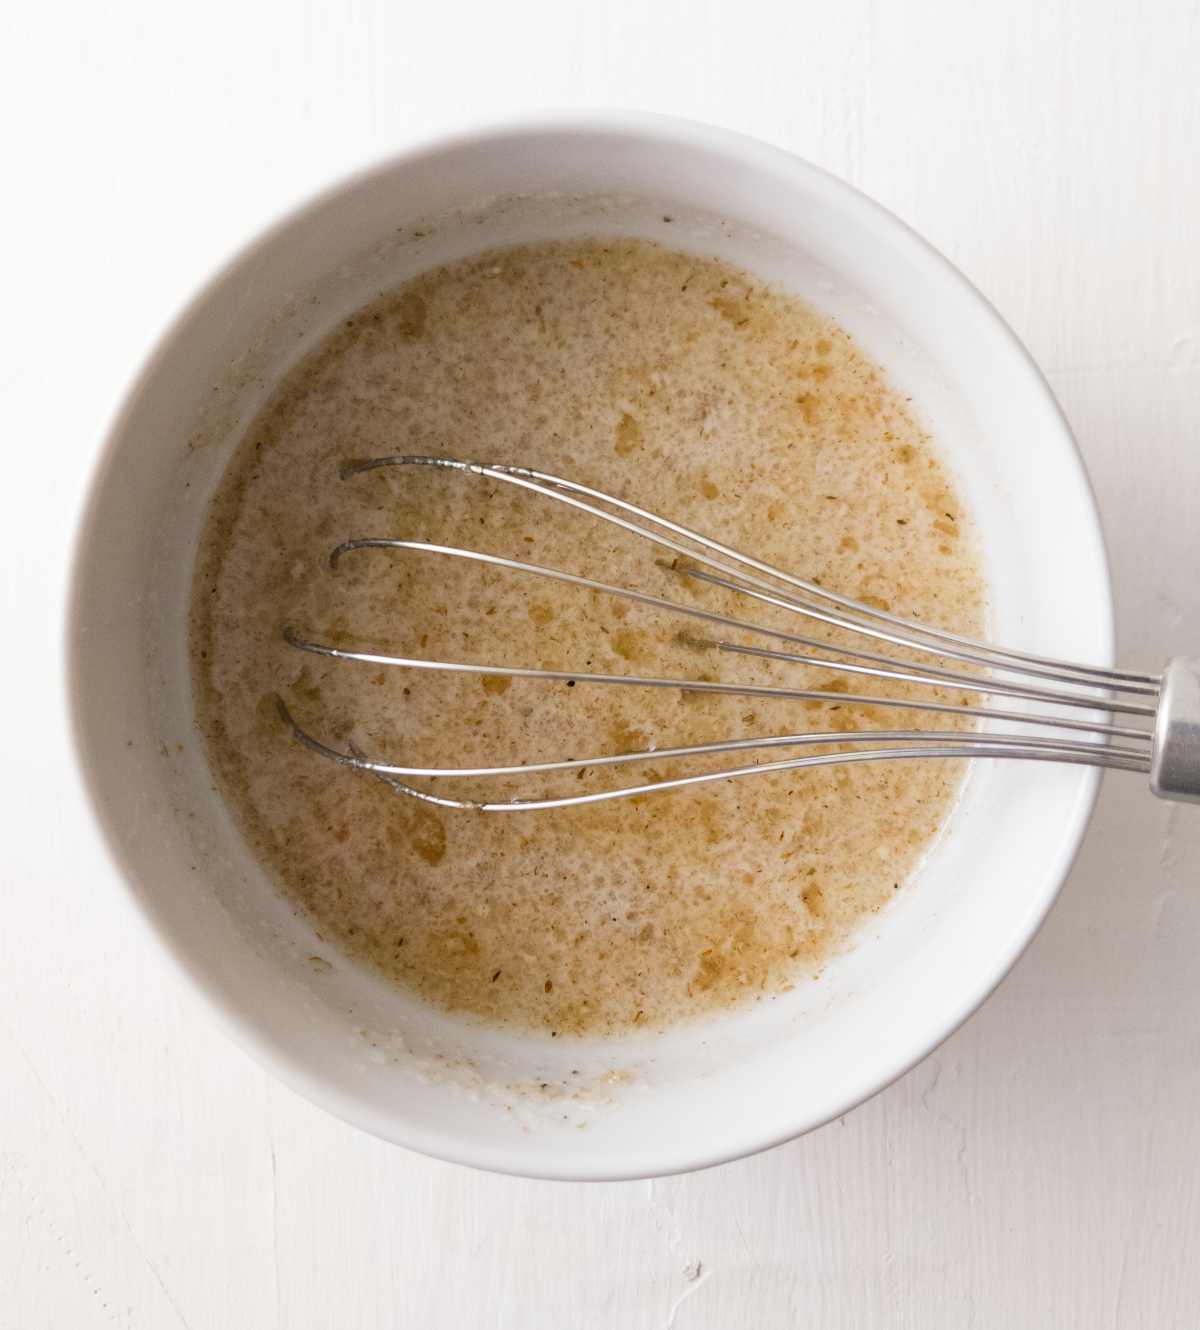
In a medium-sized bowl combine whole psyllium husks, milk, water, oil, and sugar.
Whisk to incorporate and set aside to let the psyllium gel form (2 minutes). As psyllium husk absorbs water it forms a gel that will add a bready texture to the muffins.
Step 2
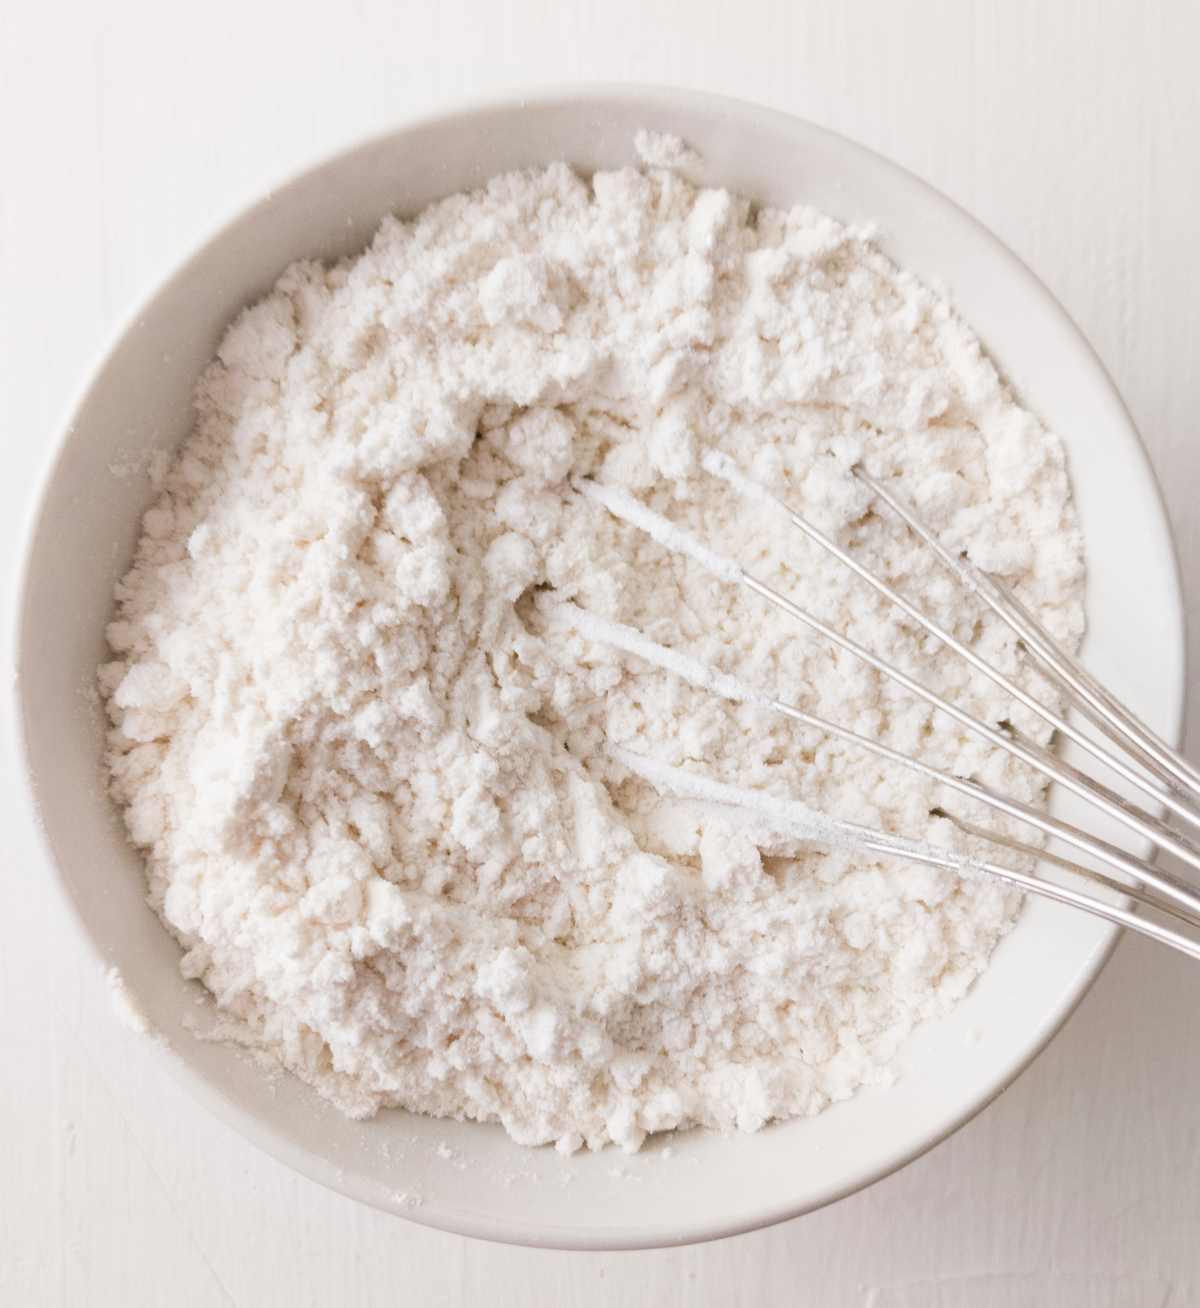
Combine the gluten-free flour, salt, and baking powder in a separate mixing bowl. Stir well to incorporate.
Step 3
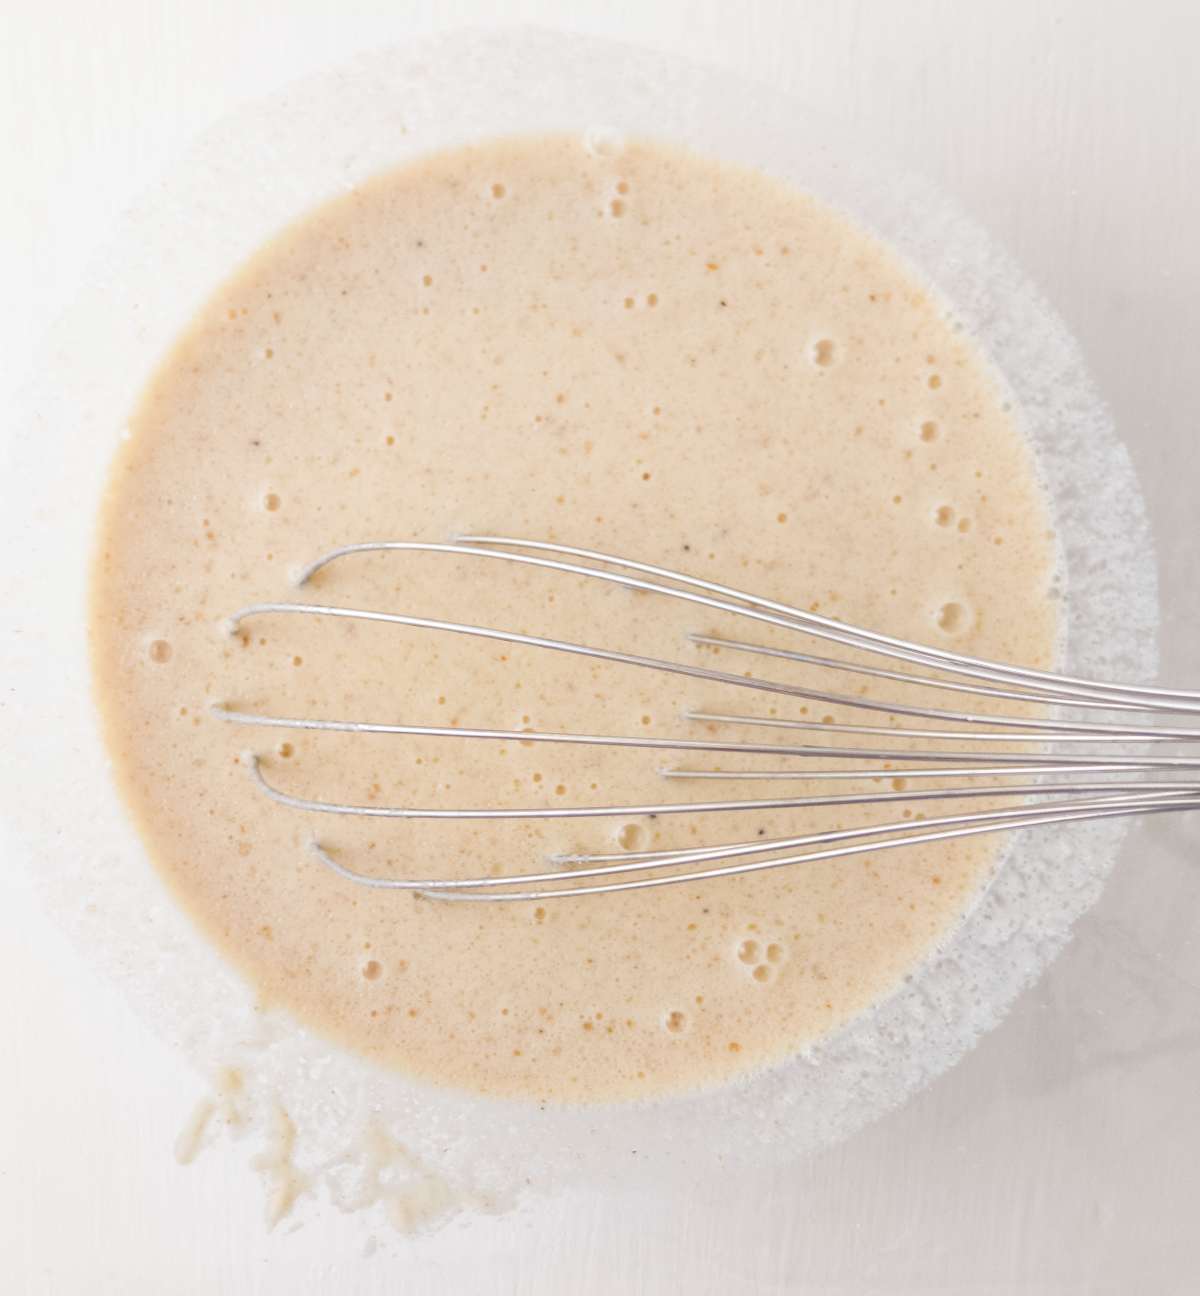
Once psyllium gel has formed (1-2 minutes after you mixed it), add the sourdough starter to the bowl with the wet ingredients, and whisk to incorporate.
If you are using starter discard instead of an active starter, add 7g of instant yeast to the dry ingredients (not active dry yeast as this type needs to be activated before using).
The active starter is the one you feed and discard from; starter discard is what you take away from the mother starter during feedings and keep in the refrigerator.
Step 4
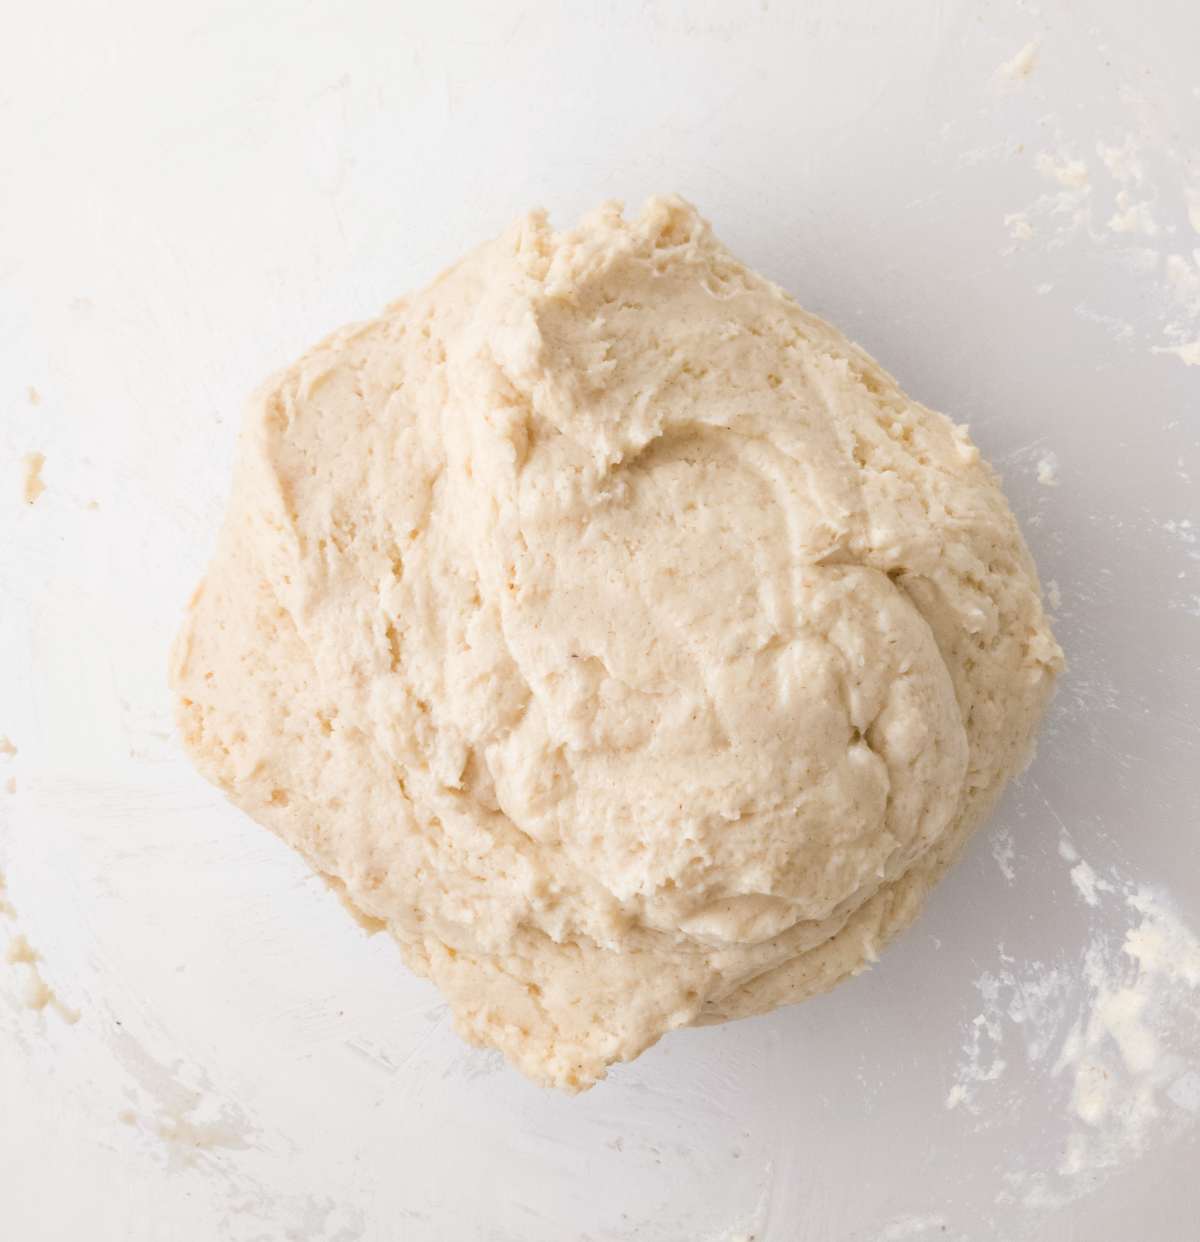
Add the dry and wet ingredients together and mix with your hands or an electric mixer with the dough hooks attached.
The dough will be sticky but not too sticky to work with. It definitely shouldn't be dry and crumbly!
If the dough is too dry to shape, add more water. If your muffins turn out too dry, next time add more water to the dough.
Step 5
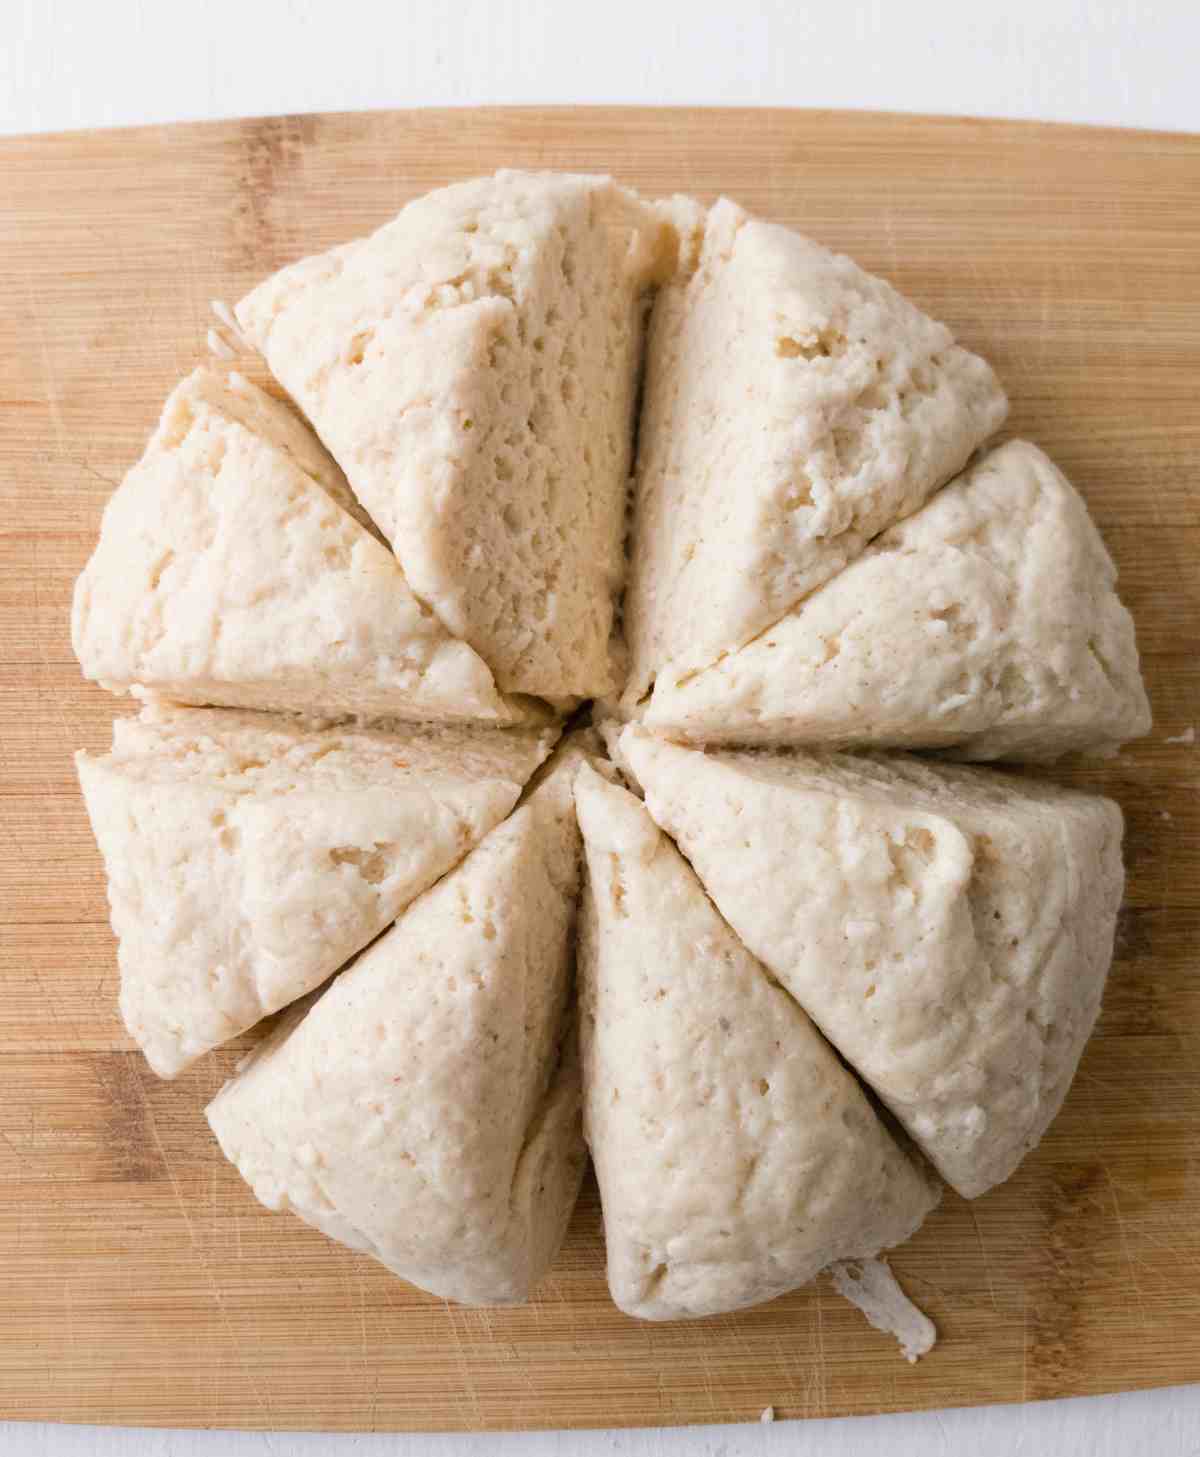
Turn the dough over onto a lightly floured surface and shape it into a ball.
Divide the dough into 8 equal pieces (mine were about 100g each) with a bench scraper or a knife.
Step 6

Grease your hands with oil to prevent sticking and shape each piece into a small ball, then slightly press each one into a disc.
Step 7
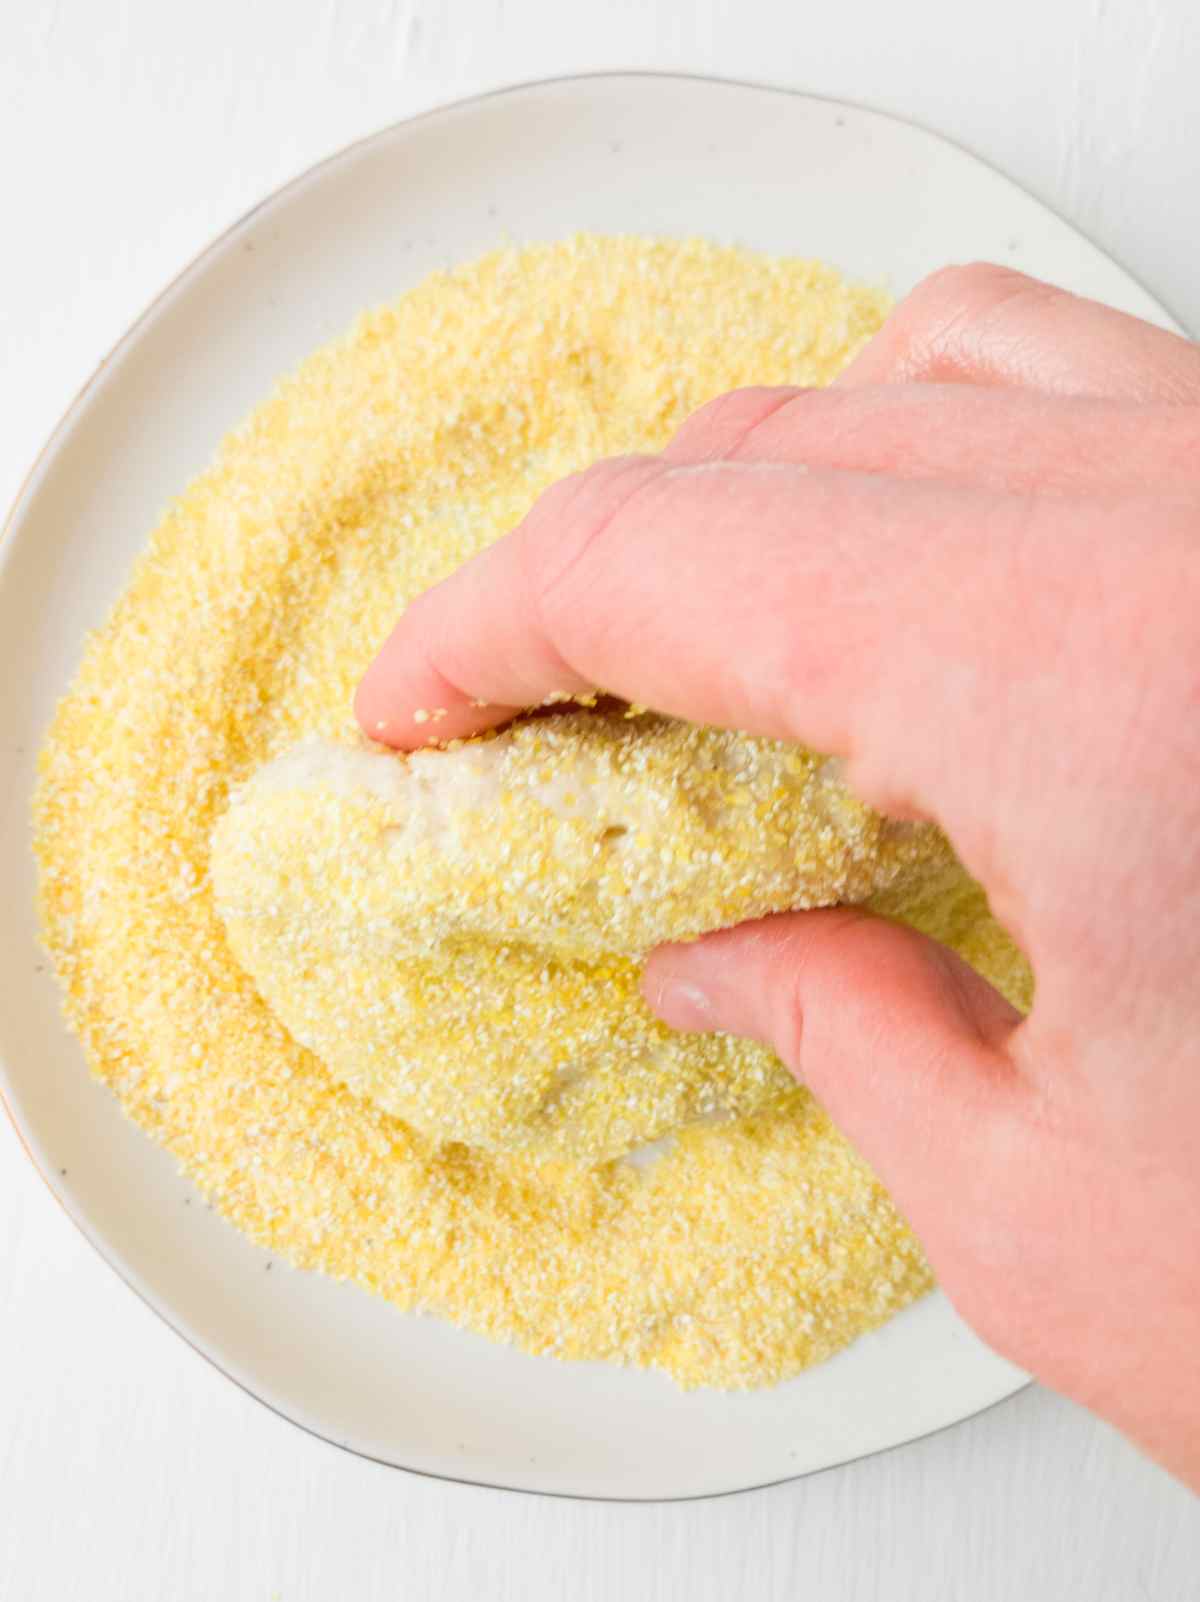
Add cornmeal to a plate and dip both sides of each muffin in it to prevent them from sticking to the frying pan.
Step 8
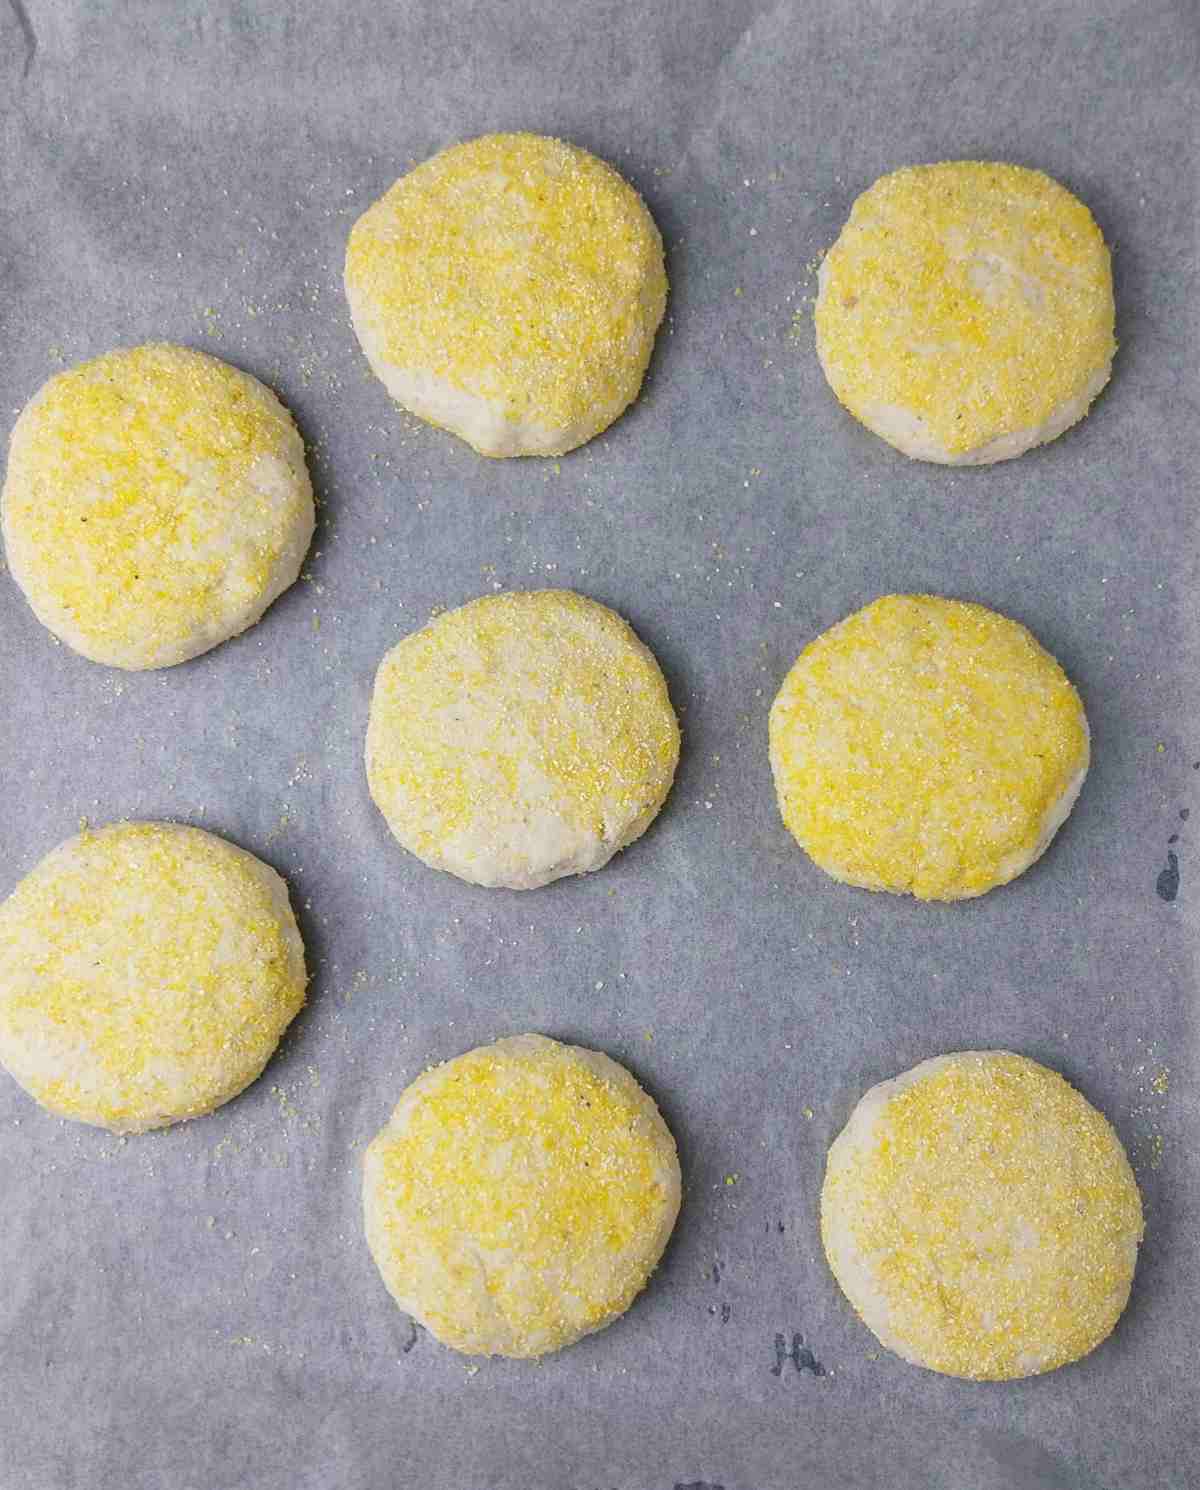
Place the shaped muffins onto a baking sheet lined with parchment paper, cover with a tea towel, and leave to ferment for 3.5-5 hours (or overnight in the refrigerator).
The muffins will puff up slightly but won't double in size.
If you are using instant yeast you only need to proof for 1-1.5 hours. In this case, your muffins will rise more and might even double in size.
Step 9
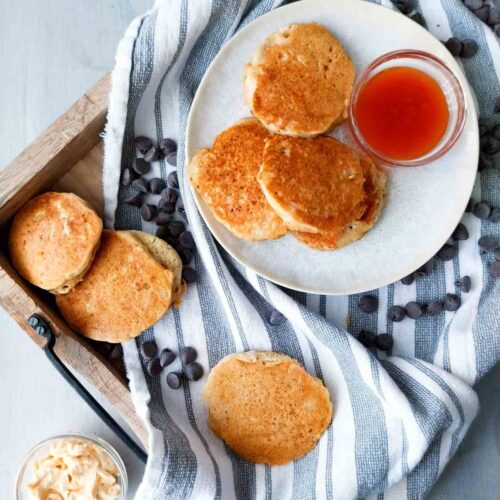
Once the muffins are ready, preheat a cast iron pan or griddle over low heat for a few minutes. Don't add any oil or grease to the pan!
Fry each muffin for 10-11 minutes on each side over low heat until deep golden brown. Longer cooking time allows for the dough to cook through completely without burning on the outside.
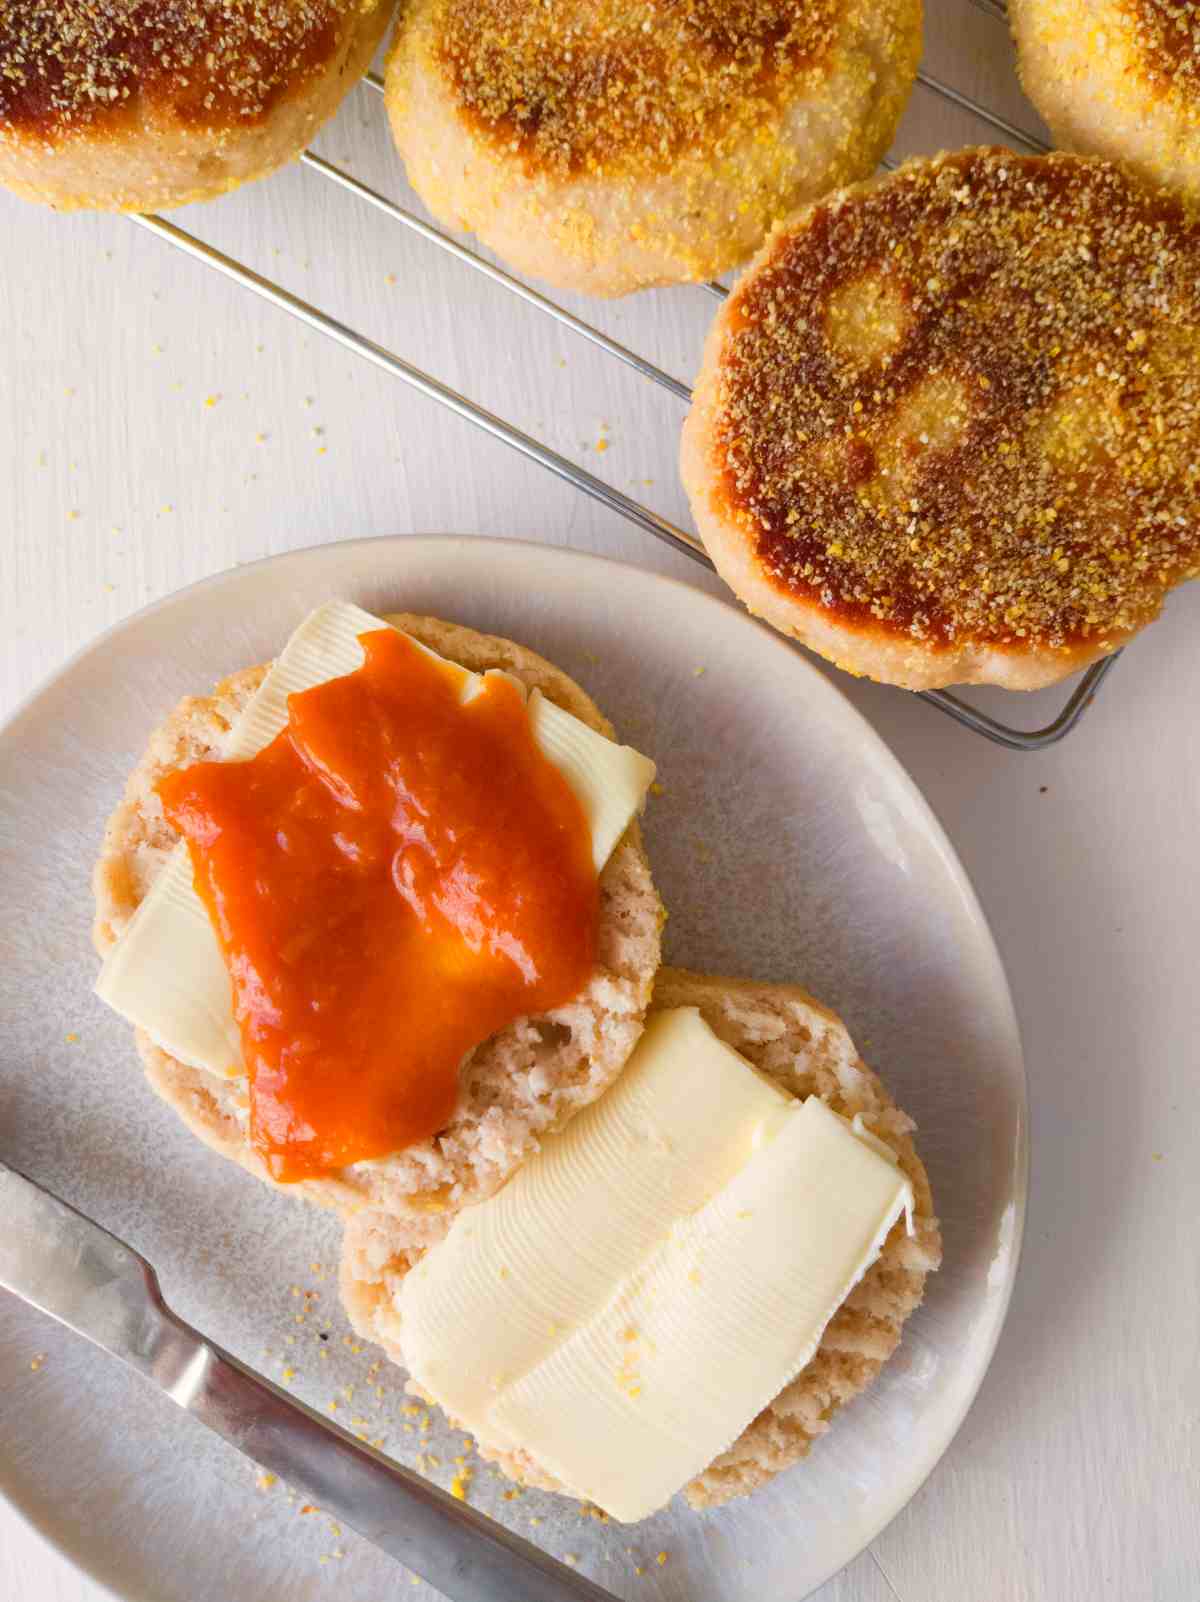
Transfer the cooked muffins to a cooling rack and let them cool completely before slicing! If you slice them too soon, they will be sticky inside.

Storing & freezing
Store these muffins in the refrigerator for up to 5 days and reheat before eating.
You can freeze these muffins in a freezer bag or an airtight freezer container for up to 3 months. To defrost, simply pop them into the microwave for 30 seconds or reheat in the oven at 350F/175C until soft and warm!
Serving Suggestions
Make a sandwich with your English muffins by adding a fried egg, meat, veggies, and your favorite sauce!
Or spread some butter and jam onto the muffins for a sweet breakfast.
Expert Tips
- Use a mature starter, meaning a starter that was fed a few hours ago and is rising and bubbling. It will help with fermentation and airy texture in the muffins!
- Use a cast iron pan to help the muffins cook through before the sides get too brown! Non-stick pans don't transfer heat as well as cast iron does. However, if you don't have a cast iron pan or griddle, a non-stick pan will do, it just might need more time to cook through.
- Grease your hands with oil before shaping English muffins as the dough will be sticky. Don't add extra flour to the surface or to your hands!
FAQ
Make sure you cook your English muffins over low heat for a longer time. Cooking them quicker at a higher heat will result in a gummy center.
More gluten-free sourdough breakfast ideas!
Get my new gluten-free sourdough recipes eBook
The top 32 recipes of 2026!

Gluten-Free Sourdough English Muffins
Ingredients
- 15 grams psyllium husk If using psyllium powder, use 13 grams. For more details read my psyllium husk for baking post.
- 200-250 grams water, use 200g and add extra if the dough is too dry
- 75 grams (⅓ cup) plant-based milk or regular milk
- 2 teaspoon sugar or maple syrup/honey
- 2 tablespoon oil any vegetable or seed oil
- ½ cup (140g) gluten-free sourdough starter If you are using starter discard, add 7g of instant/active dry yeast or 20g of fresh yeast
- 286 grams (2 cups) gluten-free flour I am using my homemade blend with brown rice flour which for this recipe would be: 73g brown rice flour, 70g white rice flour, 143g starch of choice (cornstarch/tapioca/arrowroot/potato)
- 2 teaspoon baking powder check the package to make sure it is gluten-free
- 6 grams (1 tsp) salt
- cornmeal for coating optional
SAVE THIS RECIPE!💌
Instructions
- In a medium-sized bowl combine whole psyllium husks, milk, water, oil, and sugar.Whisk to incorporate and set aside to let the psyllium gel form (2 minutes). As psyllium husk absorbs water it forms a gel that will add a bready texture to the muffins.
- Combine the gluten-free flour, salt, and baking powder in a separate mixing bowl. Stir well to incorporate.
- Once psyllium gel has formed (1-2 minutes after you mixed it), add the sourdough starter to the bowl with the wet ingredients, and whisk to incorporate.If you are using starter discard instead of an active starter, add 7g of instant yeast to the dry ingredients (not active dry yeast as this type needs to be activated before using).The active starter is the one you feed and discard from; starter discard is what you take away from the mother starter during feedings and keep in the refrigerator.
- Add the dry and wet ingredients together and mix with your hands or an electric mixer with the dough hooks attached.The dough will be sticky but not too sticky to work with. It definitely shouldn't be dry and crumbly!If the dough is too dry to shape, add more water. If your muffins turn out too dry, next time add more water to the dough.
- Turn the dough over onto a lightly floured surface and shape it into a ball.Divide the dough into 8 equal pieces (mine were about 100g each) with a bench scraper or a knife.
- Grease your hands with oil to prevent sticking and shape each piece into a small ball, then slightly press each one into a disc.
- Add cornmeal to a plate and dip both sides of each muffin in it to prevent them from sticking to the frying pan.
- Place the shaped muffins onto a baking sheet lined with parchment paper, cover with a tea towel, and leave to ferment for 3.5-5 hours (or overnight in the refrigerator).The muffins will puff up slightly but won't double in size.If you are using instant yeast you only need to proof for 1-1.5 hours. In this case, your muffins will rise more and might even double in size.
- Once the muffins are ready, preheat a cast iron pan or griddle over low heat for a few minutes. Don't add any oil or grease to the pan!Fry each muffin for 10-11 minutes on each side over low heat until deep golden brown. Longer cooking time allows for the dough to cook through completely without burning on the outside.Transfer the cooked muffins to a cooling rack and let them cool completely before slicing! If you slice them too soon, they will be sticky inside.
- For visual instructions please refer to the post above!

Jenna says
These turned out great for my first time ever making bread. The only hard time I’ve had is determining if it’s cooked through. My low setting on electric stove and iron skillet took me about an hour to cook and a couple were still a little under cooked but no big deal as they will be getting toasted.
I can’t wait to try it with cinnamon/ raisins or cranberry/orange next go. 😊
Darnell says
I made these muffins today. This is my first time trying to make any type of English Muffins. They turned out beautiful. I accidentally used 2 TBSPs of Maple Syrup, but no big deal, not too sweet. I covered my skillet while cooking and they temped at 210 before taking them out. They have a beautiful texture and all the bubbles/holes expected when cut. But they are a little salty (and I am sure I didn't mix it up like the Syrup). Not sure if you can just cut the salt by half and have the same results? I think I might try that next time.
Kathy says
Has anyone tried baking them in the oven instead of stovetop? If so, what temp? Any tips or tricks??
I find I spend a long time cooking stove top but love how they come out!
Mary says
I just baked mine at 400 degrees F for 15 minutes. I made sure they reached 200 degrees inside with a quick read. They are great!
EJ says
This is a helpful recipe! I made it exactly as written the first time and it came out pretty nicely. It was a tad dense and I didn’t like the taste of the flour mix used following the recipe. For the second time, I didn’t follow as closely as I tweaked a few measurements slightly and used a mix of brown rice, buckwheat, oat, and tapioca flour. It was great! Beautiful air pockets and a nice taste. I’m glad I came across this recipe. Also a note: Make sure you flatten out the muffins enough when shaping.
Ruth says
Hi. Could you tell me what amounts you used for brown rice, buckwheat, oat and tapioca as I would like to use these.
Jennie says
Is there a substitute for the corn meal? My son has a severe corn allergy.
Natasha Levai says
Hi Jennie! You can skip the cornmeal altogether or simply coat the muffins in some rice flour (or any other gluten-free flour).
Christine says
My first batch didn't cook all the way through at the #2 setting on the induction range with my preheated Cast iron skillet. Toasting solved that problem. It was a little too salty for me. I baked the second batch on the #3 setting. I'm glad I tried it and will try it again.
Christine says
Hi, I'm new to Sourdough baking. My sourdough starter went into the refrigerator after day 6. Prior to that it sat on the counter as I fed and discarded for 6 days. Your instructions "The active starter is the one you feed and discard from; starter discard is what you take away from the mother starter during feedings and keep in the refrigerator." are confusing me. Where does the active starter live? My understanding is that the active starter goes into the refrigerator. I want to make the English muffins and I just refreshed what I understood to be my refrigerated active starter. Thank you.
Natasha Levai says
Hi Christine! Yes, the active starter can be kept in the fridge if you aren't baking with it consistently. Discard is generally kept in a separate jar and can sit unfed for days/weeks/months until you use it or it goes moldy. So, for active starter use discard from your jar you do regular feedings for, and for discard use the starter you've been discarding from feedings and keeping without refreshing it with flour and water.
Marsha says
The best and most complete instructions I have EVER stumbled on to! THANK you!!
Natasha Levai says
Thank you Marsha! I am happy you are enjoying the recipes!
Kathy says
So good!!!
I was a bit hesitant to make these as I'm not the best when it comes to baking but they are perfect and easy to make! Thank you!!!
Melissa says
How much cinnamon and raisins would you recommend adding?
Natasha Levai says
1 tsp cinnamon and 1/4 cup raisins!
Vicky says
Wow these are absolutely delicious and so fun to make. I made the recipe as written, but had to keep mine on the cast iron skillet for longer than 10/11 minutes on each side. I started on low, and turned it up a notch after 12 minutes or so. It probably ended up being 15-18 minutes on each side. Texture is fantastic. I only needed 200 g of water and used olive oil.
Janet L says
This is very delicious and was better than the gluten version. Nice and dense, I used a thermometer to make sure they reached 200 degrees, Will definitely make again. Been gf for 18 years and this was way better than any recipe so far or any store bought. thank you Natasha.
Natasha Levai says
I am glad you enjoyed them!
Julie says
Hi, I’m a little confused by the recipe. The ingredient list indicates that you need to add 7 g of instant/active dry yeast if you are using starter discard. The instructions say to use instant yeast if you are using starter discard, not active dry yeast since that needs to be activated. Can you use active dry yeast instead of instant if you activate it?
Natasha Levai says
Hi Julie! Yes, you can use active dry yeast instead of instant, but you will have to activate it in part of the liquids of the recipe!
Lisa says
I used active starter, 210 g of water, a combo of sorghum, millet and tapioca, measured 100g balls, fridge proofed for 10 hours and one hour on counter, a cast iron skillet on low for the first 4 muffins. With those variables, I needed to keep muffins on for an hour and there was still moistness in center and no nooks and crannies— very dense. They rose nicely on the skillet tho.
Nikki says
these turned out perfect!!!
I followed the recipe exactly (including her gf flour recipe) and let them rise overnight. I got fluffy, perfectly cooked gf English muffins
Abby says
Can you substitute potato starch for the psyllium husk? If so, do you need to adjust the liquid?
Natasha Levai says
Hi Abby, no potato starch is in no way a good substitute for psyllium husk in baking. If you want to make a recipe without psyllium husk, you would need to find a recipe that is designed to be made without it, because there is no good substitute for psyllium when it comes to baking, unfortunately!