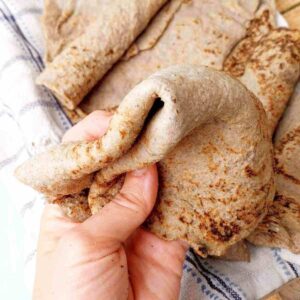
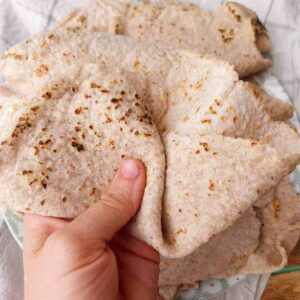
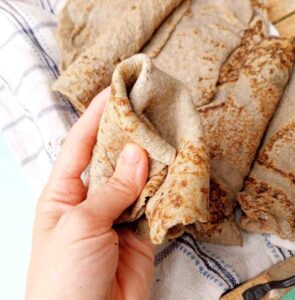
This is the softest Gluten-Free Dutch Oven Bread you will ever make! The crust softens after cooling making slicing a breeze. Eggs and milk make the bread rich and flavorful! This is a quicker version of my soft & fluffy gluten-free sourdough loaf.

This gluten-free Dutch oven bread recipe is one of the most popular recipes on my site. The plush crumb is combined with delicious flavor of white bread just like in my gluten-free sourdough hamburger buns and gluten-free sliders!
This recipe calls for a few different gluten-free flours, so if you are a beginner and don't have a stacked pantry yet, check out my 100% brown rice bread instead.
I made this dough and it turned out perfect! Great taste & texture.
- Cynthia
⭐⭐⭐⭐⭐
Jump to:
Why You Will Love This Recipe
- The crust softens as the bread cools making it easy to slice and enjoyable to eat! This buckwheat focaccia is another great plush-crumb recipe.
- The recipe only calls for 1 rise making the process quicker! In fact, all of my gluten-free breads only need 1 rise (like this Teff loaf).
- This loaf is big and airy thanks to the use of a Dutch oven! See more gluten-free Dutch oven recipes for ideas.
Ingredients for Gluten-Free Dutch Oven Bread

Ingredient notes:
- Psyllium husk - I recommend using whole husks for the best results, although powder can be used, too, if that's all you have. See my psyllium husk guide for details!
- Oil - You can use sunflower, coconut, avocado, olive, or any other neutral seed or vegetable oil.
- Instant yeast - I don't recommend active dry yeast because you need to activate it before use.
See the recipe card for quantities.
Substitutions
Eggs - use 2 flax eggs, for that mix 10g of flaxseed powder or 2 tablespoon of flaxseed meal with 110g of water, whisk, and set aside for 10 minutes to let it thicken. Then use them instead of the eggs!
Milk - use plant-based milk instead.
Xanthan gum - you can use guar gum instead.
Psyllium husk - this ingredient can't be substituted.
Sorghum flour - you can use brown rice or buckwheat flour instead.
Tapioca starch - use arrowroot starch instead.
Potato starch - cornstarch is a good substitute.
Variations
- Cheddar jalapeno bread - add about 60g cheddar and 40g jalapenos to the dough.
- Cinnamon raisin loaf - add ¼ cup of brown sugar, ½ cup of raisins, and 1-2 tablespoon of cinnamon.
- Chocolate bread - add ¼ cup brown sugar, ¼ cup cocoa powder, and chocolate chips to taste.
How to Make Gluten-Free Dutch Oven Bread

Step 1. Add water and psyllium husk to a medium-sized bowl and whisk to incorporate.
Set the bowl aside to let the psyllium gel form (2 min).

Step 2. In a large mixing bowl combine all of the dry ingredients including sugar and whisk thoroughly to incorporate.

Step 3. Finally, add all the wet and dry ingredients together and mix using an electric mixer with dough hooks.
I recommend mixing for at least 5 minutes to ensure a smoother dough.
Alternatively, you can mix with hands or a wooden spoon but the loaf might turn out bumpier on the top.
The dough will be very sticky, don't add extra flour to it!

Step 4. Turn the dough onto a floured working surface and shape it into a ball. Grease your hands with some oil to prevent sticking or use extra flour for dusting.
I like my bread in a batard shape better but you can bake it as a boule, too.
Dust a banneton basket with flour or use a mixing bowl lined with a dusted kitchen towel.
Turn the dough inside down into the basket/bowl and press it in to create a flat surface.
Cover the dough and leave to proof for 1-1.5 hours. The dough will puff up but won't double in size.
I recommend proofing at about 75F/24C for the best results. Alternatively, you can place the dough in the oven with the light on.
About 40 minutes into proofing, start preheating the oven to 450F/230C with the Dutch oven inside.

Step 5. Once the loaf is done proofing, carefully turn it over onto a piece of parchment paper and score. Scoring means cutting the top of the dough with a sharp razor to create a pattern and aid the oven spring.
Oven spring is the rising process during the first part of baking.
Then, gently lower the parchment with the loaf into a preheated Dutch oven, close the lid, and transfer it to the oven. Bake for 40 minutes with the lid on, then take the bread out of the Dutch oven, lower the temperature to 350F/175C, and continue baking on the oven rack for 30 minutes.
Let your gluten-free Dutch oven bread cool completely before slicing into it to prevent it from collapsing and avoid gumminess. Enjoy!
Expert Tips
- Don't add extra flour to the dough even if it is sticky.
- If at all possible, use a digital kitchen scale to measure the ingredients!
- Toast the slices if they come out slightly wet on the inside and use less water next time.
- If you have a large hole in the middle of the loaf it is a sign of overproofing - leaving the dough out to rise for too long.
- Let the bread cool completely before slicing to avoid gumminess.
- Place foil rings on the bottom of your Dutch oven to prevent the bread's bottom from burning.
Common Questions
Yes, you can proof the dough in a bread pan and then bake it at 400F/200C for 1h10min.
A Dutch oven traps the steam allowing the bread to rise better during baking. Plus, a Dutch oven's cast iron retains the heat better than a bread pan allowing for a crunchier crust. I love baking my vegan gluten-free sourdough loaf in it!
Any bread made with gluten-free ingredients (no wheat or rye) is considered gluten-free. Buckwheat flour bread is a great example of a hearty, yet 100% gluten-free sandwich loaf.

Storage
- Keep this bread at room temperature for up to 3-4 days. It is best to store this loaf in a bread box or bag to prevent it from going stale.
- Freeze the slices to keep the bread fresh for longer. Wait for the bread to cool, then slice it. Transfer the slices into a freezer-friendly bag or container and keep for up to 3 months.
- To defrost, take out a piece or two and place them into a microwave for a couple minutes.
More Gluten-Free Bread Recipes You Will Love!


If you tried this Gluten-Free Dutch Oven Recipe or any other recipe on my blog please leave a 🌟 star rating and let me know how it went in the 📝 comments below. Thanks for visiting!

Gluten-Free Dutch Oven Bread
Equipment
Ingredients
Psyllium Gel
- 20 grams whole psyllium husks use 18g if using powder
- 260 grams water warm or room temperature
Dry Ingredients
- 130 grams tapioca starch or arrowroot starch
- 100 grams potato starch or cornstarch
- 170 grams sorghum flour or brown rice flour
- 15 grams sugar or honey or maple syrup
- 7 grams instant yeast if using active dry yeast, activate it with some of the water or milk from the recipe
- 7 grams xanthan gum or guar gum
- 8 grams baking powder don't use baking soda
- 12 grams sea salt
Wet Ingredients
- 100 grams milk use plant-based milk for dairy-free
- 2 eggs or use 2 flax eggs instead (10g of flaxseed powder mixed with 110g of water and left to sit for 10 min)
- 30 grams sunflower oil or any other vegetable or seed oil
SAVE THIS RECIPE!💌
Instructions
- Add water and psyllium husk to a medium-sized bowl and whisk to incorporate.Set the bowl aside to let the psyllium gel form (2 min).20 grams whole psyllium husks, 260 grams water
- In a large mixing bowl combine all of the dry ingredients including sugar and whisk thoroughly to incorporate.130 grams tapioca starch, 100 grams potato starch, 170 grams sorghum flour, 15 grams sugar, 7 grams instant yeast, 7 grams xanthan gum, 8 grams baking powder, 12 grams sea salt
- Finally, add all the wet and dry ingredients along with psyllium gel and mix using an electric mixer with dough hooks.100 grams milk, 2 eggs, 30 grams sunflower oil
- I recommend mixing for at least 5 minutes to ensure a smoother dough.Alternatively, you can mix with hands or a wooden spoon but the loaf might turn out less smooth on the top.The dough will be very sticky but don't add any extra flour to it!
- Turn the dough onto a floured working surface and shape into a ball. Grease your hands with some oil to prevent sticking or use extra flour for dusting.I like my bread in a batard shape better but you can bake it as a boule, too.Dust a banneton basket with flour or use a mixing bowl lined with a dusted kitchen towel.Turn the dough inside down into the basket/bowl and press it in to create a flat surface. Cover the dough and leave to proof for 1-1.5 hours. The dough will puff up but won't double in size.
- I recommend proofing at about 75F/24C for the best results. Alternatively, you can place the dough in the oven with the light on.
- About 40 minutes into proofing, start preheating the oven to 450F/230C with the Dutch oven inside.
- Once the loaf is done proofing, carefully turn it over onto a piece of parchment paper and score. Scoring means cutting the top of the dough with a sharp razor to create a pattern and aid the oven spring.
- Then, gently lower the parchment with the loaf into a preheated Dutch oven, close the lid, and transfer it to the oven. Bake for 40 minutes with the lid on, then take the bread out of the Dutch oven, lower the temperature to 350F/175C, and continue baking on the oven rack for 30 minutes.Let your gluten-free Dutch oven bread cool completely before slicing into it to prevent it from collapsing and avoid gumminess. Enjoy!
Notes
-
- Keep this bread at room temperature for up to 3-4 days. It is best to store this loaf in a bread box or bag to prevent it from going stale.
-
- Freeze the slices to keep the bread fresh for longer. Wait for the bread to cool, then slice it. Transfer the slices into a freezer-friendly bag or container and keep for up to 3 months.
-
- To defrost, take out a piece or two and place them into a microwave for a couple minutes.
-
- Don't add extra flour to the dough even if it is sticky.
-
- If at all possible, use a digital kitchen scale to measure the ingredients!
-
- Toast the slices if they come out slightly wet on the inside.

Tiffany says
hey! can I use more psylium husk instead of the gum?
Natasha Levai says
Hi Tiffany! You can try but the gum plays a special role in this bread allowing for extra fluffiness and softness. I have other recipes that don't include gums!
Paul says
I have made this recipe over 10 loaves now and have only gotten 2 that do not have a huge hole in the center leaving the loaf useless.
I have proofed for multiple different times up to the recommended 5 hrs and same result each time.
Thoughts? Do i need to do more folding of the dough when out of the mixer?
Beverly Melton says
Excellent bread! Can you refrigerate the dough overnight before proofing?
Beverly Melton says
I use this recipe to also make hot dog buns in a mesh mold. I have trouble with the buns forming air pockets and the dough is not over proofed. One tip I read was to chill the dough 4-24 hours before shaping. So I guess an additional question is...if the dough can be refrigerated, should it before proofing or after proofing and just before shaping?
Natasha Levai says
Do you bake the buns in a Dutch oven or on a baking sheet?
Aasa says
I have to say I am not easy to impress and I am such a nerd and perfectionist when it comes to gluten free baking, and I've tried sooo many recipes... But this bread is unbelievably good and so far the best I have ever eaten! I almost can't believe how close the texture and flavour is to regular white bread. I used yoghurt instead of milk and it turned out great. Light and fluffy with a bit of a chew and a thin crispy crust. This is definitely a new favourite! Thank you sooo much!
Beverly Melton says
In regards to my last question...I have re-read the directions and realized that you actually take the bread out of the dutch oven and put it on the oven rack for the last 30 minutes (different from your sourdough bread that I had previously made). So now a different question, do you leave the bread on the parchment paper or discard it before you put the bread back in the over?
Natasha Levai says
Hi Beverly! I generally just put the bread straight on the rack without the paper.
Bev says
Do you leave the lid on or off of the dutch oven during the last 30 minutes of baking at 350 degrees?
Sherri says
At last, a great tasting, soft gluten free sourdough bread recipe. I used almond milk and baked in a well oiled stoneware loaf pan covered with another loaf pan at the recommended 400 F for 1 hr and 10 min. I am so happily surprised by the results because I had given up on having good sandwich bread
Lydia Smollen says
Hi, instant yeast isn’t available much in my country. Could I sub a portion of the warm water to activate yeast and use the rest for the psyllium husk? Or possibly use the milk?
Natasha Levai says
Hi Lydia, yes, absolutely! Use either water or milk.
Anne Marie Moore says
Wow! My husband is beyond thrilled. He is celiac and loves his bread. This recipe was easy to follow and the results were fabulous. It's a keeper and it looks just beautiful. Thank you.
Paulla says
This bread is outstanding! Great recipe which will become a constant in my quest for delicious and healthy gluten free bread. Thank you, Natasha.
Amy says
This recipe has become my weekly go-to! It has never failed me and I love the taste and texture; I’ve made it so many times I’ve memorized the recipe!
Shelly Starr says
Do you think this bread could be made in a regular bread pan?
Natasha Levai says
Hi Shelly! Yes, in fact I always bake this bread in a cast iron bread pan! I use a standard 9x5 inch cast iron pan with a lid.
Tracy Sharlow says
Can you make this bread with GF sourdough discard?
Natasha Levai says
Yes, you can! You can simply add 150g of discard to the dough without making any changes.
Cynthia says
I made this dough and it turned out perfect! Great taste & texture. do u think it this recipe would still work if I removed the xanthum gum?
Natasha Levai says
Hi Cynthia! This bread will turn out too wet without xantan gum but I have another recipe designed with psyllium husk only, here is it: https://www.natashashome.com/gluten-free-bread-with-psyllium-husk-powder/
BWell says
Can white rice flour be used instead of brown?
Natasha Levai says
You can use white rice flour instead, although it might affect the texture to some degree.
Natasha Levai says
A great bread with a soft crust!