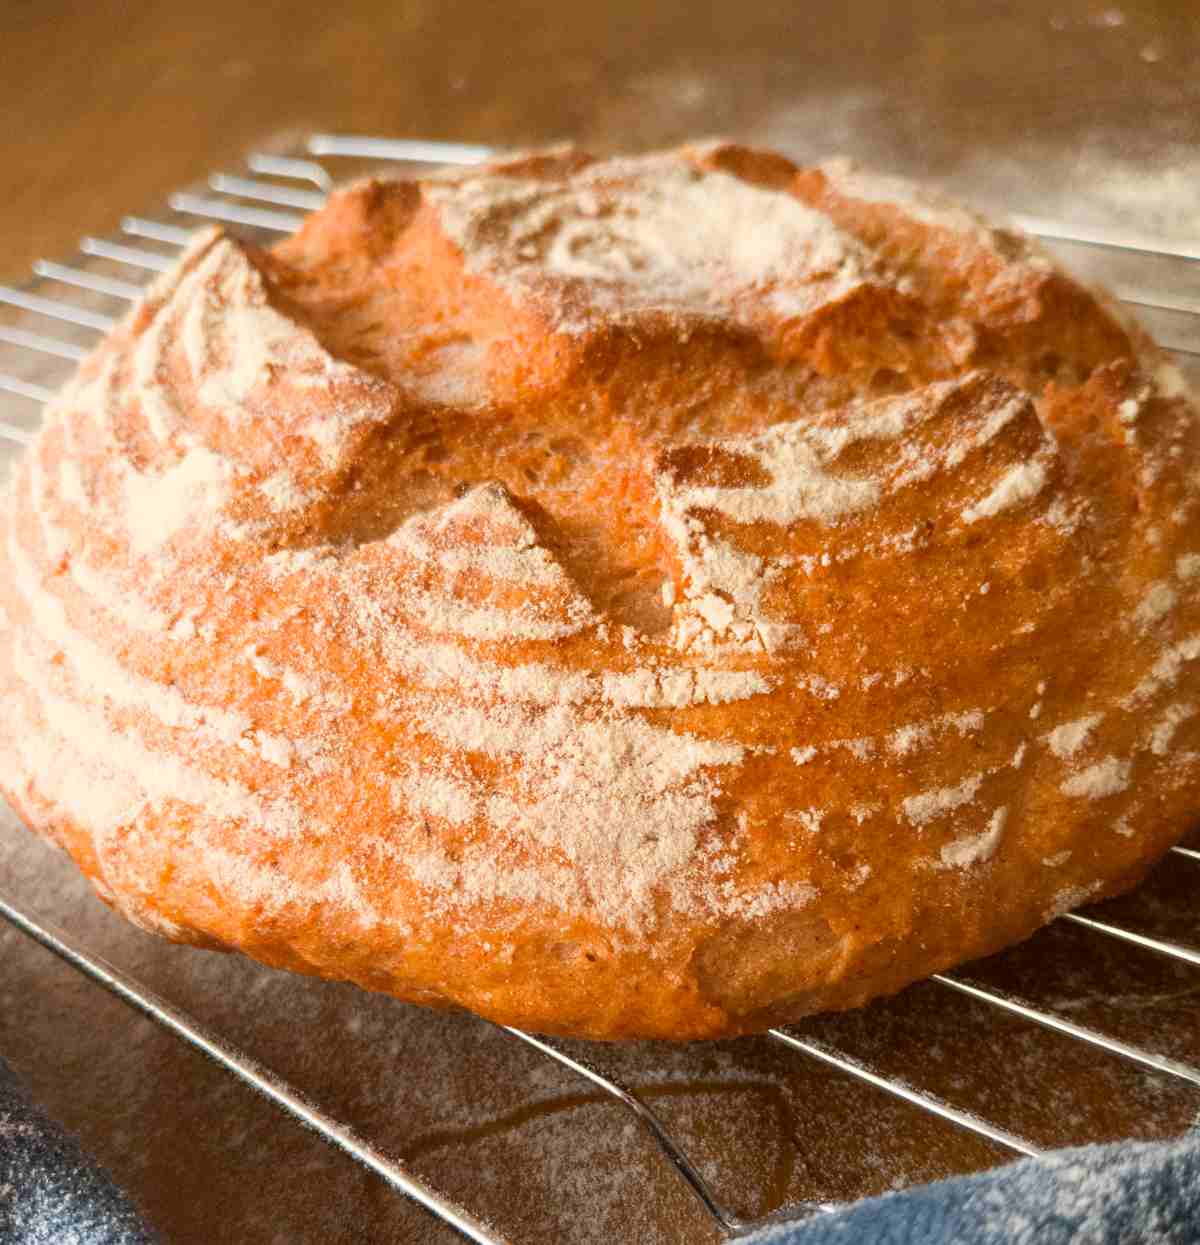
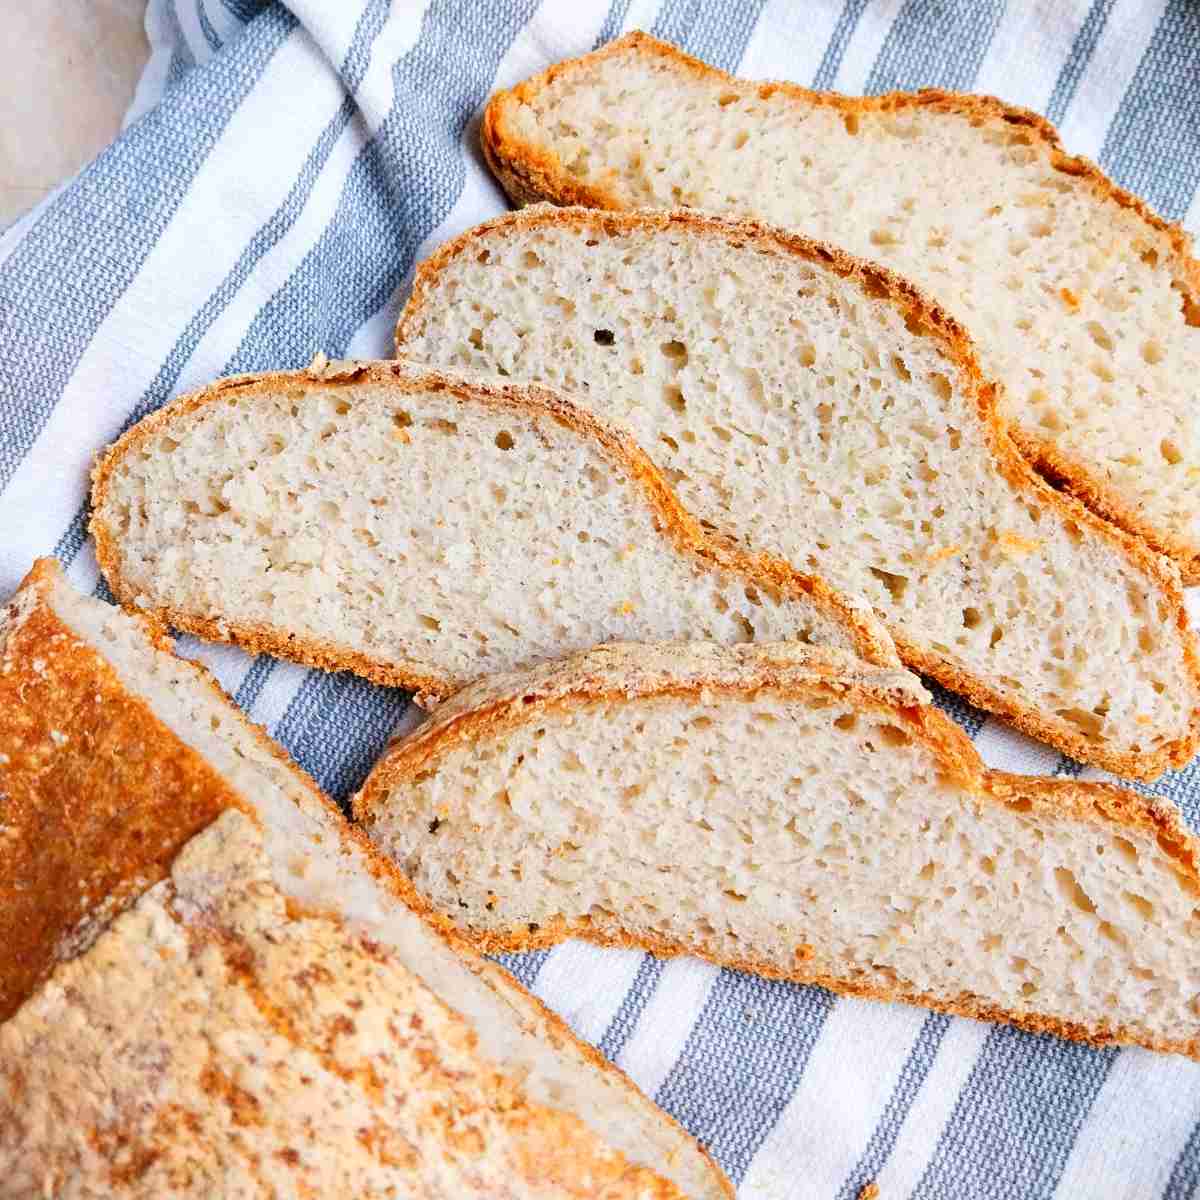
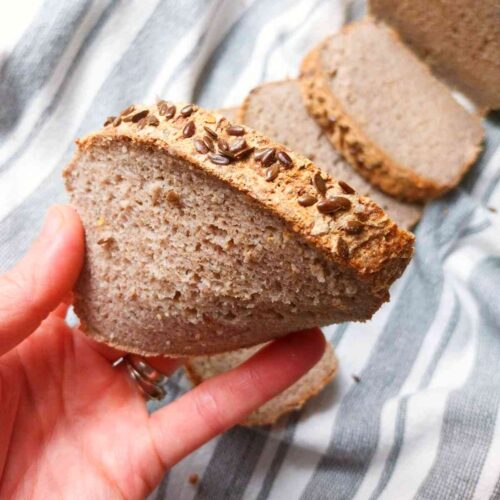
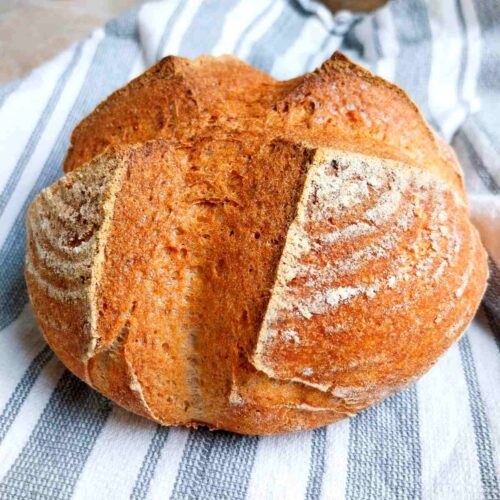
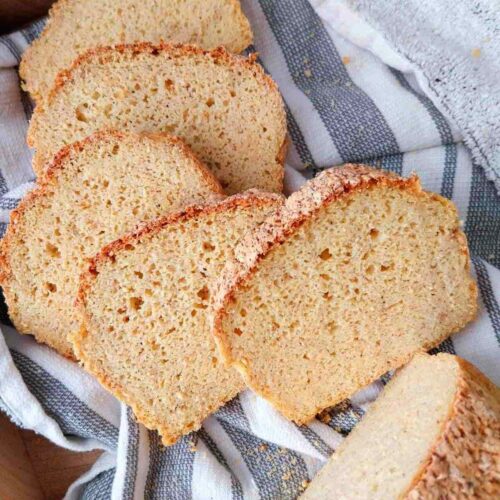
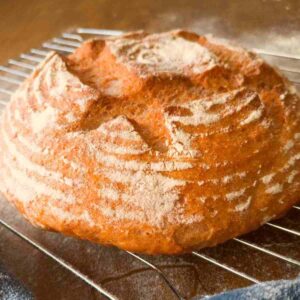
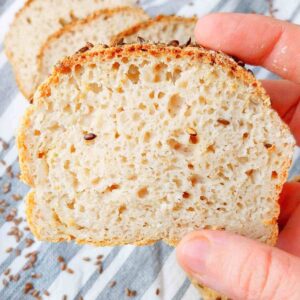
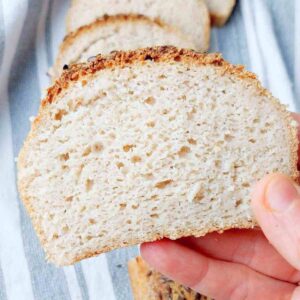
This no-knead gluten-free bread with psyllium husk is soft, moist, flexible, flavorful, and remarkably stable. It is also vegan and very easy to make. My gluten-free bread has never been better! You will need a Dutch oven to make this bread the best it can be.
Jump to:
Why You Will Love This Recipe
- Texture. Psyllium husk makes the bread incredibly soft and moist!
- Flavor. The bread is so tasty I keep snacking on it all day long. For even more flavor try it in grilled cheese!
- Easy to make. Gluten-free bread baking advantage is that it is always no-knead!
Whole Husks vs. Powder
I often get asked what is the difference between the two. It is not obvious whether you have psyllium husk powder or whole husks if you are not familiar with the ingredient.
I myself used psyllium powder at first, thinking I am using whole husks and wondered why aren't my recipes turning out! If you have whole husks you can see small particles while with powder it looks like brown flour with no distinct particles.
This recipe calls for whole husks although it is possible to substitute whole husks for the powder. Read my psyllium husk 101 article for more information and illustration.
Ingredients
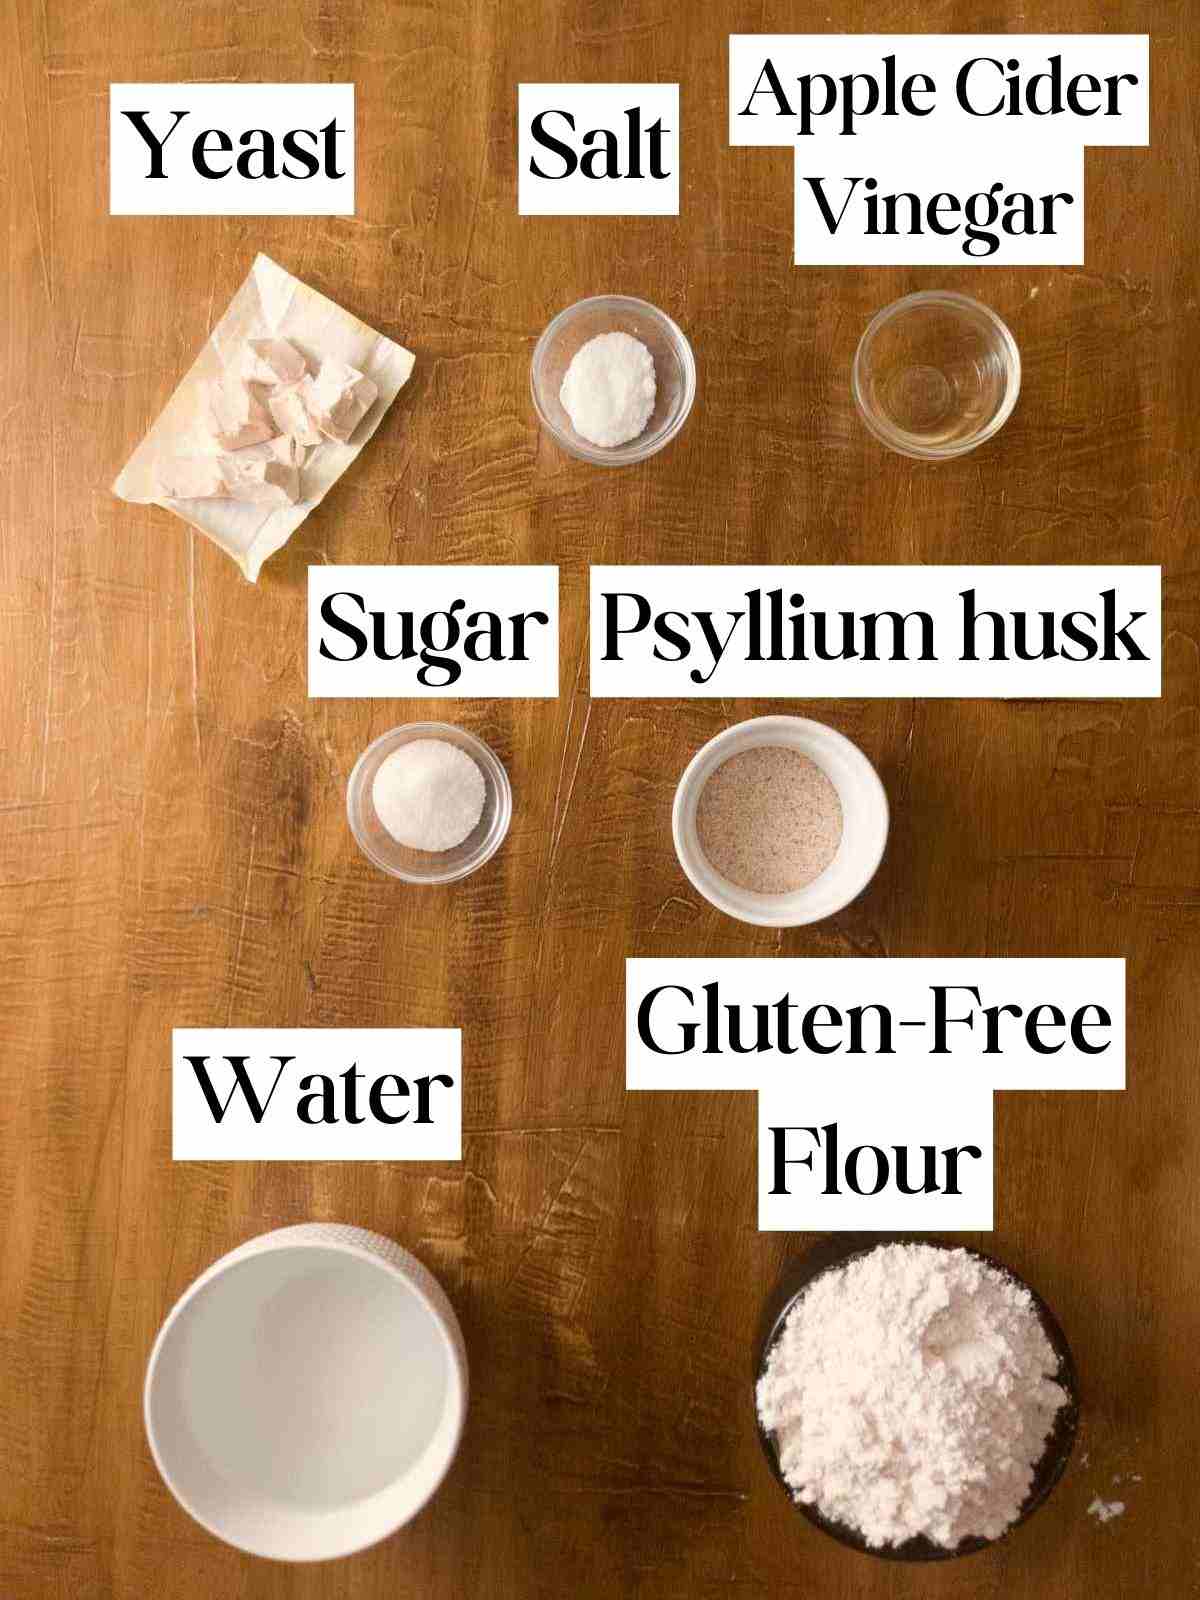
Gluten-free flour - I use my nightshade-free gluten-free flour blend which is a combination of brown rice flour, white rice flour, tapioca starch and potato starch. You can experiment with other flour types but might need to adjust the water amount.
Psyllium husk - use whole husks, not psyllium husk powder. Check out this psyllium husk guide if you are new to it!
Yeast - use instant yeast vs. active dry. Active dry yeast requires activation and instant yeast can be added straight to the dry ingredients!
Apple cider vinegar - optional, helps the yeast thrive but I've been getting great results without it as well.
Water - I used tap water but depending on the quality of your tap water, you might need to use bottled water. If you can drink your tap water then it is safe to use in bread!
Substitutes
Psyllium husk - there is no good substitute for psyllium husk! Xanthan gum will yield crumbly and dense bread, so it is not a good option to use in this recipe.
You can use psyllium husk powder. In that case, use 17g (9.5 tsp) of psyllium husk powder but don't reduce the water. Psyllium husk powder needs to be added to the dry ingredients, for if you soak it, it will clump!
Sugar - you can use honey or maple syrup instead of sugar. Sugar helps yeast thrive and raise the bread!
Yeast - you can use any type of yeast. If using dry yeast, use 8g (2.5-3 tsp). A fun way to substitute yeast is to use wild yeast (sourdough)! Check out my vegan gluten-free sourdough bread recipe if you are up for a challenge!
Starches - if you can't have starches, you can make my starch-free whole-grain millet bread, almond flour bread, buckwheat brown bread, or my 100% rice flour bread instead.
Step-By-Step Instructions
Step 1 - make psyllium gel
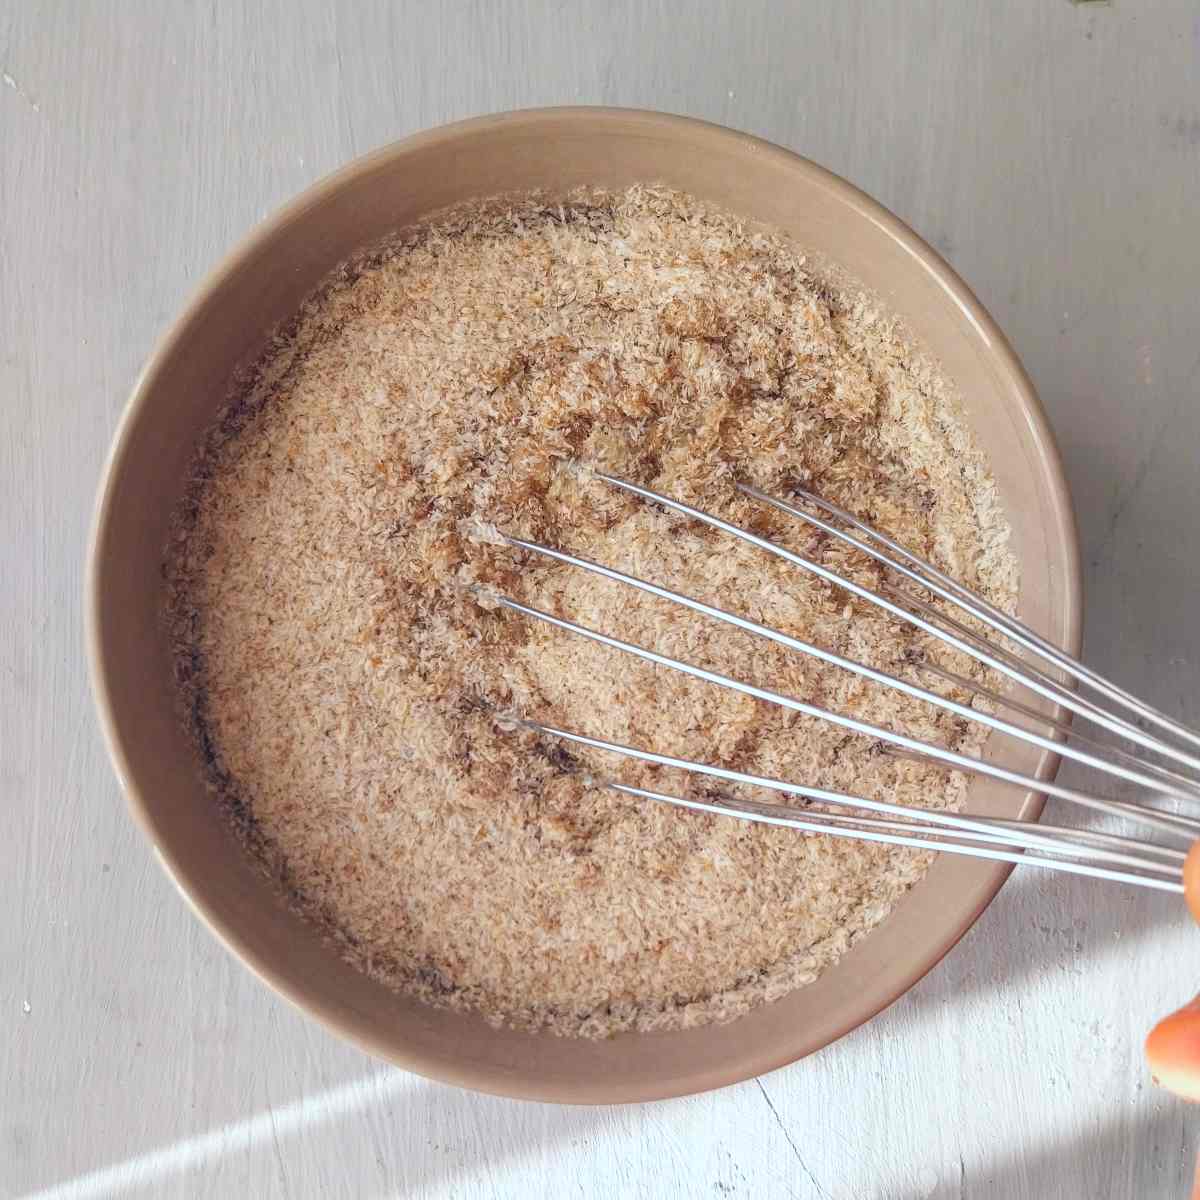
Combine whole psyllium husks, water, and sugar in a medium-sized bowl and whisk to incorporate. Set aside.
Step 2 - mix the dry ingredients
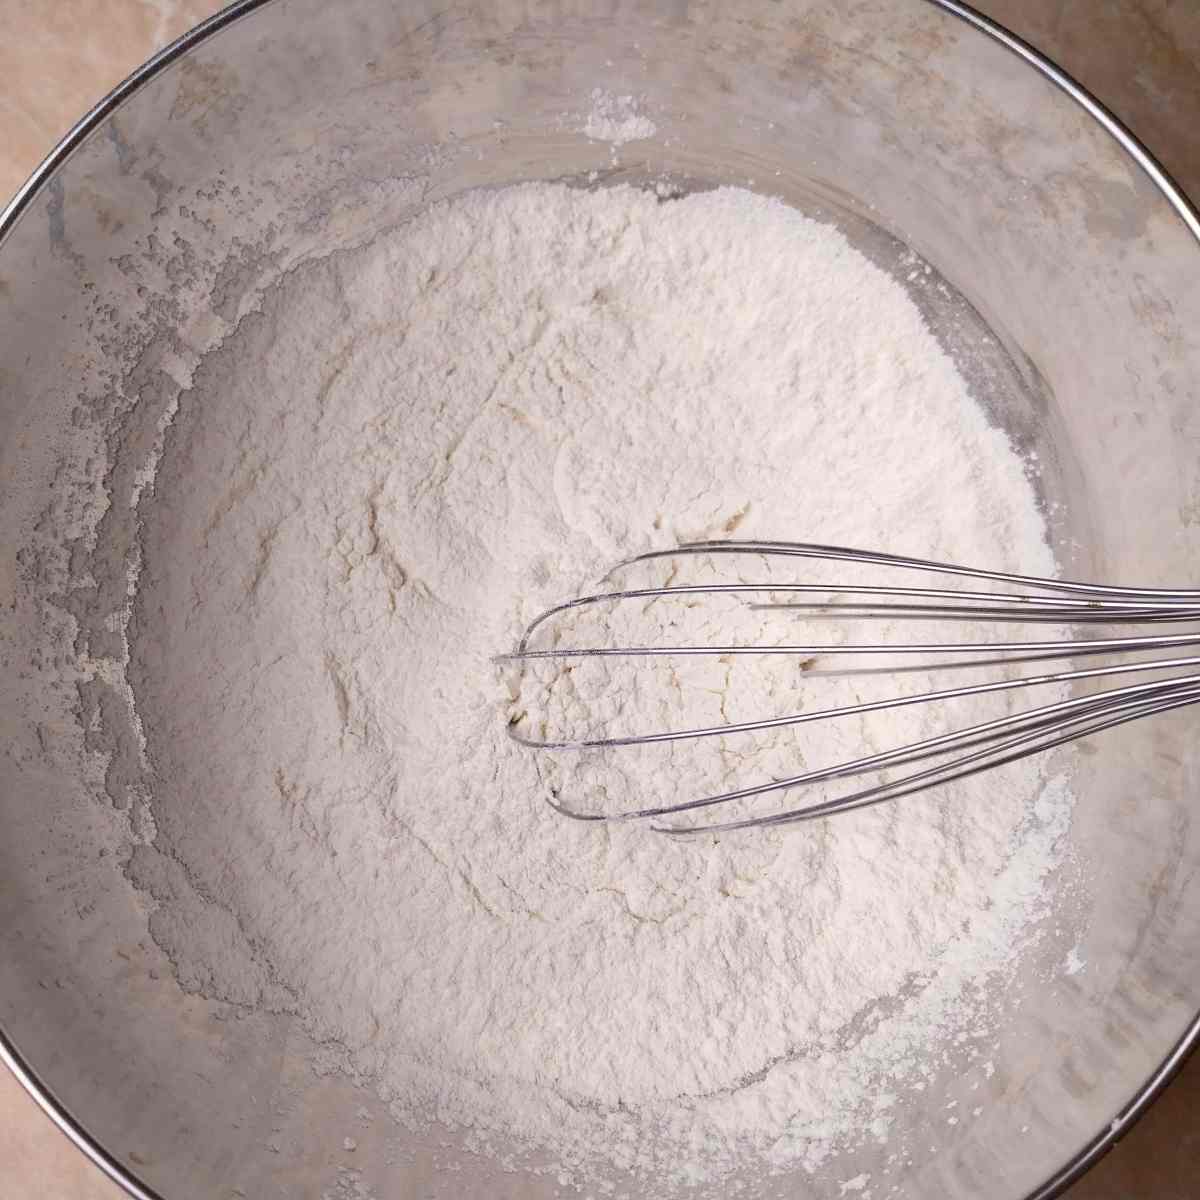
Add the dry ingredients to a large mixing bowl (flour, yeast, and salt). Whisk to incorporate.
Step 3 - mix the dough
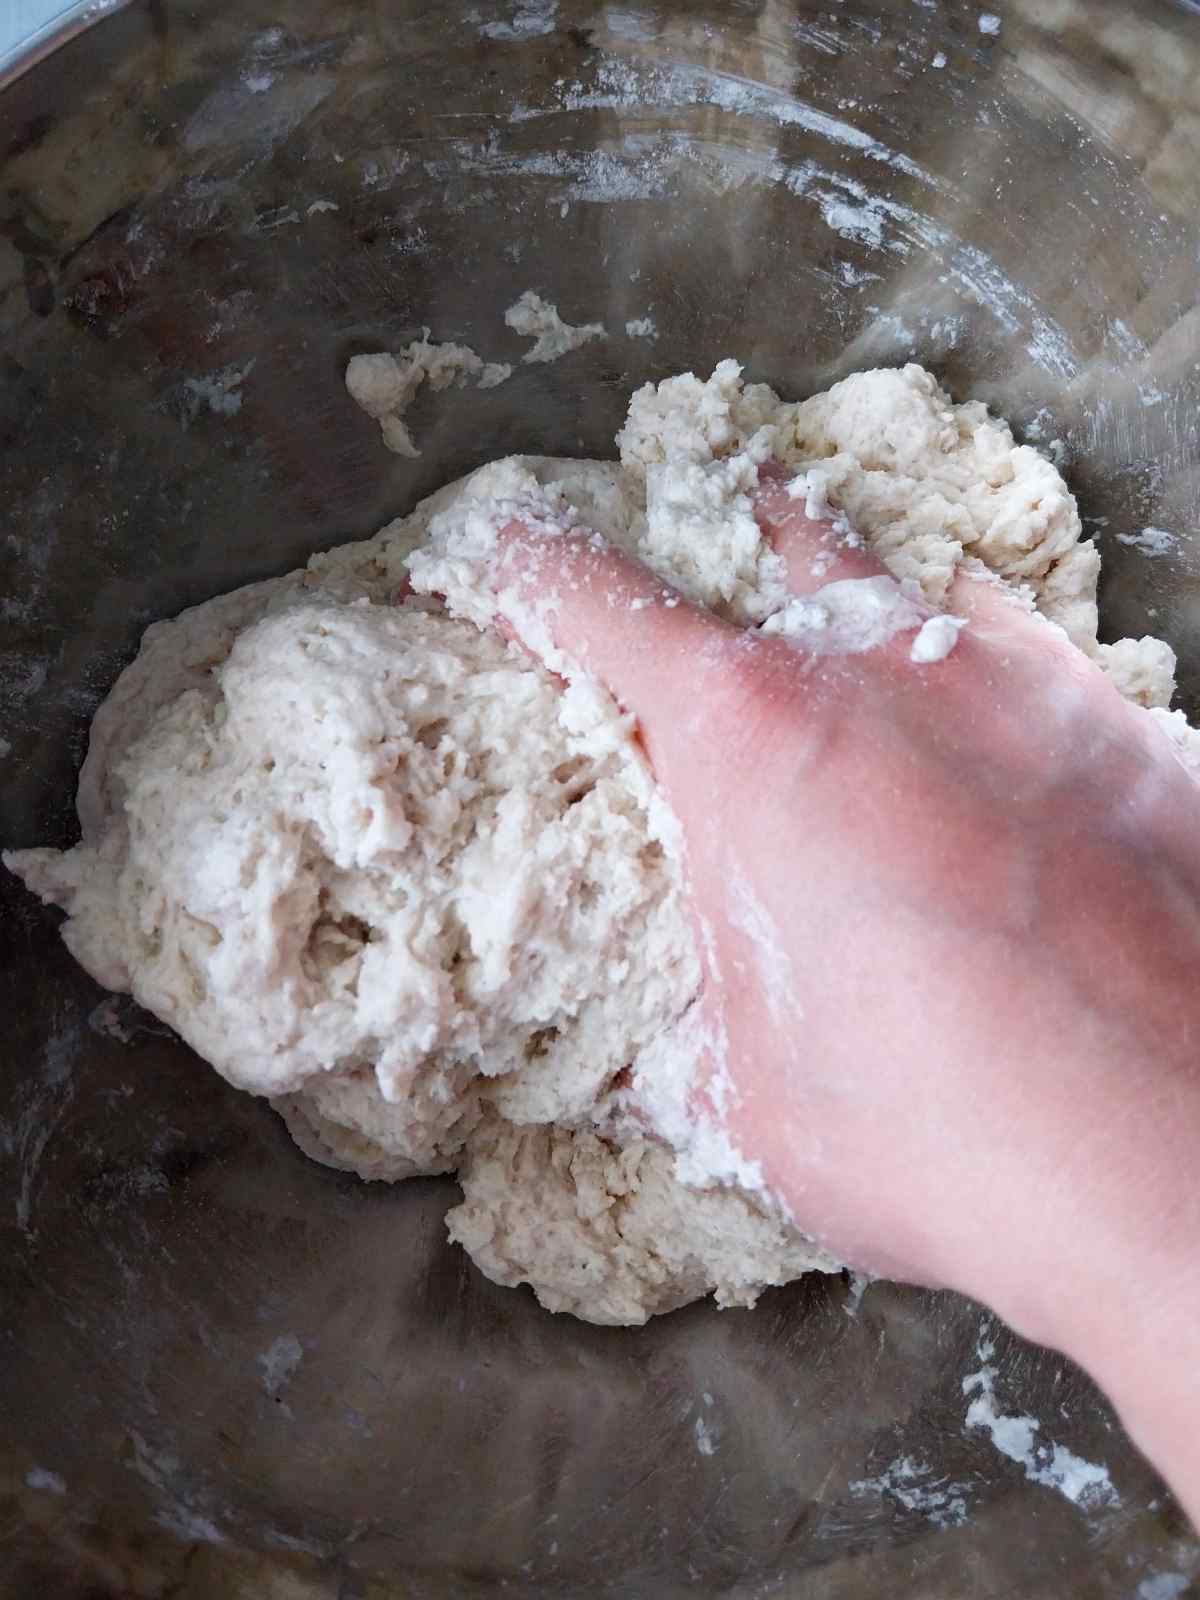
Once the psyllium husk turns into a gel (1-2 minutes), add it to the dry ingredients and mix the dough.
You can mix the dough by hand, with an electric mixer, or with a wooden spoon. It will be sticky but workable!
Step 4 - shape the loaf
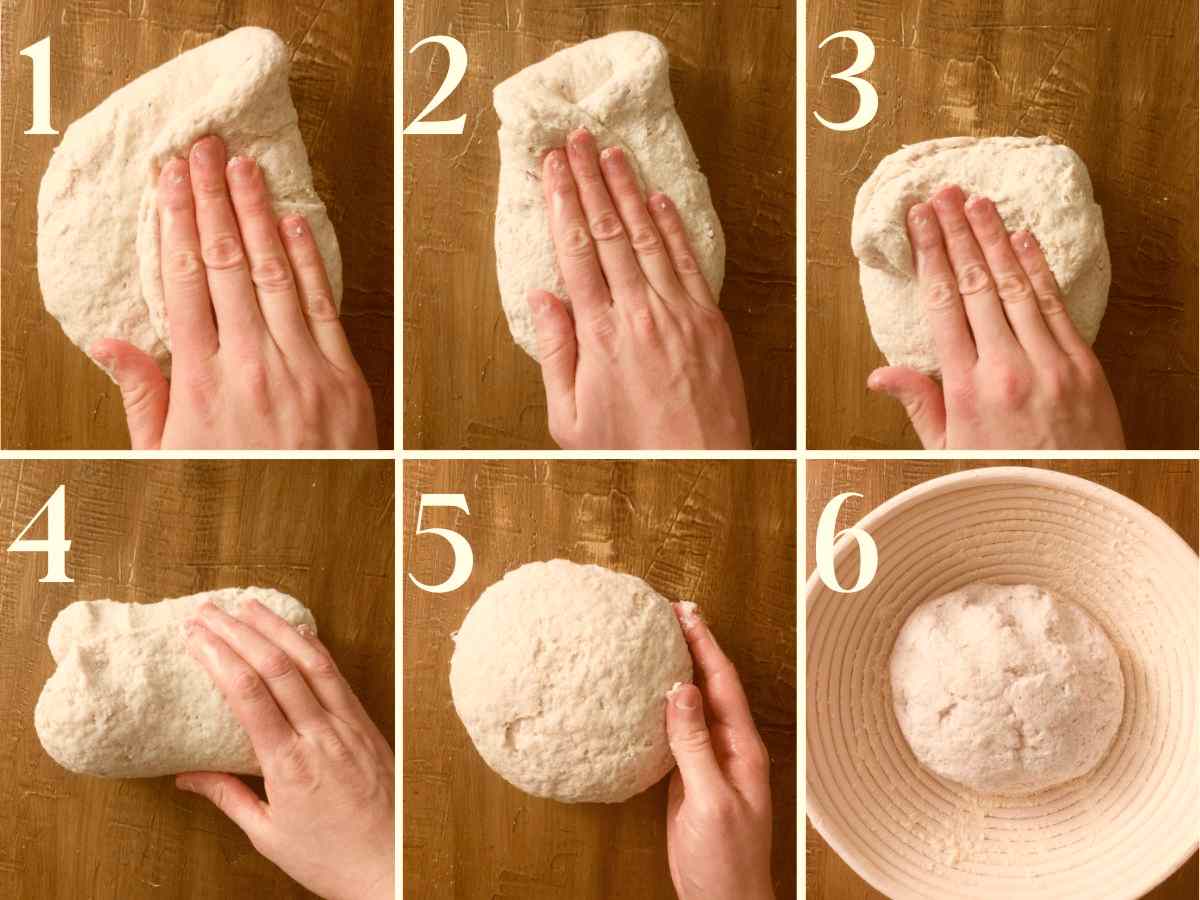
Transfer the dough onto a lightly floured working surface and flatten it into a disc. Shape the dough by folding each side of the dough disc onto its middle, then flip it.
Shape the dough into a ball by turning it around with your hands and tucking the sides under. See the pictures or video for visual instructions!
Place the dough into a floured proofing basket or a mixing bowl lined with a kitchen towel. If you are baking the bread in a bread pan, place it into the greased bread pan. Cover the dough with a kitchen towel.
Leave the dough to rise for about 30-60 minutes. Keep an eye on the bread, you don't want it to rise too high (or double in size) or it will fall during baking.
Step 5 - bake
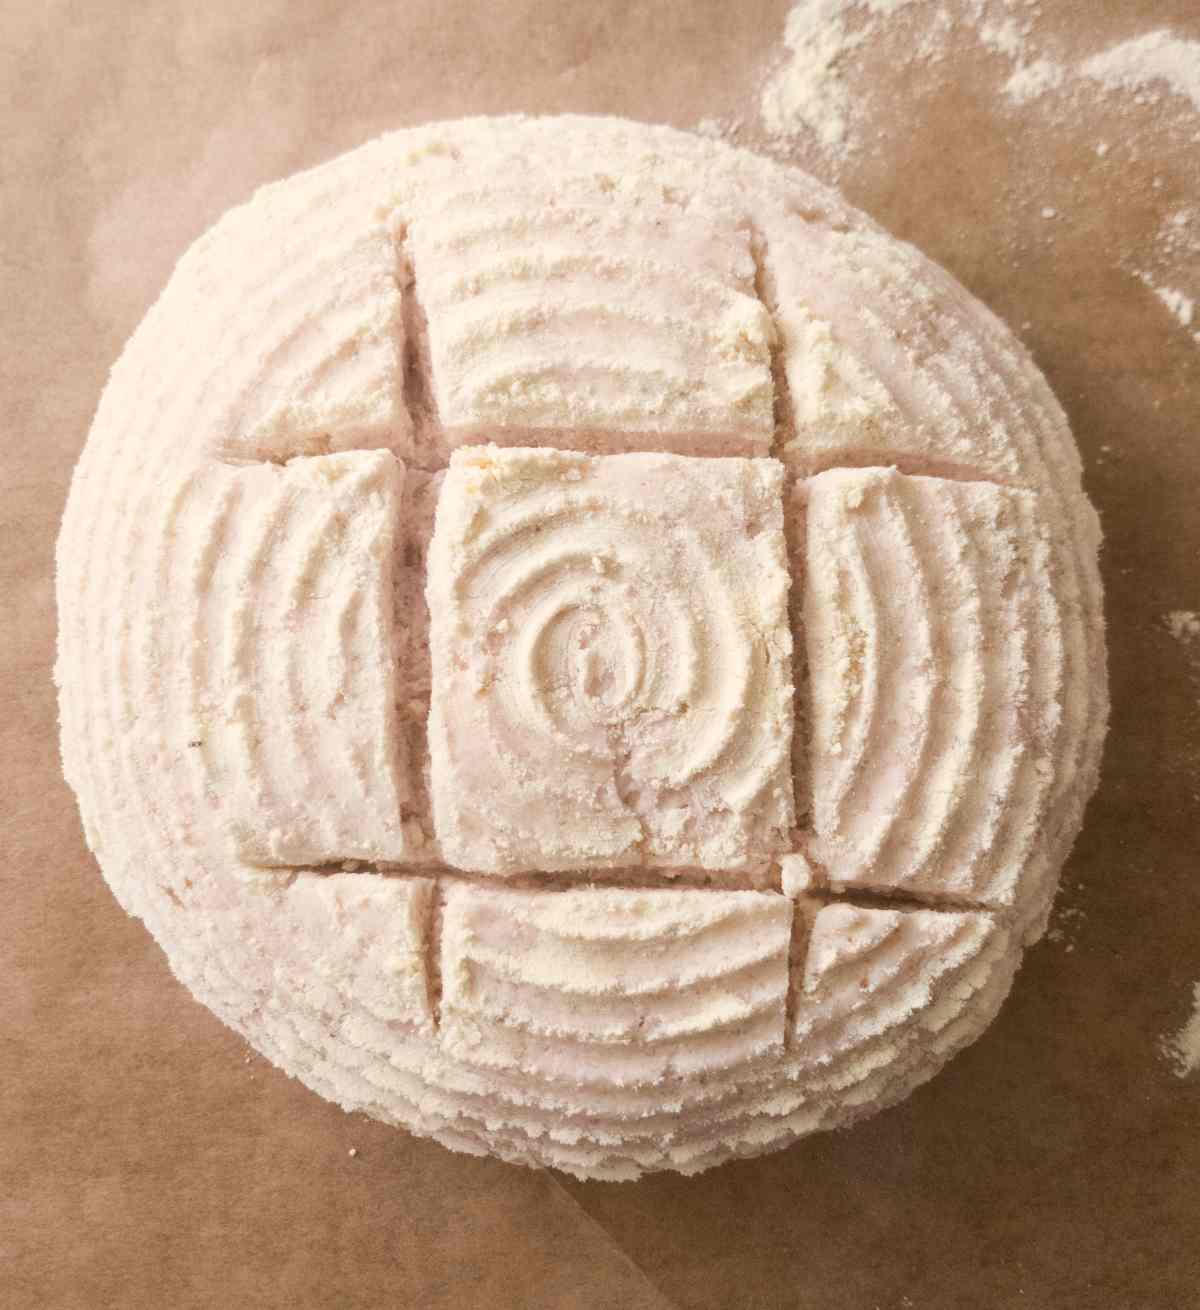
Once the loaf is done proofing, carefully transfer it onto a piece of parchment paper, score (cut the surface with a razor) about 1inch/2.5cm deep, and carefully lower the loaf into the Dutch oven (unless you're baking in a bread pan).
Place the lid onto the Dutch oven and transfer it into the oven. Start preheating the oven to 450F/230C. Once the oven is ready, start the timer and bake for 40 minutes.
Then, carefully remove the loaf from the Dutch oven, transfer it to the oven rack, lower the temperature to 350F/180C, and keep baking for another 30 minutes.
Let the bread cool completely (until no longer warm to the touch) and enjoy!
How To Store
Store this bread at room temperature in a bread bag or in the refrigerator. The bread should keep for 3-4 days! You can also freeze this gluten-free bread for up to 3 months. You can slice it first, and then freeze it or freeze the loaf whole.
I prefer freezing sliced bread as it allows me to take out a few slices at a time without defrosting the whole loaf! If you freeze the bread sliced, the pieces will stick together but I am always able to break them apart without damaging them. To avoid sticking you can freeze each slice individually on a piece of parchment paper and then transfer them to a bread bag.
To defrost, simply put the slices into the microwave for 30 seconds. If defrosting a whole loaf, let it thaw at room temperature.
Expert Tips
- Don't use cold or hot water. The yeast will do best with warm or room-temperature water.
- For the best results use a digital scale to measure your ingredients.
- If the dough is sticky when shaping, grease your hands with some oil!
- You can bake the bread in a Dutch oven, cast iron skillet, a bread pan, or any other dish you like. The results will be slightly different based on what you bake in but the bread will be just as soft, moist, and delicious!
- Wait until the bread cools down before slicing it as the crumb is still setting as the bread cools.
Frequently Asked Questions
I never tried it but I don't think this recipe is good for a bread machine because of the different steps you need to take to bring the dough together.
Yes.
More gluten-free bread recipes you might like!
This bread goes great with my gluten-free broccoli cheddar soup (Panera copycat)!
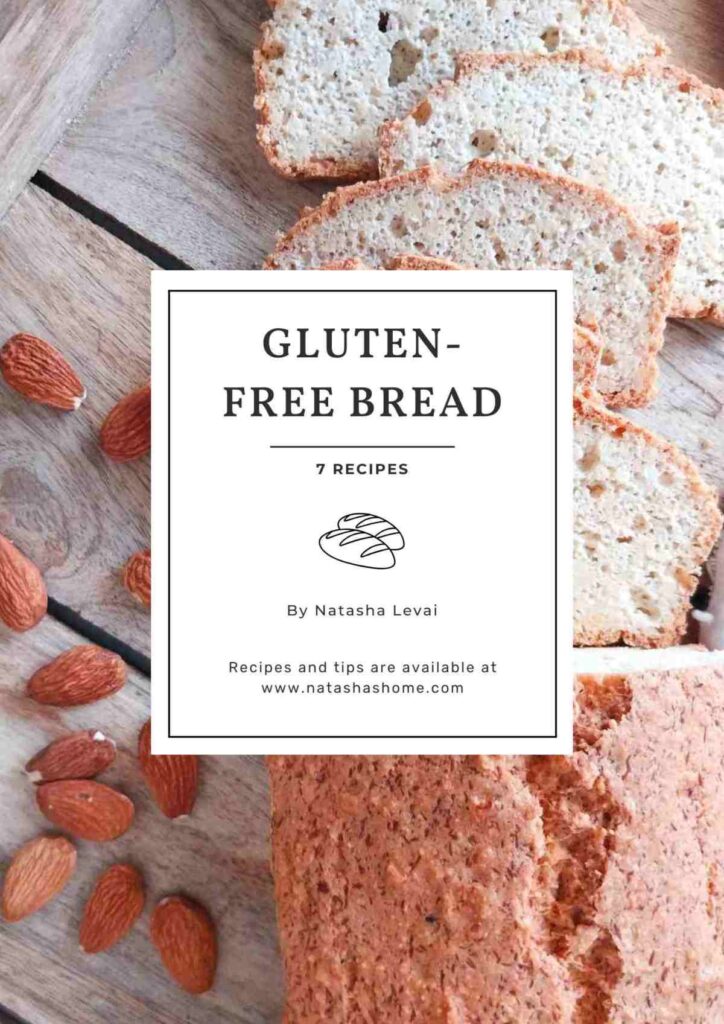
Get my new
Gluten-Free Bread Recipes eBook
The top 7 recipes of 2024!
📖 Recipe
No-Knead Gluten-Free Bread With Psyllium Husk
Equipment
- dutch oven (a cast iron skillet or a regular bread pan will work, too!)
- 1 digital scale (strongly recommended)
Ingredients
Wet ingredients
- 20 grams (3 tbsp) whole psyllium husks, if using powder, use 18 grams
- 435 grams (1¾ cups + 2 tbsp) water, room temperature or warm
- 15 grams sugar, or honey/maple syrup
Dry ingredients
- 100 grams (⅔ cup) brown rice flour or sorghum flour
- 100 grams (⅔ cup) white rice flour
- 100 grams (¾ cup + 2 tbsp) tapioca starch or arrowroot starch
- 100 grams (½ cup + 1 tbsp) potato starch or cornstarch
- 12 grams (2 tsp) salt
- 7 grams (1 packet) instant yeast
Instructions
- Combine whole psyllium husks, water, and sugar in a medium-sized bowl and whisk to incorporate. Set aside.
- Add the dry ingredients to a large mixing bowl (flour, yeast, and salt). Whisk to incorporate.
- Once the psyllium husk turns into a gel (1-2 minutes), add it to the dry ingredients and mix the dough.You can mix the dough by hand, with an electric mixer, or with a wooden spoon. It will be sticky but workable!
- Transfer the dough onto a lightly floured working surface and flatten it into a disc. Shape the dough by folding each side of the dough disc onto its middle, then flip it.Shape the dough into a ball by turning it around with your hands and tucking the sides under. See the pictures in the post or the video down below for visual instructions!
- Place the dough into a floured proofing basket or a mixing bowl lined with a kitchen towel. If you are baking the bread in a bread pan, place it into the greased bread pan. Cover the dough with a kitchen towel.Leave the dough to rise for about 30-60 minutes in a draft-free area. Keep an eye on the bread, you don't want it to rise too high (or double in size) or it will fall during baking.
- Once the loaf is done proofing, carefully transfer it onto a piece of parchment paper, score (cut the surface with a razor) about 1inch/2.5cm deep, and carefully lower the loaf into the Dutch oven (unless you're baking in a bread pan).Place the lid onto the Dutch oven and transfer it into the oven. Start preheating the oven to 450F/230C. Once the oven is ready, start the timer and bake for 40 minutes. Then, carefully remove the loaf from the Dutch oven, transfer it to the oven rack, lower the temperature to 350F/180C, and keep baking for another 30 minutes.
- Let the bread cool completely (until no longer warm to the touch) and enjoy!
Natashashome
Hi Carolyn! Those comments were related to another bread recipe I had on this page before. I removed them to prevent confusion! 🙂 The post itself has the correct information.
Barbara Ernst
What is your flour combo? I’m allergic to wheat, rice and almond. Thanks
Natashashome
I use rice flour in my blend but you can use rice-free gluten-free flour. For example, use 140g of millet flour, 140g of sorghum flour, and 120g of any starch of choice (you can use 30g of tapioca starch and 90g of cornstarch, for example).
Natashashome
Hi Lori! I had a different bread recipe here before and that comment did not get removed when the recipe was updated! No, no eggs in this bread. 🙂
Linda
My bread didn’t seem cooked. Very doughy. Cooked it an additional 15 minutes and still doughy. Any suggestions?? I was so hoping this was the recipe I was looking for.
Natashashome
Oh no!! I would love to help you! What flour did you use? Did your bread rise? How long did you leave it out for rising? What temperature did you bake it at?
Amanda
Hi! If I am to use gluten free sourdough starter, how many grams would I add in for this bread recipe? Do I need to adjust anything else?
Thanks! Your site has been super helpful to me 🙂
Natasha Levai
Hi Amanda! To make a GF sourdough bread I would recommend following a specifically designed recipe like this one https://www.natashashome.com/gluten-free-sourdough-bread/ !
Emily
i’ve made this bread twice now and it’s so simple and delicious!!!
Natasha Levai
Thank you so much for your feedback, Emily!
Sophia
What brand of psyllium husk do you use? The one I tried in another recipe turned my bread purple. It was a psyllium husk powder so not sure it there is a difference in color between the whole husks and the powder?
Natasha Levai
Hi Sophia! I buy psyllium husk locally online and I live in Europe so I don't think you can get the same kind but generally, yes, powder might turn your bread purple while whole husks should not. You can also buy "blond" psyllium husk if you find it. Here is a post I have on psyllium husk in gluten free baking with an amazon link to buy it. 🙂
Sidra
Can I use this recipe in my bread machine (with gluten free setting)?
Natasha Levai
Hi Sidra! I have never tried it in a bread machine but I think it could work! Let me know if it does! 🙂
Mona
This bread requires only one proofing right ?
I’m about to make it now and was wondering if a second proof is needed before baking. That’s what I do with my regular breads.
Natasha Levai
Hi Mona! You are right, this bread only requires one proofing. With gluten-free breads you don't need to do two stages of proofing!
Natasha Levai
Hi Bon! Before, this recipe used to have 400g of flour and recently I updated it to be 500g because with some blends the dough was too wet to hold its shape. So, at this point you would want to add 50g additional flour and 50g additional starch!
Sarah
I just baked this recipe using 500g like you stated in the above comment and my dough was very stiff and didn’t rise at all?!
The recipe initially stated 400g, so I’m confused as to what measurements I’m to use.
Natasha Levai
It is 400g just like the recipe says! The comment above is outdated and I will remove it.
Pat
I just made this bread . It didn't rise well, but that is always my challenge with every bread. I added some shredded cheddar on top and it was delicious and SO soft inside- the 1st time I have used the psyllium husks. What a great addition. Do you have any other GF bread recipes with it? Anyway.. I just looked at my printed recipe - I think it's a few months old. But it says 500 gms of GF flour, which is what I did. The current recipe on your site says 400 gms. of flour. How did that happen? I assume it should be 400 not 500? Was that my problem? All other ingredients, notes, instructions on my print out are the same. I'm about to make it again, and will do 40 gms. Thanks for the recipe.
Natasha Levai
Hi Pat! Yes, I changed the recipe to 400 grams. I was tweaking it and realized that depending on what flour you use the results will be different. So, I specified the exact flour types and limited the volume to 400g to ensure stable results!
Pat
Awesome! Thank you.
Charlie
Hi hi. I think you have a typo. The first time I made it I made it according to the typo, and hooboy was it purple and springy. Still had really good flavor though. Anyhow, the typo:
In the ingredients section at the bottom, you have this.
20 grams (11.5 tsp) psyllium husk. Since I use tsp/tbsp measurements, I put 11.5 tsp in. Even at the time this seemed excessive, but I did it! It should read (4tsp)
Anyhow, awesome stuff you have here. Excellent!
Natasha Levai
Thank you!! I actually took the tsp measurements from another source as I myself only use a scale. Thank you for pointing this out! I will go in and fix it.
Paula Taylor
I have tried so many gluten free bread recipes only to end up with solid bricks or some inedible gluey substance. But this bread is actually good, even if you aren't gluten-free. It is easy to make and you can mix in different flours for different tastes.
melody
What purpose does the yeast serve in this recipe? Without gluten, the yeast has nothing to work with. Could those of us who cannot have yeast leave it out?
Natasha Levai
Hi Melody! Yeast feeds on carbohydrates, not on gluten, so it will still work well with a gluten-free flour blend. If you take out the yeast from the recipe, your bread will be a gummy brick, so I wouldn't recommend that! If you are intolerant to yeast, you can try making a gluten-free sourdough bread!
Michelle Vest
I have great difficulty finding a receipt to meet all of my needs as far as my ingredients except this one. I found a few things very confusing in this recipe and hoping you could clarify so I can use this recipe. I do not see a full explanation of how to use thethe vinegar. Also the measurements of the water to use for the yeast do not match the main ingredients versus the instructions. I only have powdered psyllium husk that I am planning to use and I also do not understand where you say to add the powder to the dry ingredients but still use all the water? When do I use it? Thank you!
Natasha Levai
Hi Michelle! Thank you for your note, I will need to go in and edit the text. Vinegar is for the yeast to feed on, so you can add it at any point in the recipe. Follow the ingredient list in the recipe card, that is the most correct one, and if there are differences, I will go in and edit those as well! With psyllium husk powder, you can try using it, but in my experience it creates a much wetter dough that doesn't shape as well as the one created with whole husks.
If you use powder, you will need to add it to the dry ingredients and still use all the water, because psyllium powder will eventually absorb that water!
Liz
One of the best gluten free breads I have come across. Had to make some changes to the recipe as the gf flour mix I used required more water. I also added a whole egg. Cooking the bread in a cast iron skillet made the crust delicious. I will definitely make it again. Thanks for the recipe.
Mandi
Is it possible to use 200g brown rice, 100 tapioca and 100g cornstarch? I’m new to GF baking, so many types of flours
Natasha Levai
Yes!
Corina
This bread is so delicious! I am on an avid bread baker, and I'm on an allergy elimination diet so off gluten for a few months. This bread is so yummy that I will probably still bake it sometimes even if it turns out I'm not sensitive to gluten. The crust is so crunchy, and the inside is sooooo soft and drool worthy. I wish I could buy this in the store!!
I always forget to make ice cubes, so I just dump a little water (1/4 cup?) into the hot Dutch oven between the parchment and the pan, and that has worked great with no issues. Oh, and I am also off corn and nightshades, so I replace the potato/corn starch with more tapioca starch. Thank you so much, Natasha!
Nancy Kirsch
Can I use regular all-purpose white flour for this recipe? I am not gluten-free but have lots of psyllium fiber husks to bake bread with!
Thank you
Nancy
Natasha Levai
Hi Nancy! I have never tried this recipe with regular flour! I think it is better to go with a regular bread recipe and add psyllium husk to it than using this recipe with wheat flour.
Margret
Really like this Bread. It’s easy to make, it’s quick to make and it tastes good!
Jane
This is a great recipe to work off of. I got a cast iron pullman loaf shaped dutch oven and in a week we've already baked and eaten two loaves.
To fill the 7 quart dutch oven, I doubled this recipe.
I pre-heated it and rose the bread in the dutch oven as well, as I'm in a northern cold/dry environment.
I used psyllium husk powder as thats what I can find in my area and made with the water to gel ahead of mixing. To get around the clumping, I mixed it with an immersion blender before adding. It worked great!
The flour mix I'm using for this is my egg/nightshade/gluten free flour mix:
3 parts brown rice flour
3 parts corn starch
2 parts otto's cassava flour
2 parts white rice flour
2 parts sweet potato starch (from my asian grocery)