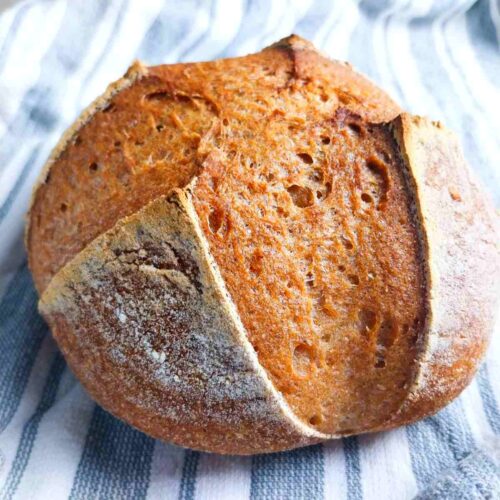
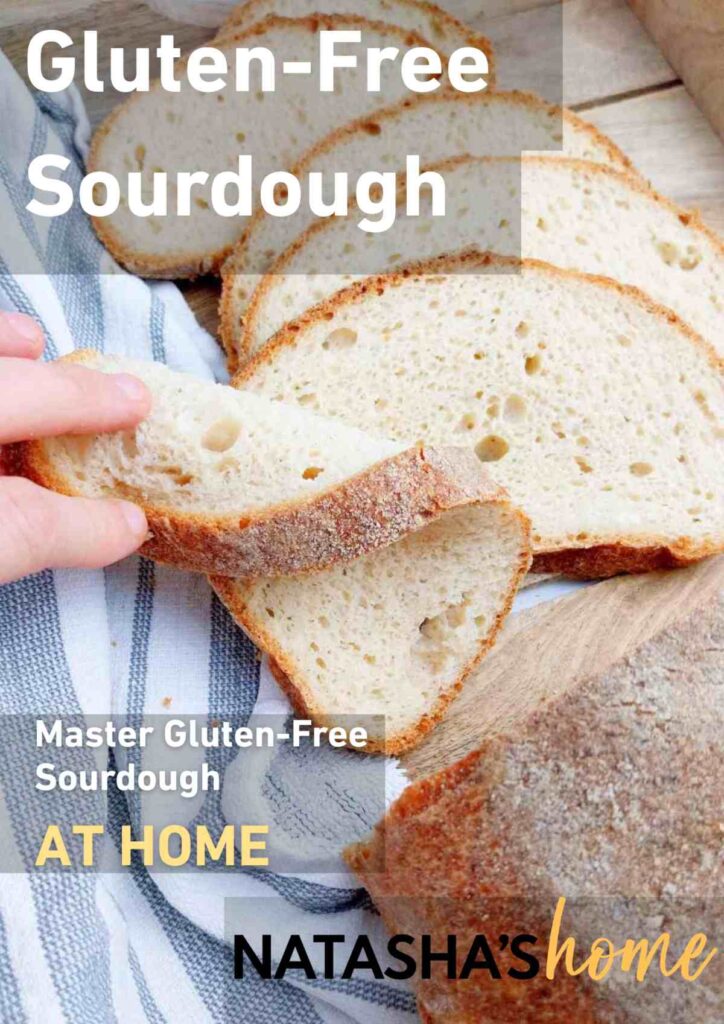
This brown rice sourdough bread came as a result of many requests for a loaf that doesn't have any added starches. This bread is whole-grain, it is crusty on the outside and soft on the inside! If you also like millet flour, make sure to check out my starch-free millet sourdough.

Brown rice has many benefits and is rich in vitamins and minerals. So, making a loaf of hearty bread from it is not a bad idea!
Since this bread doesn't have any gluten in it, it doesn't need any stretching, folding, slapping, or autolysing. Simply mix the dough, shape the loaf, and proceed with the recipe!
If you like experimenting with basic gluten-free flours, check out my soft corn flour sandwich bread recipe!
Jump to:
New to gluten-free sourdough? Watch my 16-minute video tutorial for beginners!
Ingredients for Brown Rice Sourdough
Check the recipe card at the end of the post for the measurements!
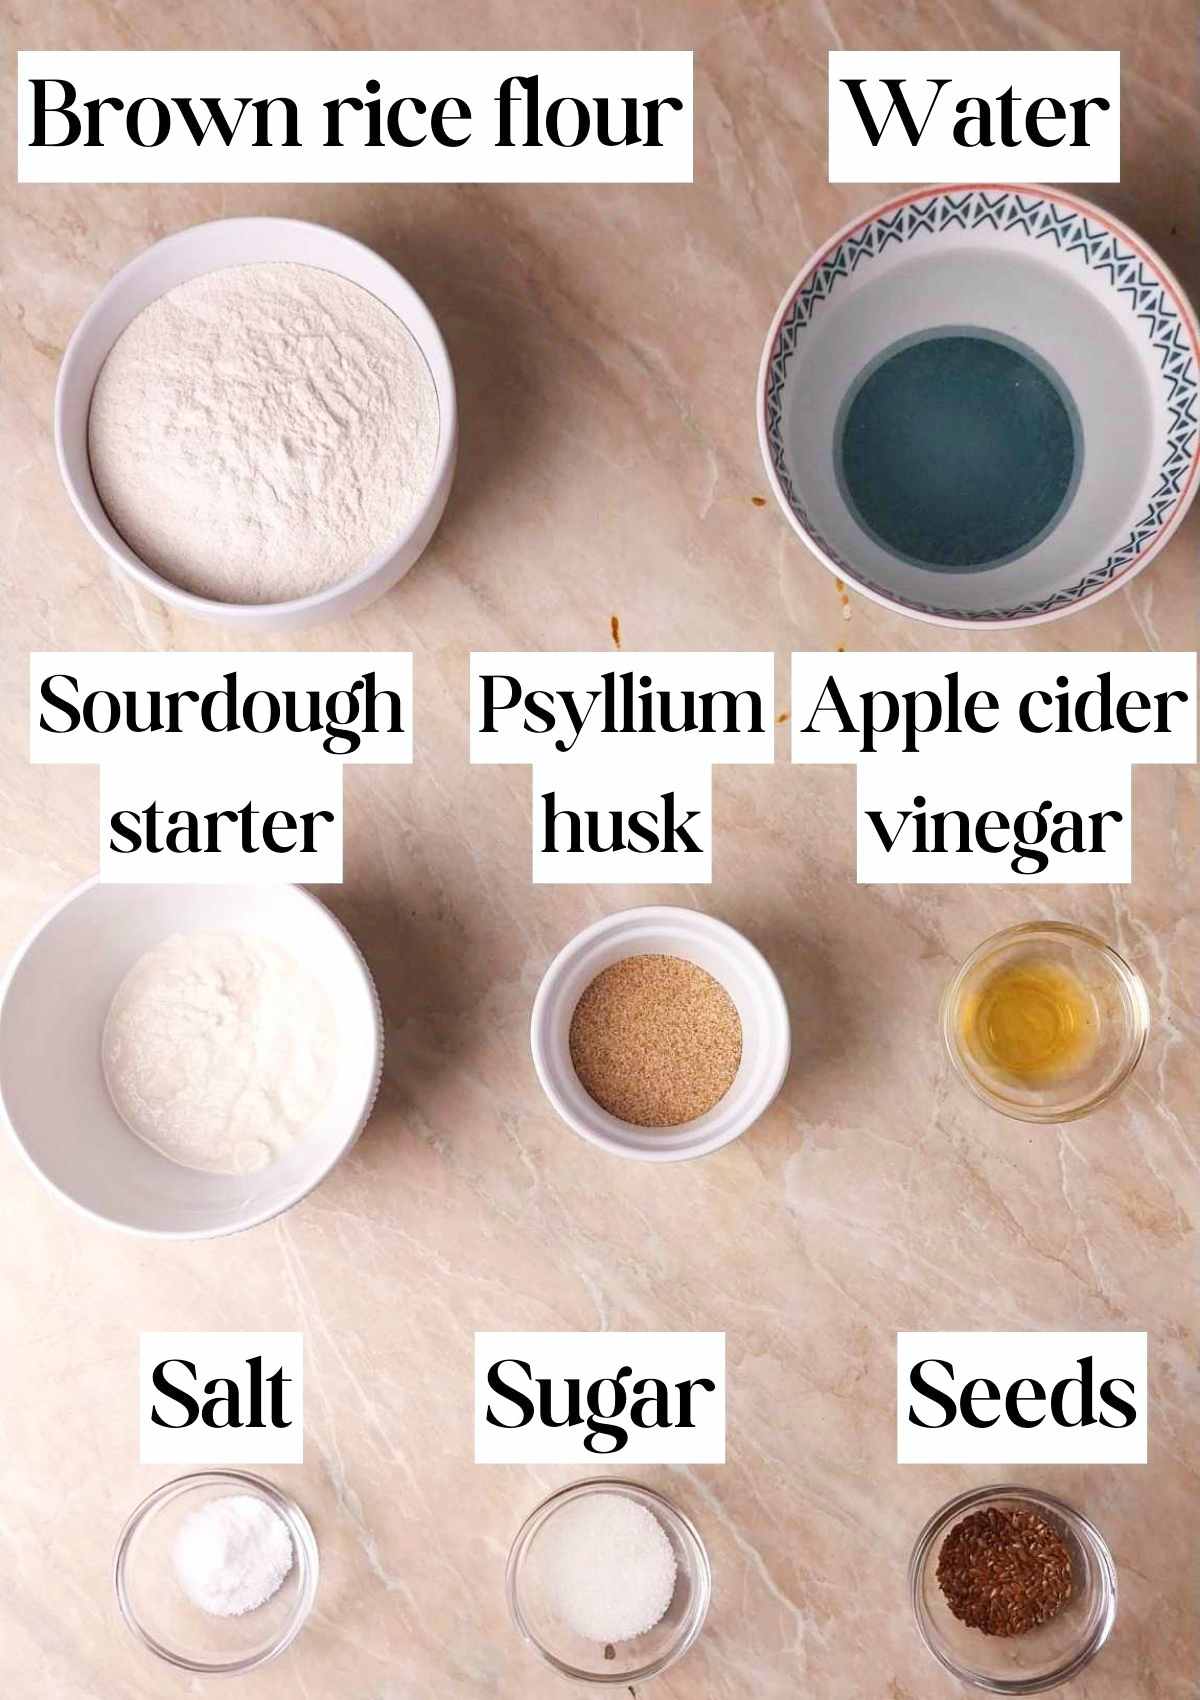
- Brown rice flour - use superfine flour for this recipe. You can also make your own brown rice flour at home!
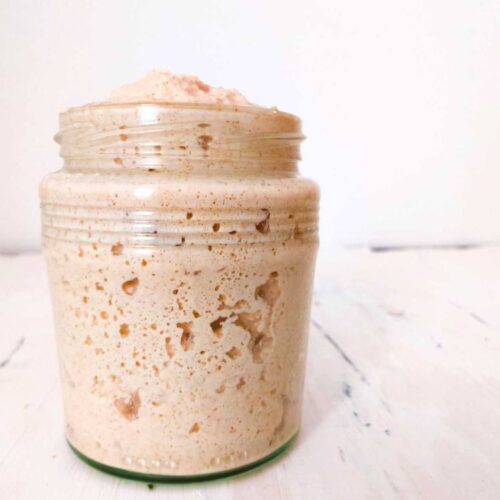
- Gluten-free sourdough starter - use an active starter at its peak activity for this bread.
- Psyllium husk - I recommend using whole husks vs. powder.
- Apple cider vinegar - it is used to help the bacteria in the starter (optional).
- Sugar - also helps the starter do a better job.
Substitutes
Psyllium husk - there are some great psyllium substitutes out there but I don't recommend using any of them for this bread recipe. If you can't have psyllium husk, I recommend you check out a different gluten-free sourdough recipe that calls for xanthan gum or another ingredient!
Sourdough starter - if you don't have a sourdough starter yet, you can make brown rice bread with regular yeast.
How to Make Brown Rice Sourdough
Step 1
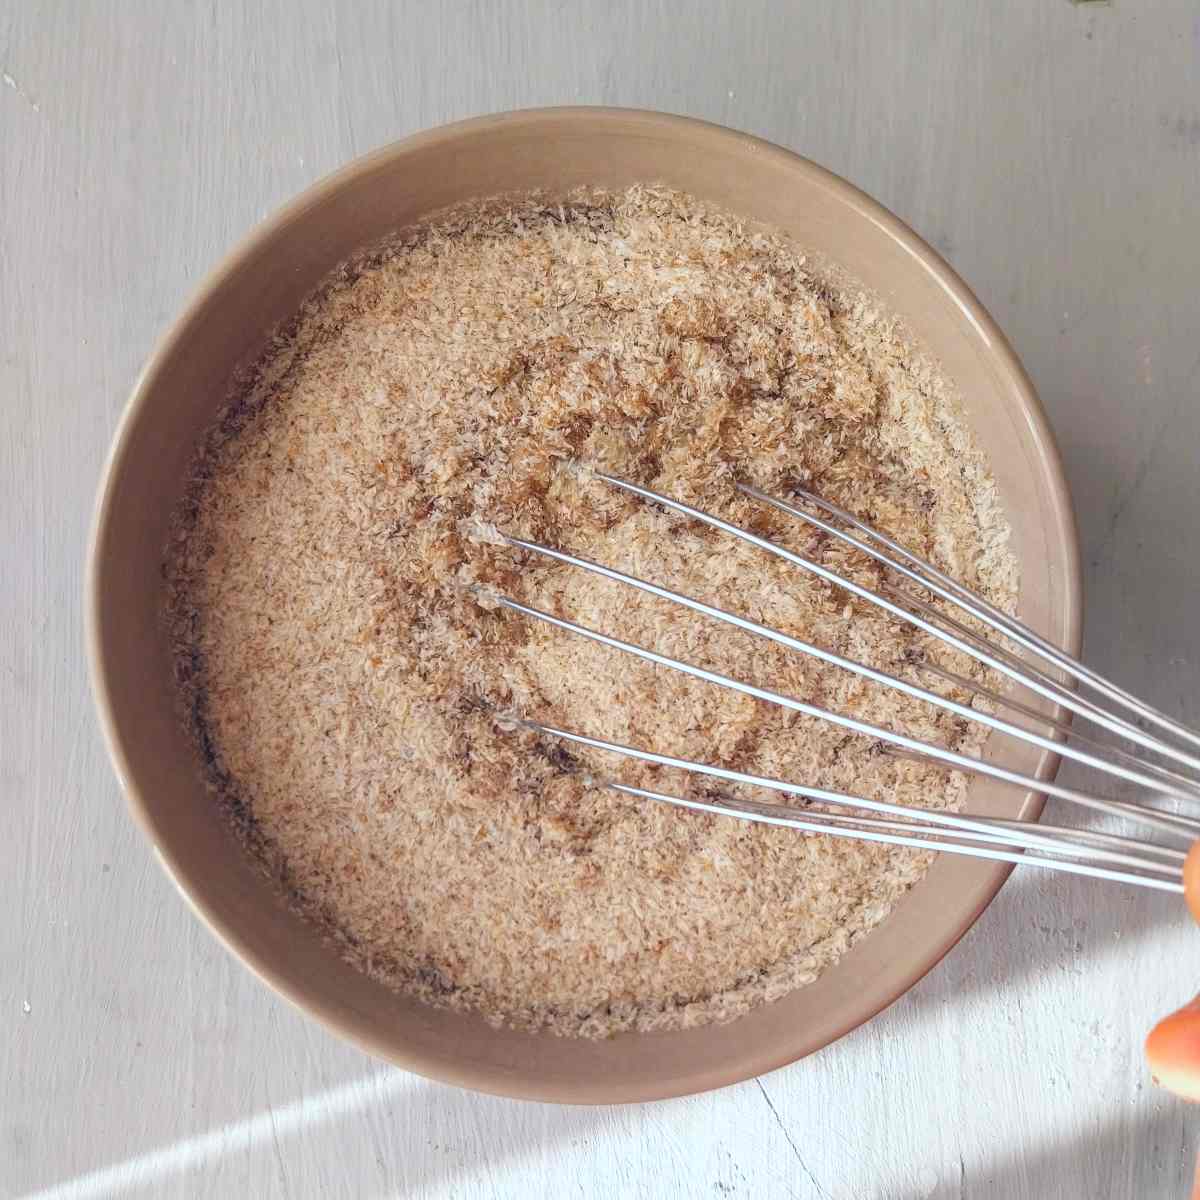
First, add 22g of psyllium husk to a medium-sized bowl along with the 415g of warm water. Whisk the mixture until incorporated.
Add 15g of sugar to the psyllium mix. Set the bowl aside for a couple of minutes.
Step 2
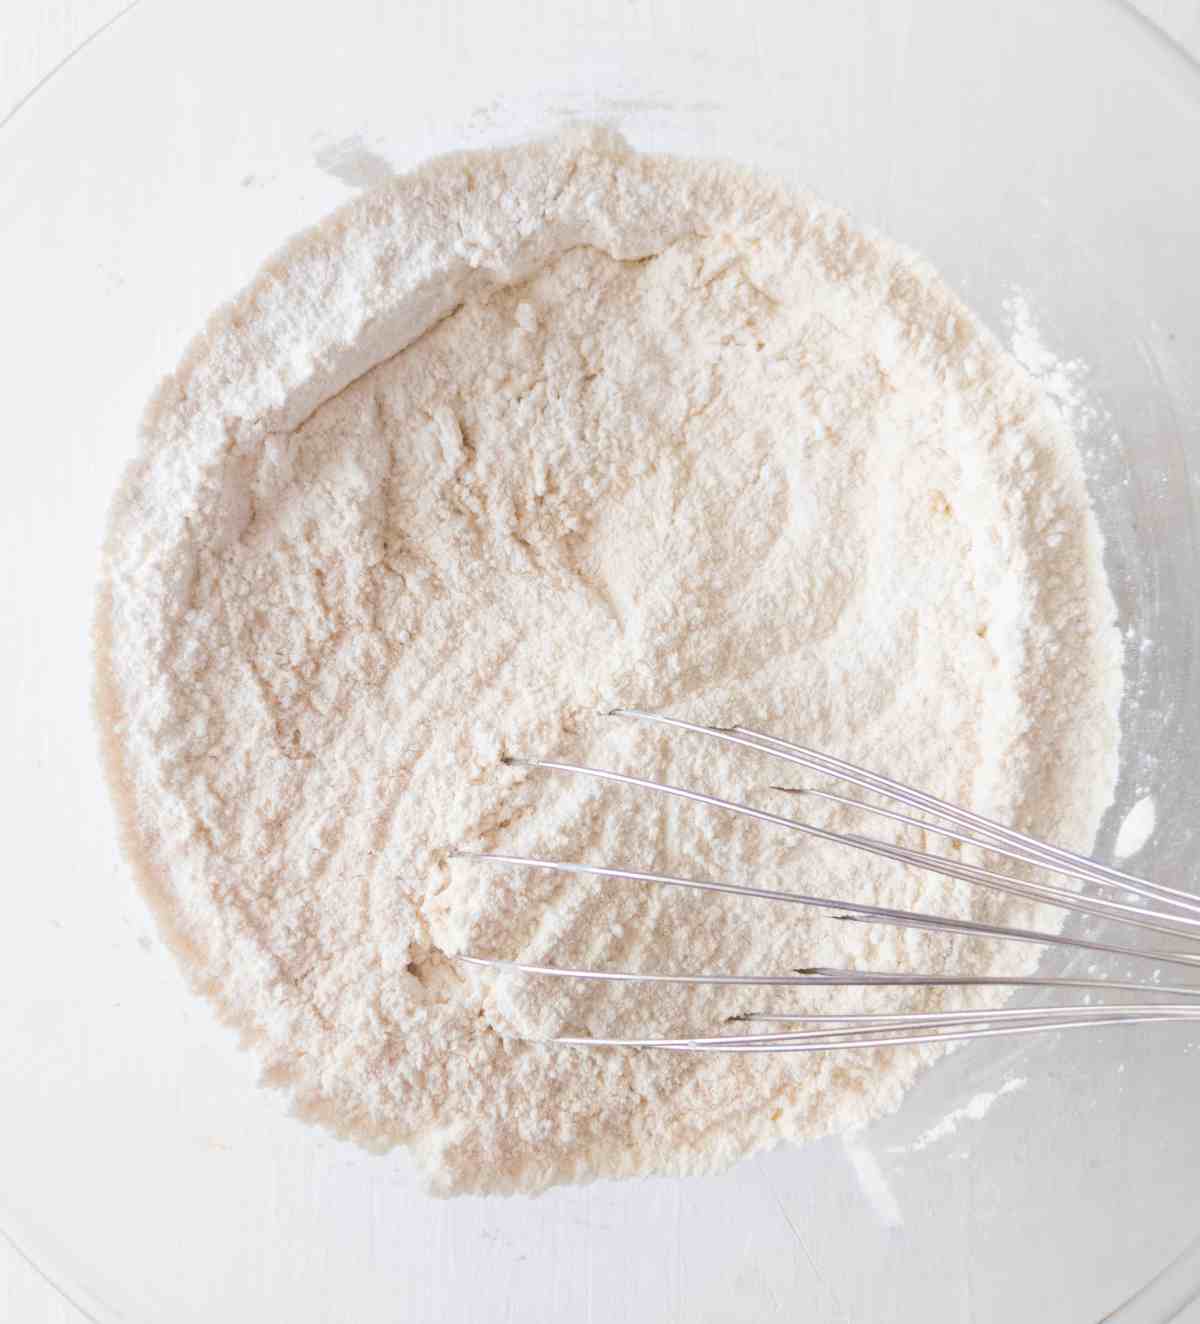
Add 360g of brown rice flour, 2 teaspoon baking powder, and 12g of salt to a large mixing bowl and whisk to incorporate.
Step 3
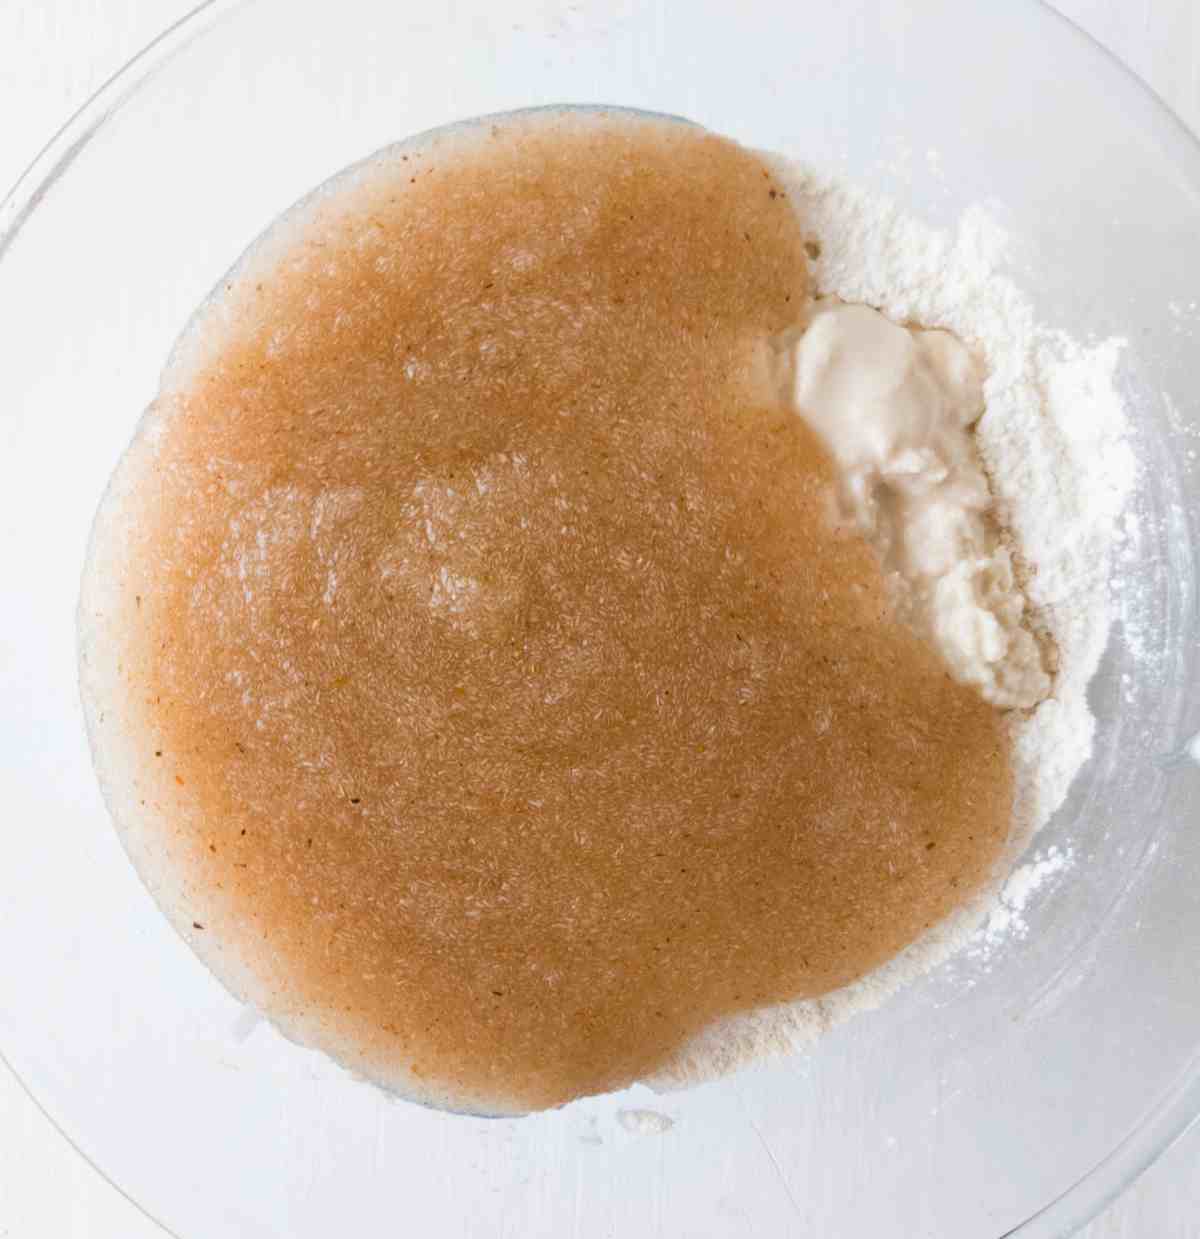
Then, once the psyllium gel starts to thicken, add both the psyllium mix and the starter to the bowl with the dry ingredients.
Mix the dough by hand or use an electric mixer with dough hooks. Continue mixing until all of the ingredients are evenly incorporated.
Step 4
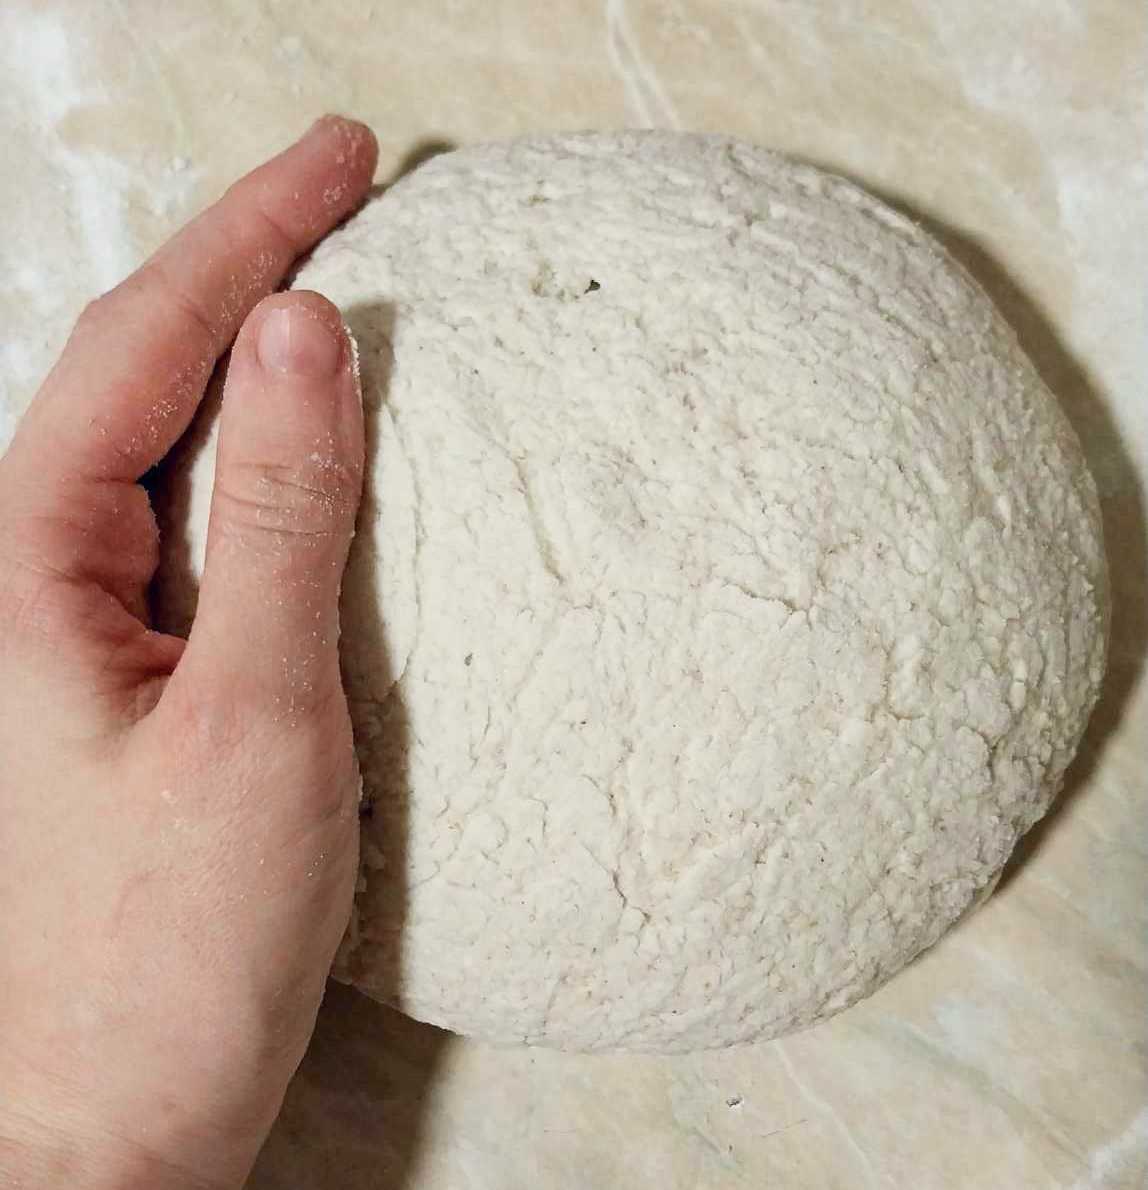
Wash your hands and turn the dough over onto a lightly floured working surface. Shape the dough into a ball and flatten it with your hands.
Step 5
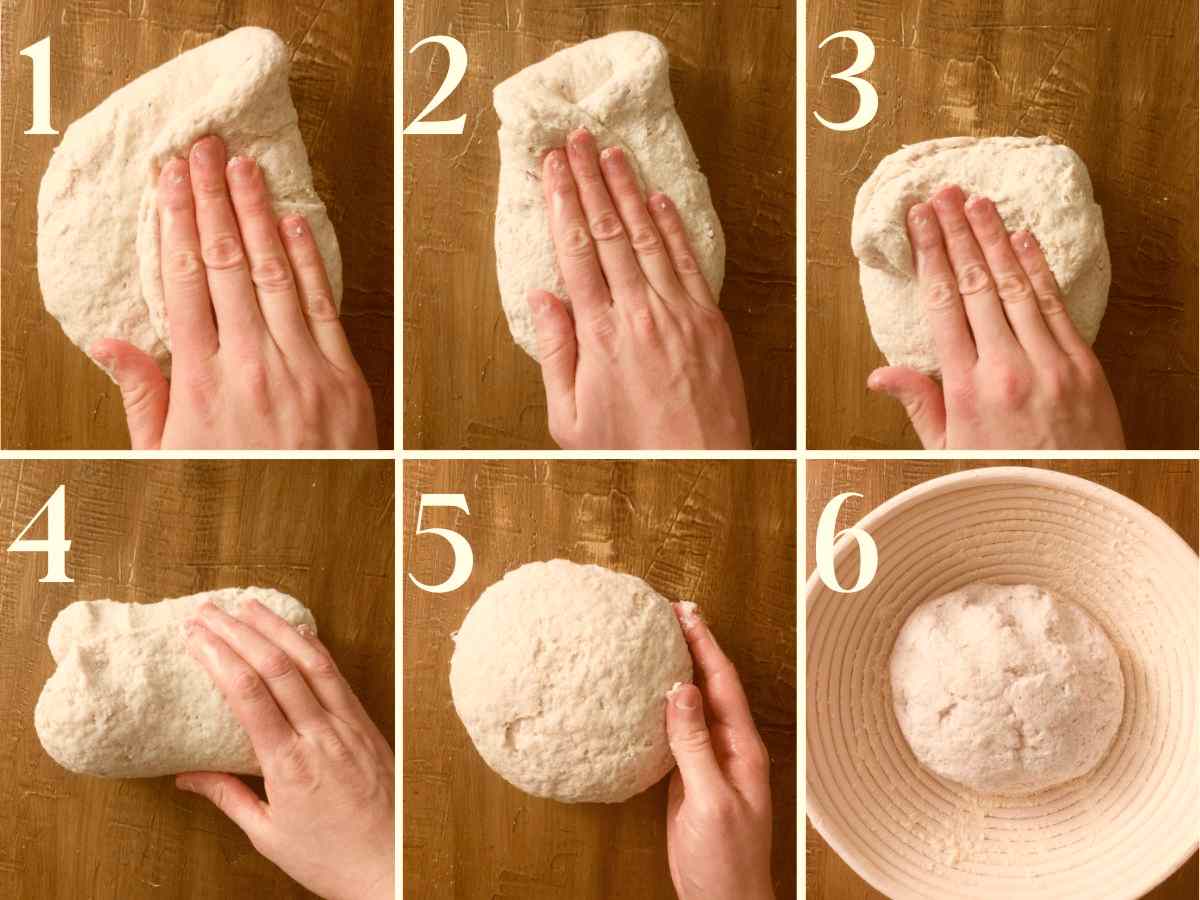
Then, fold each side of the dough onto itself. Take the top and fold it onto the center of the dough and repeat with the bottom and both sides.
Then, flip the loaf onto the other side and shape it into a ball once again by turning the dough around and tucking it under itself.
Step 6

If you want to add seeds to the top, turn the dough top side down onto a plate covered with sesame or linseeds, then transfer the loaf into a proofing basket.
If you don't have a proofing basket, you can use a mixing bowl lined with a kitchen towel. Make sure to flour the kitchen towel as well as the proofing basket to prevent sticking.
Cover the dough with a kitchen towel and let it ferment and proof for about 5 hours at room temperature (74-76F/ 23-24C) or 12 to 18 hours in the refrigerator.
The dough should puff up and rise some but it won't double in size. The time of proofing will largely depend on the temperature in your house.
Step 7
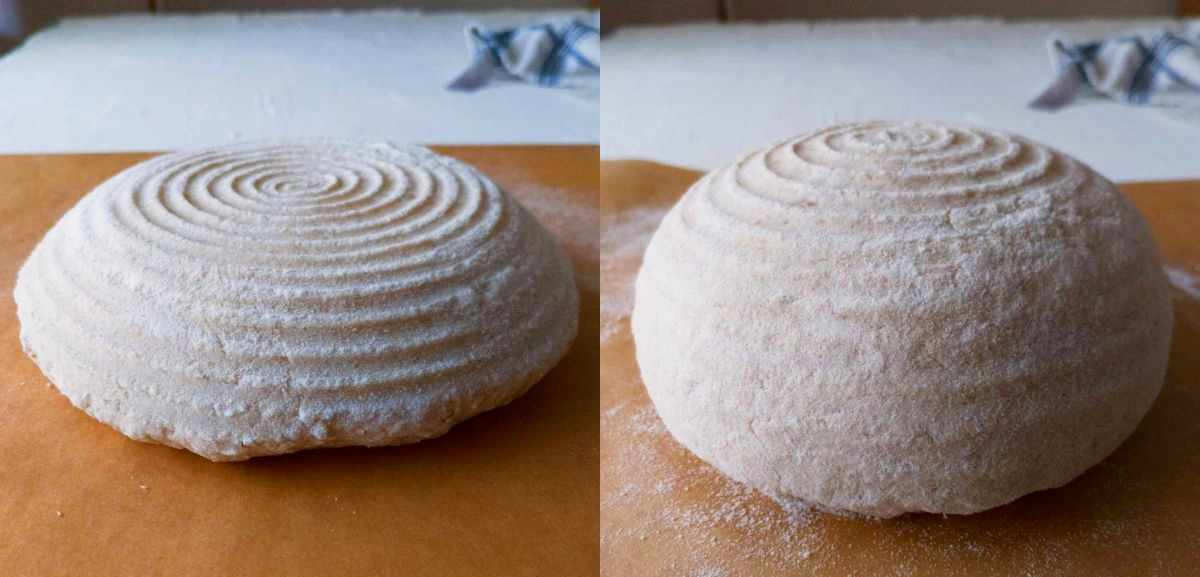
Once the dough is done proofing, gently turn it over onto a working surface and carefully tuck the sides of the loaf under itself by turning it in a circle with your hands. This will allow for a taller loaf.
Step 8
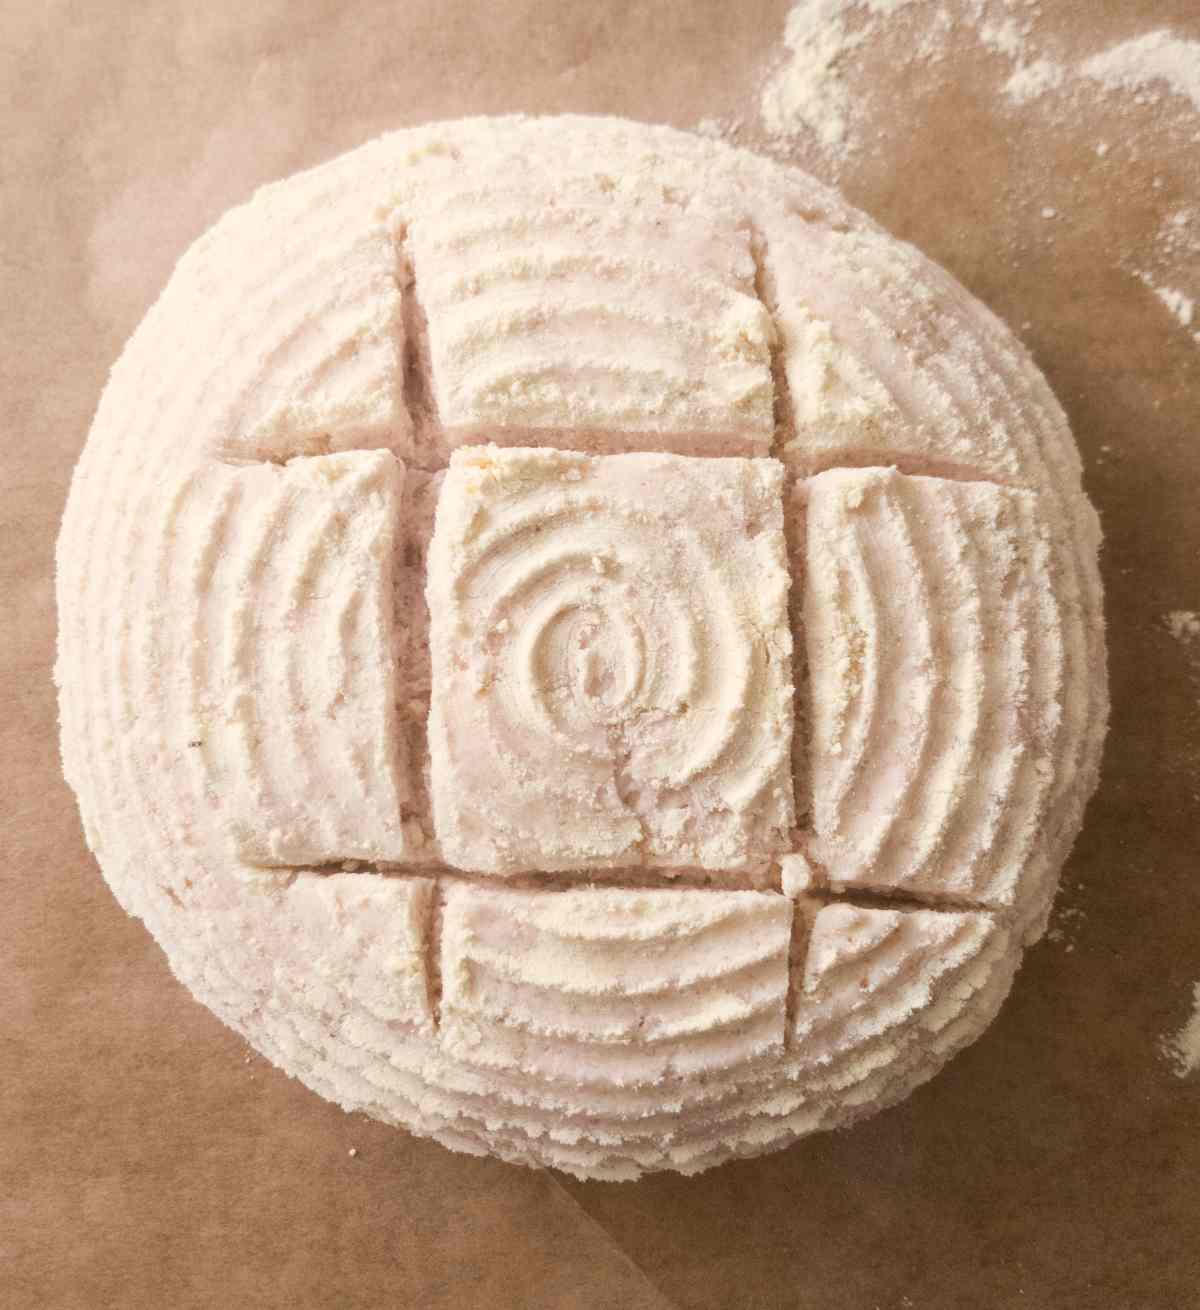
Then, turn the bread onto a piece of parchment paper and score it. Scoring means cutting the surface of the dough with a razor or a sharp knife. You can either make one large cut or create a pattern!
Lower the parchment paper with the bread into the Dutch oven and cover it with the lid.
Place the bread into the cold oven and start preheating it to 450F/230C. Once the oven is preheated, start the timer and bake for 40 minutes.
Then, take the bread out of the Dutch oven and place it onto the oven rack.
Turn the temperature down to 350F/175C and bake for another 30 minutes.
Take the bread out and let it sit on a cooling rack until no longer warm to the touch. Don't cut the bread too soon, or it will be gummier. Use a serrated knife to slice the bread. Enjoy!

Storing and freezing
Store this brown rice sourdough bread at room temperature for 3-5 days and in the fridge for up to a week. Although the bread will get harder in the refrigerator.
Freeze for up to 3 months. I recommend slicing the bread first, then freezing it. To freeze, arrange the slices on a tray or a piece of parchment paper and freeze for 30 minutes.
Then, transfer the slices into a ziplock bag or an air-tight container for the rest of the time.
To reheat, simply place the bread into the microwave for 30 seconds and enjoy!
Expert tips
- Use an active starter at its peak.
- I recommend using a Dutch oven vs. a Pullman pan. It is possible to use a Pullman pan but it won't be as effective. Dutch oven traps the steam that comes from the loaf thus allowing for a more open crumb!
- To prevent the bottom of the loaf from burning, place a baking sheet in the bottom of the oven in the second part of baking.
FAQ & troubleshooting
If your bread is gummy, try baking for longer or decreasing the water in the recipe. Make sure to wait until the loaf cools down before slicing it to avoid gumminess.
The hole is a sign of overproofing. If the bread falls flat after baking or if it has a large hole in between the top crust and the crumb it means you let it proof for too long.
This bread will be denser than others simply because it doesn't have any added starches. However, you should have little air pockets in the dough. If the loaf is too dense, the chances you didn't proof long enough or your starter is not as active.
You might also like these!


Get my new gluten-free sourdough recipes eBook
The top 32 recipes of 2026!

100% Brown Rice Sourdough (Gluten-Free)
Ingredients
Wet ingredients
- 22 grams whole psyllium husks
- 415 grams warm water, not hot
- 15 grams sugar, honey or maple syrup can be used instead
- 70 grams active sourdough starter
Dry ingredients
- 360 grams brown rice flour, superfine
- 12 grams salt
- 2 teaspoon baking powder, check the label to make sure it is gluten-free
For topping (optional)
- sesame seeds or linseeds
SAVE THIS RECIPE!💌
Instructions
Mix the dough
- First, add 22g of psyllium husk to a medium-sized bowl along with the 415g of warm water. Whisk the mixture until incorporated.
- Add 15g of sugar to the psyllium mix. Set the bowl aside for a couple of minutes.
- Add 360g of brown rice flour, 2 teaspoon baking powder, and 12g of salt to a large mixing bowl and whisk to incorporate. Then, once the psyllium gel starts to thicken, add both the psyllium mix and the sourdough starter to the bowl with the dry ingredients.
- Mix the dough by hand or use an electric mixer with dough hooks. Continue mixing until all of the ingredients are evenly incorporated.
Shape the loaf & ferment
- Wash your hands and turn the dough over onto a lightly floured working surface. Shape the dough into a ball and flatten it with your hands.
- Then, fold each side of the dough onto itself. Take the top and fold it onto the center of the dough and repeat with the bottom and both sides. Then, flip the loaf onto the other side and shape it into a ball once again by turning the dough around and tucking it under itself.
- If you want to add seeds to the top, turn the dough top side down onto a plate covered with sesame or linseeds, then transfer the loaf into a proofing basket.
- If you don't have a proofing basket, you can use a mixing bowl lined with a kitchen towel. Make sure to flour the kitchen towel as well as the proofing basket to prevent sticking.
- Cover the dough with a kitchen towel and let it ferment and proof for about 5 hours at room temperature or 12 to 18 hours in the refrigerator.
- The dough should puff up and rise some but it won't double in size. The time of proofing will largely depend on the temperature in your house.
Bake
- Once the dough is done proofing, gently turn it over onto a working surface and carefully tuck the sides of the loaf under itself by turning it in a circle with your hands. This will allow for a taller loaf.
- Then, turn the bread onto a piece of parchment paper and score it. Scoring means cutting the surface of the dough with a razor or a sharp knife. You can either make one large cut or create a pattern!
- Lower the parchment paper with the bread into the Dutch oven and cover it with the lid.
- Place the bread into the cold oven and start preheating it to 450F/230C. Once the oven is preheated, start the timer and bake for 40 minutes.
- Then, take the bread out of the Dutch oven and place it onto the oven rack. Turn the temperature down to 350F/175C and bake for another 30 minutes.
Cool
- Take the bread out and let it sit on a cooling rack until no longer warm to the touch. Don't cut the bread too soon, or it will be gummier. Use a serrated knife to slice the bread. Enjoy!


G says
hi,
why in the big picture there is apple cider vinegar but in the recipe and instructions is not.
thanks.
im trying this recipe today. but I had altered it.
Natasha Levai says
Hi! The older version called for the vinegar, but I found that the results weren't significantly different without it, so I left it out to simplify the recipe for the readers. You are free to add 1-2 tsp of vinegar as some people prefer adding it to allow for a better rise.
Randy Goldenberg says
How do you get the sourdough starter?
Natasha Levai says
Here is a recipe for a starter: https://www.natashashome.com/gluten-free-sourdough-starter/
Stephanie says
Hello! I have a really moist brown rice sourdough starter. That just seems to rise best in my home. Should I reduce the amount of moisture? I also only have psyllium husk powder.
Natasha Levai says
Hi Stephanie! No, you don't need to change your starter, use it as it is. Psyllium powder if fine, make sure to mix it with cold water to prevent clumps. Powder may turn your bread purple, but it is still edible 🙂
Alima Friar says
This looks great. Do I have to use a brown rice sourdough starter?
Thanks for all your efforts testing and finding such delicious GF SD combinations.
Alima
Natasha Levai says
Hi Alima! You can use any starter in this bread.
Abigail says
This is my go-to recipe for bread using my brown rice starter. It’s delicious and has the best crust of any gluten free bread I’ve tried! Natasha, have you tried adding any additional ingredients to this recipe? I was hoping to try a loaf that had a different flavor.
Natasha Levai says
Hi Abigail! It depends on what ingredients you want to add. If you want to add seeds or olives, then it should be fine. If you want to swap flour, that might cause a textural issue. What substitute are you looking for?
Shawna says
I loved this recipe and have been sharing it with lost of my friends.
Natasha Levai says
Hi Shawna! Glad you enjoyed the recipe!
Sarah says
I failed twice with this recipe, then I reduced the water by about 75 grams and it’s in the oven now! Not that we didn’t gobble down the other loaves, I knew I was not doing it right. I’m new to GF baking but used to make sourdough everything! So I just guessed with the amount of water and it looks fantastic so far in the oven.
Thanks
Sarah