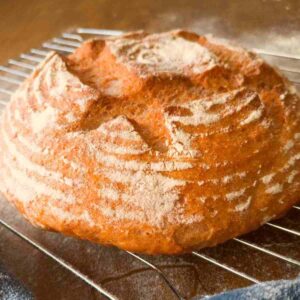
No-Knead Gluten-Free Bread With Psyllium Husk
This easy no-knead gluten-free Dutch oven bread is my go-to! It is soft, fluffy, moist, and stays this way for days!
Equipment
- dutch oven (a cast iron skillet or a regular bread pan will work, too!)
- 1 digital scale (strongly recommended)
Ingredients
Wet ingredients
- 20 grams (3 tbsp) whole psyllium husks, if using powder, use 18 grams
- 435 grams (1¾ cups + 2 tbsp) water, room temperature or warm
- 15 grams sugar, or honey/maple syrup
Dry ingredients
- 100 grams (⅔ cup) brown rice flour or sorghum flour
- 100 grams (⅔ cup) white rice flour
- 100 grams (¾ cup + 2 tbsp) tapioca starch or arrowroot starch
- 100 grams (½ cup + 1 tbsp) potato starch or cornstarch
- 12 grams (2 tsp) salt
- 7 grams (1 packet) instant yeast
Instructions
- Combine whole psyllium husks, water, and sugar in a medium-sized bowl and whisk to incorporate. Set aside.
- Add the dry ingredients to a large mixing bowl (flour, yeast, and salt). Whisk to incorporate.
- Once the psyllium husk turns into a gel (1-2 minutes), add it to the dry ingredients and mix the dough.You can mix the dough by hand, with an electric mixer, or with a wooden spoon. It will be sticky but workable!
- Transfer the dough onto a lightly floured working surface and flatten it into a disc. Shape the dough by folding each side of the dough disc onto its middle, then flip it.Shape the dough into a ball by turning it around with your hands and tucking the sides under. See the pictures in the post or the video down below for visual instructions!
- Place the dough into a floured proofing basket or a mixing bowl lined with a kitchen towel. If you are baking the bread in a bread pan, place it into the greased bread pan. Cover the dough with a kitchen towel.Leave the dough to rise for about 30-60 minutes in a draft-free area. Keep an eye on the bread, you don't want it to rise too high (or double in size) or it will fall during baking.
- Once the loaf is done proofing, carefully transfer it onto a piece of parchment paper, score (cut the surface with a razor) about 1inch/2.5cm deep, and carefully lower the loaf into the Dutch oven (unless you're baking in a bread pan).Place the lid onto the Dutch oven and transfer it into the oven. Start preheating the oven to 450F/230C. Once the oven is ready, start the timer and bake for 40 minutes. Then, carefully remove the loaf from the Dutch oven, transfer it to the oven rack, lower the temperature to 350F/180C, and keep baking for another 30 minutes.
- Let the bread cool completely (until no longer warm to the touch) and enjoy!
Video
Notes
– Don’t use cold or hot water. The yeast will do best with warm or room-temperature water.
– For the best results use a digital scale to measure your ingredients.
– If the dough is sticky when shaping, grease your hands with some oil!
– You can bake the bread in a Dutch oven, cast iron skillet, a bread pan, or any other dish you like. The results will be slightly different based on what you bake in but the bread will be just as soft, moist, and delicious!
– Wait until the bread cools down before slicing it as the crumb is still setting as the bread cools.
Nutrition
Serving: 3slicesCalories: 404kcalCarbohydrates: 91.6gProtein: 7.9gFat: 1.7gSaturated Fat: 0.6gSodium: 1477mgPotassium: 103mgFiber: 16gSugar: 7.5gCalcium: 4mgIron: 1mg
Tried this recipe?Let us know how it was!