Soft & Fluffy Gluten-Free Sourdough Bread
This is my ultimate gluten-free sourdough that has a soft crust, fluffy crumb, and is larger than an average gluten-free loaf!
Servings: 1 loaf
Calories: 2300kcal
Cost: 5$
Equipment
- A Dutch oven, a cast iron skillet, pizza stone, or baking sheet could be used instead but not recommended.
- A kitchen scale, highly recommended
- A banneton basket, optional
- A razor or bread lame
Ingredients
Psyllium gel
- 20 grams whole psyllium husks or use 18g if using powder
- 260 grams water, room temperature
Dry ingredients
- 130 grams tapioca starch, or arrowroot starch
- 100 grams potato starch, or cornstarch
- 170 grams sorghum flour, brown rice, millet, or oat flour can be used istead.
- 15 grams sugar or honey/maple syrup
- 7 grams xanthan gum, or guar gum. Don't leave it out, this ingredient is crucial!
- 8 grams baking powder, NOT baking soda
- 12 grams sea salt
Wet ingredients
- 120 grams milk, use plant-based for dairy-free
- 2 large-medium eggs, room temperature
- 50 grams sunflower oil, or any other neutral vegetable or seed oil
- 60 grams gluten-free sourdough starter, active, not from the fridge
Instructions
- Add water and psyllium husk to a medium-sized bowl and whisk to incorporate.Set the bowl aside to let the psyllium gel form (2 min).20 grams whole psyllium husks, 260 grams water,
- In a large mixing bowl combine all of the dry ingredients including sugar and whisk thoroughly to incorporate.130 grams tapioca starch, , 100 grams potato starch,, 170 grams sorghum flour,, 15 grams sugar, 7 grams xanthan gum, , 8 grams baking powder,, 12 grams sea salt
- Finally, add all the wet and dry ingredients together and mix using an electric mixer with dough hooks.120 grams milk, , 2 large-medium eggs,, 50 grams sunflower oil,, 60 grams gluten-free sourdough starter,
- I recommend mixing for at least 5 minutes to ensure a smoother dough. Alternatively, you can mix with hands or a wooden spoon but the loaf might turn out less smooth on the top.The dough will be very sticky but don't add any extra flour to it!
- Turn the dough onto a floured working surface and shape into a ball. Grease your hands with some oil to prevent sticking or use extra flour for dusting.I like my bread in a batard shape better but you can bake it as a boule, too.
- Dust a banneton basket with flour or use a mixing bowl lined with a dusted kitchen towel.Turn the dough inside down into the basket/bowl and press it in to create a flat surface. Cover the dough and leave to proof for 5-7 hours or overnight (12-18h) in the refrigerator.I recommend proofing at about 75F/24C for the best results. Alternatively, you can place the dough in the oven with the light on. The poke test, unfortunately, doesn't work with gluten-free sourdough.
- The dough will puff up some but it won't double in size, that is okay!Carefully turn the dough over onto a piece of parchment paper and score. Scoring means cutting the top of the dough with a sharp razor to create a pattern and aid the oven spring.
- Then, gently lower the parchment with the loaf into a cold Dutch oven, close the lid, and transfer to a cold oven.Start preheating the oven to 450F/230C and once preheated, start the timer for 40 minutes. After the first 40 minutes, take the lid off the Dutch oven, lower the temperature to 350F/175C, and bake for an additional 30 minutes.
- Once the bread is done, transfer it to a cooling rack and let it sit until no longer warm to the touch. Slice with a serrated knife and enjoy!
Notes
Storage
-
- The bread will keep for 3-4 days at room temperature in a bread box or a textile bag. But I prefer to freeze my bread because sometimes it will get moldy in a bread box.
-
- To freeze, slice the bread and line the slices with parchment paper to prevent sticking, then transfer them to a freezer bag. Keep for 3-4 months.
-
- To defrost, simply pop the slices into a microwave for a couple of minutes!
-
- Score the dough deep (0.5-1in/1-2cm) if making one cut and do shallow cuts if creating a more elaborate pattern.
-
- Place a couple of foil rings in the bottom of your Dutch oven to prevent bread from burning.
-
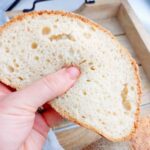
- Large hole between the top crust and the crumb - this is a sure sign of overproofing. Next time bake the bread a bit sooner!
-
- Dense crumb could be due to underproofing, using a different type of flour, or substituting ingredients.
-
- Gumminess happens when you underbake or underproof your bread. It also might happen if you play around with ingredients and don't follow the recipe exactly.
-
- The bottom of the bread burns - refer to the section above to see how I solve that issue in my Dutch oven.
-
- Feed your starter the night before (the later the better).
-
- 8 am - mix & proof the dough.
-
- 1-2 pm - bake according to instructions.
-
- Feed your starter in the morning when you wake up.
-
- Mix the dough before going to sleep or in the late afternoon.
-
- Ferment the dough overnight in the refrigerator for 12-18 hours and bake in the morning according to instructions.
Nutrition
Serving: 1loaf | Calories: 2300kcal | Carbohydrates: 420g | Protein: 29g | Fat: 62g | Saturated Fat: 8g | Polyunsaturated Fat: 5g | Monounsaturated Fat: 45g | Cholesterol: 22mg | Sodium: 5829mg | Potassium: 1937mg | Fiber: 40g | Sugar: 28g | Vitamin A: 205IU | Vitamin C: 4mg | Vitamin D: 1µg | Calcium: 782mg | Iron: 11mg
