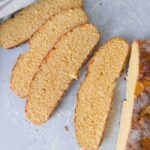
The Best Chickpea Bread (Vegan & GF)
This is the best gluten-free chickpea bread made with yeast, psyllium husk, chickpea flour, and starches. A great option for a gluten-free and vegan diet!
Servings: 1 loaf
Calories: 1647kcal
Cost: 3
Ingredients
- 200 grams chickpea flour
- 200 grams starch of choice potato, cornstarch, arrowroot, or tapioca starch will work well
- 300 grams water at room temperature
- 20 grams psyllium husk 15 grams if using powder, avoid fine powder, more details in my psyllium husk 101 article!
- 7 grams instant yeast
- 15 grams sugar
- 12 grams apple cider vinegar optional, helps the yeast
- 10 grams salt
Instructions
- Add water, psyllium husk, yeast, sugar, and apple cider vinegar to a small bowl and whisk to combine. Let the mixture sit for a couple of minutes to create psyllium gel. If you are using dry active or instant yeast, use warm water to activate the yeast.
- Add chickpea flour, starch, and salt to a large mixing bowl and whisk until incorporated. You can use a stand mixer or a hand mixer for combining the flour and, later, the dough, although I find it sufficient to mix by hand (fewer dishes to wash!).
- Add the wet ingredients to the bowl with the dry ones and mix until the dough comes together and you don't see flour streaks anymore. Turn the dough onto a floured working surface and shape it into a ball. Transfer the dough onto a piece of parchment paper, cover it with a tea towel, and let the dough rise for 30-40 minutes. You don't want the dough to double in size as in that case, it will fall during baking. Rather, wait until it rose by half its size (about 30 minutes) and start baking!
- About 15-20 minutes into the rising, start preheating the oven to 350F/175C. Place a baking dish with water on the bottom of the oven to allow for more steam during baking. Once the loaf is done rising, score the dough with a razor or a sharp knife. Scoring is basically cutting the dough to determine where the steam will escape creating a better pattern on the bread.
- Place the bread in the oven and bake for 40-60 minutes (until a toothpick comes out without too much raw dough sticking to it.) After about 25-30 minutes of baking check the bread and if it has become dark brown, cover it with foil and continue baking until done! Transfer the baked chickpea bread onto a cooling rack and wait until the bread is no longer warm to the touch.
Notes
- Keep an eye on the bread to make sure it doesn't burn before it is done. If it starts browning too much, cover it with foil.
- You can bake this bread on a regular sheet pan or a cast iron Dutch oven. I tried the Dutch oven at 400F/220C and my bread almost burned within 40 minutes, although it baked through.
- Don't wait until the bread doubles in size. In my experience, if you start baking the bread before it doubled, it will most likely be nice and puffy while baking it at its peak rise will deflate the bread a little bit although it won't ruin it!
Nutrition
Serving: 1loaf | Calories: 1647kcal | Carbohydrates: 318g | Protein: 61g | Fat: 15g | Saturated Fat: 2g | Polyunsaturated Fat: 6g | Monounsaturated Fat: 3g | Sodium: 4133mg | Potassium: 3771mg | Fiber: 50g | Sugar: 44g | Vitamin A: 82IU | Vitamin C: 8mg | Calcium: 294mg | Iron: 13mg
