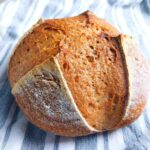
Gluten Free Vegan Sourdough Bread
If you miss eating soft, fluffy, and wholesome bread, you are in the right place! This gluten-free sourdough is a great option for those with celiac or gluten intolerance.
Servings: 1 loaf
Calories: 1544kcal
Cost: 6$
Ingredients
Wet ingredients
- 20 grams (3 tbsp) psyllium husk, whole husks, if using coarse powder use 20 grams, fine powder - 17g. For more details check my psyllium husk 101 article
- 410 grams (1⅔ cups) water, room-temperature
- 15 grams (1tbsp + 1tsp) sugar/maple syrup, helps the sourdough bacteria
- 70 grams (¼ cup) active sourdough starter
Dry ingredients
- 85 grams (¾ cup) tapioca starch or arrowroot starch
- 95 grams (½cup + 1tbsp) potato starch or 95g (¾ cup) cornstarch
- 180 grams (1⅓ cups) sorghum flour
- 12 grams (2 tsp) salt
- 2 teaspoon baking powder, check the package to make sure it is gluten-free
Instructions
- Combine psyllium husk, sugar, and room temperature/warm water in a medium-sized bowl, whisk to incorporate, and set aside.
- In a large mixing bowl combine all the dry ingredients (sorghum flour, starches, baking powder, and salt) and whisk to incorporate.
- Once psyllium forms a gel, add it to the bowl with the dry ingredients.Add mature gluten-free sourdough starter to the bowl and mix the dough thoroughly.I like to use an electric mixer for this step but you can also do it by hand if you prefer.
- Once the dough is well incorporated, turn it over onto a lightly floured working surface and flatten it into a disc.Fold each side of the disc onto its middle, flip the dough, and shape it into a ball (refer to the pictures in the post for visual instructions).
- Flour the proofing basket or bowl lined with a kitchen towel and place the dough in it. Press the dough into the basket to create a flat top.Cover the basket with a kitchen towel and leave to rise at room temperature for about 5 hours or in the refrigerator overnight (12-18 hours).The dough should puff up during rising but it won't double in size. Don't worry if the dough doesn't rise a whole lot, it will do most of its job in the oven.
- Once the dough has been proofed, gently turn it over onto the working surface.Carefully shape the dough into a tighter ball by turning the dough around and tucking its sides under itself.Don't push the dough too hard to avoid losing the air bubbles formed during fermentation.
- Score the dough with a razor, a lame, or a sharp knife (be creative and make a nice pattern!). Scoring allows for a better oven spring.Transfer the dough onto a piece of parchment paper and gently lower it into the cold Dutch oven and put the lid on.Place the Dutch oven with the bread into the oven and start preheating it to 450F/230C. Once the oven is heated, simply bake for 40 minutes without opening the oven.Then, open the oven, take the lid off, and transfer the loaf onto the oven rack. Turn the temperature down to 350F/175C and bake for another 30 minutes.Transfer the bread onto a cooling rack and wait until it is no longer warm to the touch to slice it. Enjoy!*If the bottom of your bread tends to burn, place a baking sheet in the bottom of the oven once you take the bread out of the Dutch oven.
Video
Notes
- Use room temperature water to help the sourdough starter work better.
- Keep the dough in a warm spot during proofing.
- For a more sour loaf proof the dough overnight in the refrigerator. Overnight means about 12-18 hours.
- Adding ice to the bottom of the Dutch oven helps create extra steam and encourages the oven spring.
- If the bread is too wet upon slicing, simply toast it or let it sit at room temperature until it dries out a bit.
Nutrition
Serving: 1loaf | Calories: 1544kcal | Carbohydrates: 351.9g | Protein: 23.5g | Fat: 6.2g | Saturated Fat: 0.2g | Sodium: 4683mg | Potassium: 909mg | Fiber: 33.2g | Sugar: 18.1g | Calcium: 382mg | Iron: 11mg
