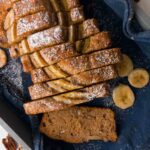
Gluten-Free Sourdough Discard Banana Bread
This gluten-free sourdough banana bread is fluffy, soft, and full of banana flavor!
Servings: 1 loaf
Calories: 2563kcal
Cost: 5
Equipment
- 1 baking bread pan
- 2 large mixing bowls
- 1 wisk
- 1 potato masher
Ingredients
- 220 grams bananas ripe
- 2 eggs room temperature
- 2 tablespoon plant-based milk any type of milk will work
- 73 grams butter
- 130 grams gluten-free sourdough starter discard fresh or old from the fridge, don't use the discard from a starter that is less than 1 week old.
- 100 grams white sugar
- 50 grams brown sugar
- 214 grams gluten-free flour I used my rice flour blend which for this recipe would be: 53g brown rice flour, 54g white rice flour, 107g starch of choice (potato/cornstarch/tapioca/arrowroot)
- 7 grams baking powder check the package to see if it's GF
- ½ teaspoon xanthan gum
- ½ teaspoon salt
- 4 grams cinnamon
- 52 grams pecans or walnuts crashed
Instructions
- Preheat the oven to 350F/175C. In a large mixing bowl mash bananas with a potato masher or with a fork. You can leave bits of banana in, it doesn't have to be completely pureed.220 grams bananas
- Place butter in a small saucepan and melt over medium-low heat.73 grams butter
- Once the butter is melted, stir it continuously to prevent burning. Once the butter has been browned, turn off the heat and continue stirring the browned butter for another minute. Brown butter adds a nutty flavor to the banana bread.
- Add eggs, milk, sourdough discard, and sugars and mix well. Then, slowly pour the browned butter while continuously stirring the mixture.2 eggs, 2 tbsp plant-based milk, 130 grams gluten-free sourdough starter discard, 100 grams white sugar, 50 grams brown sugar
- Then, combine gluten-free flour, cinnamon, baking powder, and xanthan gum (if using) in a separate bowl and whisk to incorporate.214 grams gluten-free flour, 7 grams baking powder, ½ tsp salt, 4 grams cinnamon, ½ tsp xanthan gum
- Finally, add dry ingredients to the bowl with wet ingredients and whisk to combine but avoid overmixing. Mix until you don't see white streaks of flour in the batter. Then fold in the crushed nuts.52 grams pecans or walnuts
- Cover the bowl with a kitchen towel and let the batter sit for 5-10 minutes. During this time the flour will absorb liquids and the batter will be more stable.
- Grease a bread baking pan (9x5 inch, 23x12cm) with lard, butter, coconut oil, or any other fat you have on hand. Then, transfer the banana bread batter into the bread pan using a rubber spatula. Spread the batter evenly in the pan with the spatula and add sliced banana to the top for decoration (optional).
- Bake for about 1 hour or until the bread is firm to the touch and the toothpick comes out with 1-2 crumbs. Keep checking on the bread at the 30,40, and 50-minute mark to make sure it is not browning too much on the top. If it is, cover the banana bread with foil and continue baking (I did not have to do that but all ovens are different!).
- Once the bread is baked, separate the sides of the bread from the bread pan using a metal spatula, then carefully transfer the banana bread onto a cooling rack. If you don't have a cooling rack, place the banana bread in a way that all sides are getting aired out until completely cooled down. If you don't air out the bread during the cooling stage, it will get soggy on the bottom!
- Serve with some butter, maple syrup, or honey! Enjoy!
Notes
- Use a digital scale to weigh your gluten-free flour. It is easy to overpack flour when using cups and every extra gram will alter the texture of the banana bread! After all, you only need to buy a digital scale (12$) once and it will serve you well for many years to come!
- Make sure your starter is not watery. You can use any starter (fed, unfed, new, old) as long as it is not more than 100% hydration, meaning that the amount of water is not more than the amount of flour (by weight). Generally, you want your starter to be like a thick paste. More on that in my gluten-free rice sourdough starter post.
- Cool the banana bread completely before slicing as the crumb is still setting during the cooling time. If you cut into it too soon the bread might end up denser and more crumbly!
- Use ripe bananas for the best flavor! You can even use black bananas (as long as they are not moldy!).
- If you find this banana bread is not sweet enough for you, serve it with sliced banana, maple syrup, or jam (I have a great elderberry jam recipe!).
Nutrition
Serving: 1loaf | Calories: 2563kcal | Carbohydrates: 378g | Protein: 42g | Fat: 113g | Saturated Fat: 44g | Polyunsaturated Fat: 16g | Monounsaturated Fat: 41g | Trans Fat: 2g | Cholesterol: 484mg | Sodium: 2576mg | Potassium: 1247mg | Fiber: 34g | Sugar: 186g | Vitamin A: 2543IU | Vitamin C: 20mg | Vitamin D: 14µg | Calcium: 778mg | Iron: 12mg
