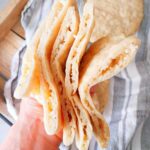
Gluten-Free Lebanese Bread (Pita Pockets)
These gluten-free pita breads are soft, flexible, stable, and all together delicious! It has never been so easy to make gluten-free bread.
Servings: 12 half-pita pockets
Calories: 96kcal
Cost: 5
Ingredients
- 290 grams water
- 10 grams active dry yeast or 20 grams of fresh yeast
- 20 grams whole psyllium husk use 18 grams if using powder
- 12 grams sugar or maple syrup, honey, coconut sugar
- 276 grams gluten-free flour I used my own blend: 25% brown rice flour, 25% white rice flour, and 50% starch of choice.
- 8 grams sea salt
- 1½ tablespoon olive oil any other vegetable oil will work, too
Instructions
- First, we need to make psyllium gel by combining water and psyllium husk in a medium-sized bowl. If you are using active dry yeast, you will need some of the water for activating the yeast. So, take 100g of water and warm it up to about 100F/40C. Then, add the yeast and sugar and let it sit for 10 minutes. Yeast should look bubbly and frothy if it is indeed active. If it doesn't look active, get a fresh pack for this recipe!Use the remaining water to form psyllium gel. To make the gel, you simply need to mix psyllium husk and water and let it sit for a couple of minutes.
- Combine all of the dry ingredients in a separate large mixing bowl and stir to incorporate.
- Then, once psyllium gel forms (1-2 minutes), add it to the dry ingredients, then add oil and yeast. Knead the dough by hand until smooth or use an electric mixer with a dough hook or a paddle attachment to do the work for you! You should have a thick but elastic dough.
- Shape the dough into a ball and cover the bowl with a kitchen towel. Place it in a draft-free area and let it rise for 45-60 minutes until it increases in volume and puffs up. The perfect temperature for proofing dough is 68-75F/20-24C.
- Once the dough is ready, start preheating the oven to 450F/240C. Turn the dough oven onto a lightly floured working surface and divide it into six equal parts. I like using a bench scraper for this!
- Then, take one piece and shape it into a small ball.
- Then, flatten it into a circle using a rolling pin. It should be about 6in/15cm in diameter. My bench scraper actually has in/cm indicator on it, so I don't have to use a ruler to know my pitas are the right size! These pitas will be a little bit thicker than all the other recipes because I find that if I roll my pita ¼ inch thin, it becomes quite hard to create pockets without cracks.
- Repeat with all the other pieces of the dough and let them rest until the oven is ready. Once the oven is preheated, arrange two pitas on a baking sheet lined with parchment paper and bake for 5-7 minutes. Be careful not to overcook because overcooking will dry out the dough and make the bread less tender and soft.
- Your pitas won't pop because they are thicker than normal. If you would like them to pop, roll them out no thicker than ¼ of an inch. Once ready, let the pitas cool before creating pockets. No need to place them on a wire rack!
- Once the pitas have cooled, it is time to create those deep pockets we are after! You will need to cut each pita in half and use a very sharp knife to cut the inside of them. Move slowly and be very careful not to tear the pitas as you go. Don't try to make the whole pita into one large pocket as it will certainly crack and only cause you frustration!
Notes
Make ahead & store
Eat these Lebanese pita breads as fresh as possible! They do become drier with time. If you know you won't eat them the day of baking, freeze them instead.
Make the pockets ahead of time, then wrap them in cling film (or place them in an air-tight freezer-friendly container) and place into the freezer. They will keep for up to 1 month.
To defrost:
- splash with water and microwave for 30 seconds OR
-
- bake for a few minutes at 350F/175C OR
-
- pop them into a toaster OR
- hold them over an open stove flame and flip frequently to prevent burning OR
-
Nutrition
Serving: 1half-pita | Calories: 96kcal | Carbohydrates: 18g | Protein: 2g | Fat: 3g | Saturated Fat: 0.3g | Polyunsaturated Fat: 0.3g | Monounsaturated Fat: 1g | Sodium: 260mg | Potassium: 8mg | Fiber: 4g | Sugar: 2g | Vitamin C: 0.003mg | Calcium: 20mg | Iron: 1mg
