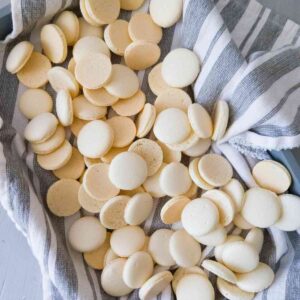
Swiss Meringue Macarons
This is your ultimate and detailed guide for how to create beatiful macaron shells even with little experience!
Equipment
- 1 mixer hand mixer or stand mixer
- 2 silicone mats mapped out for macarons or not
- 1 large bowl stainless steel/glass/ceramic
- 1-2 piping bags silicone or plastic
- 1 large sieve
Ingredients
- 120 grams powdered sugar
- 120 grams almond flour after sieving
- 110 grams egg whites not boxed
- 110 grams granulated sugar
- food coloring optional
Instructions
Preparation
- First of all, you need to make sure all of your tools are clean. To ensure that no food traces stay on the tools, you can use a kitchen or a paper towel with a little bit of vinegar to wipe the tools and the bowl. You only need to wipe those tools that will be touching the egg whites before the macaronage. So, the sieve and the bowl for the almond flour don't need to be wiped.
- You also want to prepare the silicone mats ahead of time. Take the metal sheet pans from the oven and place them upside down on a flat surface. Then, place the silicone mats on top of them. Placing the sheet pans upside down will ensure a steady airflow!
- Measure the almond flour and the powdered sugar into separate bowls using a digital kitchen scale. Then, sieve the almond flour over a large bowl placed on a digital kitchen scale. You should have no more than 1 tablespoon of almond flour left in the sieve. If it is more than that, consider using a different flour brand next time! Place the leftover larger almond flour from the sieve into a small bowl and add it to oatmeal or a smoothie later.
- Add a little bit of almond flour to the sieve until the amount in the bowl reaches 120 grams. Then, sieve almond flour and powdered sugar together over a large bowl and set aside.
- Add some water to a small saucepan and start heating it over medium heat. Place the egg whites with granulated sugar into a separate glass/stainless steel bowl and put on top of the small saucepan with water. Make sure the water doesn't touch the bowl with the egg whites to prevent them from cooking.
- Continuously stir the egg whites with sugar as long as they are above the hot water to prevent cooking. Keep the egg whites over the heat until the sugar granules dissolve. You can touch the eggs with your fingers and if you still feel sugar granules, hold them over the heat a little bit longer. Take the egg whites off as soon as the sugar dissolves, don't heat for too long.
Whipping the Egg Whites
- Once the sugar is dissolved, you can start whipping the egg whites. No need to hurry here! You can whip them right away or set the egg whites aside and whip them hours later if you need to. Just make sure that the egg whites are at least at room temperature before whipping them.
- Continue beating the egg whites until the mixture shows stiff upward-looking peaks that don't bend. You should feel some resistance from the mixture when taking the whisks out (if there is none, continue beating a little bit more). Overall it can take anywhere from 7 to 16 minutes (or longer) depending on the speed and the type of mixer you are using.
- Once the egg whites are ready, you can proceed to the macaronage step.
Macaronage
- Note: if you are using food coloring, macaronage is the step where you want to add it. Use powder or gel form, avoid liquid food coloring!
- Macaronage is the process of folding almond flour into whipped egg whites. Simply add all of the almond flour with the powdered sugar to the bowl with the egg whites and start folding the mixture with a clean rubber spatula. Scrape the side of the bowl, then fold the batter on itself. You can do it gently or more vigorously, it doesn't matter so much. What you need to pay attention to is the consistency of the batter.
- Keep folding until you are able to draw a few figures 8 one after another. If you can only make one figure 8, continue folding. The batter should be freely flowing from the spatula. It might break up sometimes but continue flowing freely right after. If you are not sure if the batter is ready, continue folding a little bit more. If you stop too soon, your macarons will have tips.
Piping
- Once the batter is ready, transfer it to a piping bag. If you have too much batter or your bags are smaller, use two bags. You can keep the batter in the bag for a few hours. To transfer the batter, place the piping bag into a large glass with the tip looking up to avoid the batter flowing out. Pour the batter into the bag with the help of a rubber spatula. You can seal the bag to prevent the batter from escaping through the top when piping but I normally don't seal mine.
- Once ready, start piping the macarons onto the silicone mats. You can either use a macaron template or a silicone mat with macaron circles already mapped out for you. Place the tip of the piping bag horizontally over the silicone mat about 1 inch (⅕ cm) above the surface. Push the bag, then stop and with a circular motion lift the bag off from the macaron. Keep in mind that the macarons will spread a little, so don't pipe them too close to each other. Continue piping until you run out of batter or space.
- Once ready, tap the baking sheets on the table or on a softer surface if you don't want to be loud. Tap 10 times to get rid of bubbles. Then, using a toothpick pop any bubbles that came up to the surface but did not pop on their own.
- Now you need to rest the macarons until they form a skin. You know they are ready when the batter doesn't stick to your finger when you touch it. If it is sticky, let the macrons rest a little bit longer. Generally, 40-60 minutes should be enough to form the skin.
- Once the macarons don't stick to your finger anymore, start preheating the oven to 275F/135C. I highly recommend using an oven thermometer to make sure your oven heats to the right temperature as many ovens run hot or cold. Mine runs hot too!
Baking
- Once the oven is ready, place one of the sheet pans into it (somewhere in the middle, not too high or too low). Bake for 13 minutes, then check on the macarons. Touch the tops and if they are moving, keep baking for 1-2 more minutes then check again. Once the macarons seem sturdy, take them out. They shouldn't have any discoloration. If they look pink or brown, that means the temperature was too high.
- Let the macarons cool down on the mat, then you can take them off. You can use a metal spatula to separate the macrons from the mats to prevent any sticking (although if baked through well, the shells shouldn't be sticking to the mats). You can fill the macarons right away or later.
Notes
Storage
It is best to keep macarons in a refrigerator or a freezer. At room temperature, they will do well for a day or two without filling but it is best to keep them cool. In the refrigerator macaron shells without filling will last for about 7 days provided they are kept in an air-tight container. If you are only planning to keep them in the fridge for a day, a loose lid/cover would be ok (let's say you are keeping them in a bowl, a plate, or on a tray). You can also freeze macaron shells for up to 2 months or longer but they will start losing their fresh qualities after 2 months according to this macaron storage guide. To freeze the shells, place them in an air-tight container and put in the freezer. When you want to fill your macarons, take the shells out and fill them right away. No need to thaw the shells before filling! They will thaw naturally in the refrigerator during the maturing process. For macarons with filling the same rules apply. Keep them in the fridge for up to a week, and in the freezer for up to 2 months. However, try not to leave filled macarons at room temperature for too long, especially if you used dairy. If you need to deliver macarons, you can either use a cooler bag or if it is a shorter delivery distance, make sure to instruct the receiver to place the macarons in the fridge upon getting them. To freeze macarons that were filled you can either freeze them right away after filling or wait 1-2 days until they mature. It is better to freeze macarons with hard and sturdy filling than with more liquid ones (jam, for example). Moist macaron fillings will make the shells soggy if left in the freezer for 1-2 months.Maturing the Macarons
Once you filled the macarons with your favorite buttercream, ganache, jam, or curd, keep them in the fridge for 1-2 days to let macarons mature. Maturing is the process where the filling moisturizes the macaron shells and they become soft and chewy while the outside stays crispy. You might be tempted to eat them right away but the difference between matured and freshly filled macarons is very big! Try it once and see for yourself!Hollow Shells
Hollow shells could be due to too much air trapped in the macaron batter, under or over-baked shells, batter not mixed long enough, or other potential causes. To get a detailed breakdown of what causes hollow macaron shells, follow this hollow macaron guide.No Feet
If you have any problems with feet (spread, ruffled, small, or none at all), follow this detailed guide on fixing macaron feet problems.Lopsided
Most of the time I get lopsided macaron shells on the sides of the baking sheet which tells me that the temperature difference causes some shells to be lopsided. To prevent this problem, I would recommend leaving the sides of the silicone mats empty and piping the shells closer to the middle of the mat. If your oven is super uneven with temperature, place a pizza stone in the oven and keep it there during the entire baking process. A pizza stone will help minimize temperature fluctuations as it retains a lot of heat.Browned
If your macarons change color during baking and become slightly darker (or much darker) it is because you either baked them for too long or the temperature was too high. Try reducing the temperature/time the next time around!Cracked
If you are having trouble with cracked macarons, check out this super-detailed guide on all possible causes and solutions for cracked macarons.Spread Too Much
If your macarons spread too much it is most likely because you overmixed the batter at the macaronage stage.Bumpy
Bumpy macarons can be caused by underwhipping the egg whites, undermixing the batter at the macaronage stage, or due to using lumpy almond butter.Nutrition
Serving: 2shells without fillingCalories: 39kcalCarbohydrates: 6.1gProtein: 0.9gFat: 1.4gSaturated Fat: 0.1gSodium: 3mgPotassium: 25mgFiber: 0.4gSugar: 5.6gCalcium: 8mg
Tried this recipe?Let us know how it was!