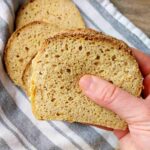
100% Millet Sourdough (Gluten-Free & Vegan)
This gluten-free millet sourdough bread is soft, moist, and easy to make! You don't need a Dutch oven to make this delicious loaf.
Servings: 1 loaf
Calories: 2014kcal
Cost: 5$
Ingredients
For the levain
- 100 grams active gluten-free sourdough starter
- 100 grams millet flour
- 60-80 grams water, warm, not hot
For the dough
- 26 grams whole psyllium husk, or 22g of coarsely ground psyllium powder
- 425 grams water, warm, not hot
- 15 grams sugar, honey or maple syrup can be used instead
- 12 grams apple cider vinegar, white or wine vinegar can be used instead
- 300 grams millet flour
- 12 grams salt
For topping
- linseed or sesame seeds, optional
Instructions
Make the levain
- In this bread, we won't yet add the sourdough starter to the rest of the ingredients. Instead, we will boost it with an extra feeding by making a levain. Levain is a starter that was fed at its peak activity, then left to rise a second time. To make a millet levain, take 100g of your active starter (it can be a starter with a different GF flour), 100g of millet flour, and 60-80g of water.Mix the ingredients until the mixture resembles a thick paste and is not too runny. Add the water slowly and stop once the right consistency is achieved! Set the mixture aside for 3.5-18 hours. The longer you let the levain sit, the more sourness you will have in the dough.
Make the dough
- Once the levain is ready, make psyllium gel. Add psyllium husk and water to a medium-sized bowl and whisk to incorporate.Then, add the apple cider vinegar and sugar to the same bowl (no need to stir this time). Set the bowl aside for a couple of minutes until the mixture starts to thicken and looks more like a gel.
- Add millet flour and salt to a large mixing bowl and whisk to combine.
- Add psyllium gel and levain to the bowl with the dry ingredients and mix by hand. You can use an electric mixer or a wooden spoon instead if you prefer. The dough will be sticky and somewhat wet. Mix until all ingredients are evenly incorporated.
- Prepare the baking tin by greasing it and/or lining it with parchment paper. Greasing the pan first makes the paper stick better.I recommend making a few cuts in the baking paper as you see in the picture to make the lining process easier! (See pics in the post)I like to use a 9x5 inch (22.5x12.5 cm) Pullman loaf pan for this bread.Line it with the parchment paper and fix it in place with clothespins until you place the dough in it.
- I don't cover my bread if proofing in the oven but if you are proofing on a kitchen counter, then make sure to cover it with a kitchen towel to prevent it from drying out.
- It should take somewhere from 3.5 to 5 hours to proof the dough. You will notice that it puffed up some but hasn't doubled in size. It won't even come up to the top of the pan.You can either bake the bread in a preheated oven or do a "cold start". Cold start is when you let the bread preheat together with the oven. I generally do a cold start with all of my breads because it is simpler! Preheat the oven to 450F/235C and make sure to place a dish with water in the bottom of the oven. This will create extra steam and allow for a better oven spring. Once the oven is ready, bake the bread uncovered for 30 minutes. Then, take the dish with water out, lower the temperature to 350F/175C, cover the top of the bread with foil (shiny side up), and keep baking for another 40 minutes.
- Once the bread is done baking, take it out of the bread pan, remove the baking paper, and let the loaf cool on a wire rack until the bread is no longer warm to the touch. Enjoy!
Notes
How to store and freeze
I recommend storing this bread at room temperature either in a bread box or wrapped in a kitchen towel for up to 3 days. If you know you won't eat the bread within 3 days, I recommend freezing it to keep the texture and a moist crumb.
To freeze, simply slice the bread when still fresh and arrange the slices on a tray or a piece of parchment paper. Place the arranged slices in the freezer for 30 minutes.
Then, transfer the slices into a ziplock bag or an air-tight container and store for up to 3 months.
Alternatively, you can simply place parchment paper pieces in between each slice and freeze the loaf together from the start.
To defrost, simply place the slices in the microwave for 30-60 seconds!
Nutrition
Serving: 1loaf | Calories: 2014kcal | Carbohydrates: 407g | Protein: 50g | Fat: 20g | Saturated Fat: 3g | Polyunsaturated Fat: 11g | Monounsaturated Fat: 5g | Trans Fat: 0.01g | Sodium: 4700mg | Potassium: 1195mg | Fiber: 38g | Sugar: 23g | Calcium: 163mg | Iron: 18mg
