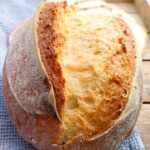
Schar Flour Gluten-Free Sourdough
This gluten-free sourdough is a same-day recipe, easy to make, and has a wonderful open crumb!
Servings: 1 loaf
Cost: 5
Equipment
- Digital kitchen scale
- banneton basket optional
Ingredients
- 500 grams Schar Bread Flour Blend
- 2 teaspoon baking powder, make sure it is gluten-free
- 8-10 grams salt
- 450 grams water, warm
- 40 grams sunflower oil, or any other neutral oil
- 60 grams active gluten-free sourdough starter
Instructions
- Add the flour, baking powder, and salt to a large mixing bowl and whisk to incorporate.500 grams Schar Bread Flour Blend, 2 tsp baking powder,, 8-10 grams salt
- Then add the water and gluten-free sourdough starter to the dry ingredients and mix using a wooden spoon or an electric mixer with dough hooks. The dough will be sticky but thick enough for you to knead. Don't add any extra flour even if the dough seems too wet.450 grams water,, 60 grams active gluten-free sourdough starter
- Turn the dough over onto a lightly floured working surface and shape into a ball or a batard.
- Prepare the proofing basket/bowl. If you are using a mixing bowl, line it with a kitchen towel and dust with some gluten-free flour to prevent sticking. If you are using a banneton, simply dust it with flour.
- Place the dough into the proofing basket/bowl seam side down, cover with a kitchen towel, and leave to proof for 5-7 hours at room temperature or 12-18 hours in the refrigerator. You can place the dough into the oven with the light on to create the perfect proofing temperature. The bread will puff up during proofing but won't double in size.
- Once the bread is done proofing, carefully turn it over onto a piece of parchment paper and score. Scoring means cutting the top of the bread with a bread lame or a sharp razor to create a path for steam to escape during baking.
- Lower the parchment paper with the bread into a cold Dutch oven, close the lid, and place the Dutch oven into a cold oven. Start preheating to 450F/230C. Once the oven has preheated, start the timer for 40 minutes. Then, remove the Dutch oven lid, lower the temperature to 350F/175C, and continue baking for another 30 minutes.
- Once the bread is done baking, take it out of the Dutch oven and transfer to a cooling rack. Let the bread cool until no longer warm to the touch before cutting. If you cut the bread too soon, the crumb might be slightly gummy.Enjoy!
Nutrition
Serving: 3slices
