Gluten-Free Sourdough Flatbread
These delicious gluten-free flatbreads (naan) are flavorful, moist, and soft. Eat them with a dipping sauce or make the flatbreads into a sandwich!
Servings: 8 medium flatbreads
Calories: 196kcal
Cost: 3
Equipment
- 1 medium-sized bowl
- 1 whisk
- 1 Frying pan (cast iron is the best option)
Ingredients
- 20 grams psyllium husk whole husks, 15 grams if using coarse powder, more details in my psyllium husk guide
- 310 grams water room temperature
- 25 grams oil I used olive oil but other oils work well, too
- 18 grams sugar can use maple syrup or honey
- 260 grams sourdough starter discard
- 100 grams sour cream or Greek yogurt, use plant-based for dairy-free
- 260 grams gluten-free flour I used my homemade potato-free flour blend which for this recipe would be: 25% brown rice flour, 25% white rice flour, and 50% starch of choice (cornstarch/tapioca/arrowroot/potato)
- 1½ teaspoon baking powder
- 10 grams salt
Instructions
- Add water, psyllium husk, oil, and sugar to a bowl and whisk to incorporate. Now, leave the mixture to form into a gel for a couple of minutes.
- When psyllium gel is ready (it should take a couple of minutes), add the sourdough starter, sour cream, and psyllium gel to a mixing bowl and mix to incorporate.
- Then, add the dry ingredients and mix with your hand to combine until the dough starts separating from the walls of the bowl. Let the dough rest for about 10 minutes to settle. If you skip this step, the dough might be stickier and harder to work with!
- Turn the dough over onto the working surface, shape it into a ball, and separate it into 8 equal parts using a bench scraper or a knife.
- Shape each piece into a small ball. Grease your hands with oil to prevent sticking.
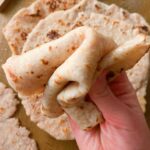
- Flour the working surface and place one ball on it. Flatten the ball with your hands and spread a little bit of oil on the surface of it to prevent sticking as you are rolling out the dough. Then, carefully roll out the naan bread. Each naan should be approximately 8 inches (20cm) in diameter. Don’t roll out the flatbreads too thin to avoid them breaking apart as you transfer them to the frying pan. Continue adding oil to the surface of the flatbread if it starts sticking as you roll them out!
- The dough will be flexible but handle it with care to avoid the flatbreads breaking apart.
- Preheat the frying pan. I prefer using cast iron but you can use a non-stick pan, too. Spread some oil onto the pan and fry each flatbread for 30-60 seconds on one side over medium heat. Keep checking to make sure the flatbreads are not burning!
- Brush the flatbread with melted butter to keep them softer. Enjoy!
Notes
– Grease the surface of the flatbread dough to prevent sticking to the rolling pin. Adding flour to the surface might make the flatbreads a bit dry. Although it is necessary to flour the working surface you are rolling the dough on!
– Grease your hands with oil when working with the dough to prevent sticking.
– These gluten-free sourdough flatbreads are high in hydration meaning they have a lot of liquids in them to ensure the best texture. If you find it hard to work with the dough decrease the water by 40g. Then flatbreads will be slightly dryer and less puffy but easier to roll out.
– Add any seasonings of choice for more flavor.
– Store your gluten-free sourdough flatbread in the refrigerator for up to 3-4 days or freeze for up to 3 months. Storing them in an air-tight bag or container will prevent the bread from drying out.
– If the flatbreads taste too sour to you, you can decrease the amount of sourdough starter by half.
Nutrition
Serving: 1flatbread | Calories: 196kcal | Carbohydrates: 32g | Protein: 4g | Fat: 7g | Saturated Fat: 1g | Polyunsaturated Fat: 1g | Monounsaturated Fat: 3g | Trans Fat: 0.01g | Cholesterol: 7mg | Sodium: 570mg | Potassium: 16mg | Fiber: 5g | Sugar: 4g | Vitamin A: 78IU | Vitamin C: 0.1mg | Calcium: 85mg | Iron: 1mg
