Easy 100% Brown Rice Bread (Gluten-Free)
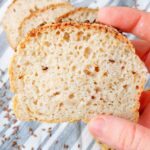
This bread is soft, fluffy, very easy to make, and is made with a single gluten-free flour type! Perfect for sandwiches or with butter and jam.
Servings: 1 loaf
Calories: 1248kcal
Cost: 4
Ingredients
For the dough
- 20 grams whole psyllium husks, not powder
- 450 grams warm water, not hot
- 15 grams sugar, honey or maple syrup can be used
- 12 grams apple cider vinegar, or white vinegar
- 7 grams instant yeast, or 10g active dry yeast, or 20g fresh yeast
- 300 grams brown rice flour, don't substitute with white rice flour
- 10-12 grams salt
For topping
- seeds of choice (linseeds, sesame seeds, sunflower seeds)
Instructions
- First, we will need to make psyllium gel. Add the water, psyllium husk, sugar, and apple cider vinegar in a medium-sized bowl and stir to incorporate. Set aside for a few minutes.If you are using active dry yeast, you will need to save some of the water called for in the recipe to activate the yeast. To activate active dry yeast: take 150g of the water called for in the recipe and warm it up in the microwave until just warm to the touch, not hot. Add the active dry yeast and sugar (optional) and let the mixture sit for 10 minutes until it starts looking frothy and bubbly.Then, proceed with the recipe!
- Combine the brown rice flour, salt, and yeast (if using instant or fresh yeast) in a large mixing bowl and whisk to combine.
- Add the wet and dry ingredients together and mix the dough. I prefer using an electric mixer with dough hooks for this recipe to create an extra smooth dough.You can, however, use your hands or a wooden spoon to knead the dough. Mix until all ingredients are evenly incorporated. The dough will be sticky and wet, avoid the temptation to add more flour!
- Prepare the baking tin by greasing it and/or lining it with parchment paper. Greasing the pan first makes the paper cling to it better. I recommend making a few cuts in the baking paper as you see in the picture in the post to make the lining process easier!
- I like to use a 9x5 inch (22.5x12.5 cm) Pullman loaf pan for this brown rice bread.Line it with parchment paper and fix it in place with clothespins until you place the dough in the loaf.
- Transfer the dough to a prepared metal loaf pan and smooth the top out with a silicone spatula. Add the seeds of choice to the top of the loaf. I used linseeds, sesame seeds are also a great option. Cover the dough with a kitchen towel for the rising time.
- Place the loaf into a warm and draft-free spot for proofing. I personally like to let my bread rise in the oven with the light on.Let the dough rise until it is still under the top rims of the loaf pan, don't let it rise too much or the bread might deflate during baking. For me, it normally takes anywhere from 35 to 50 minutes.
- When the loaf is ready, I simply turn the oven to 350F/175C, and keep the bread inside during the preheating time. This method of letting the bread warm up with the oven is called "a cold start." Alternatively, you can preheat the oven to 350F/175C beforehand and place the bread in a preheated oven.
- Bake for 60 minutes, then take the loaf out of the bread pan and paper and transfer it to the oven rack. Keep baking for another 30 minutes.
- Take the brown rice loaf out of the oven and let it cool in the bread pan for 10 minutes. Then, take the bread out, remove the paper, and place it on a cooling wire rack. Make sure the bread is cooled completely before cutting into it! Use a serrated bread knife for slicing. Enjoy!
Video
Notes
How to know the bread is done
You can use a digital thermometer to check the inner temperature of the dough. The bread should be 205-210F/95-100C when done.
Storing and freezing
You can store this bread at room temperature for 3-4 days. Store it in a bread box or bread bag to prevent it from drying out!
You can keep the bread in the fridge for up to 5 days. Make sure it is sealed in a plastic bag or a container.
If you know you won't eat the bread within 3-4 days, I recommend freezing it.
Expert tips
-
- Don't open the oven when the bread is in the oven until the first 30 min of baking are up.
-
- Avoid slicing the bread before it cools completely to avoid extra gumminess.
-
- Never bake bread in a glass dish as glass doesn't transfer heat that well.
-
- Don't use the convection setting on your oven, radiant heat is better for this bread.
-
- Use a digital kitchen scale to measure the ingredients by weight because measuring by volume using cups might not always give you the same results.
Nutrition
Serving: 1loaf | Calories: 1248kcal | Carbohydrates: 265g | Protein: 25g | Fat: 9g | Saturated Fat: 2g | Polyunsaturated Fat: 3g | Monounsaturated Fat: 3g | Sodium: 3927mg | Potassium: 944mg | Fiber: 30g | Sugar: 18g | Vitamin C: 0.02mg | Calcium: 112mg | Iron: 7mg
